Introduction
Automatic Project Management for Clarion
Multi-Proj is a comprehensive tool for the rapid creation, maintenance,
and use of DLLs in Clarion for Windows.
If you have any of the following situations then you are a candidate for
Multi-Proj
- Your product uses multiple app files
- You want to easily create DLL function libraries
- You want to wrap your DLL's up into templates, but you don't want to
learn the template language.
- You want an easy way to make sure all necessary files are copied
before distribution.
- You want to be able to generate, and compile multiple applications
in a single pass
- You want to work with files that contain debug code, but distribute
lean, debug free, programs.
- You want to create a multiple program sets which use alternate File
Drivers to the one in the Dictionary.
When your program grows large, there comes a point when you start to
consider breaking it up into many app files, that create DLL's. This
process can lead to quite a bit more overhead, functions have to be
prototyped, procedures need to be exported, and so on. Multi-Proj has been
designed to automate as much of this Multi-App-Management as possible. It
also allows you finer control over how each application interacts with the
others.
Another popular use for Multi-Proj, even if you only have one app file, is
the ability to create versions that substitute a different driver than the
one specified in the dictionary. This means, for example, that migrating
from one driver to another is much easier with Multi-Proj especially if
you need to maintain support for both drivers.
It should be noted that this is a developer-level tool. In other words it
gives you, the developer, more power, and more flexibility than before.
The cost of this power is knowledge. When you know what you're doing,
Multi-Proj is on you side. When you don't know what you're doing then it
can cause you grief. Please take the time to work through the
tutorial.
Multi-Proj continually maintains all the related files, including the EXP
files, PRJ/CWPROJ files, distribution commands, and maintenance of the
template file - automatically. Now changing a DLL becomes as simple as
compiling a single batch. All of the rest of the work is taken care of.
Another thing we regularly do now, is compile all our APPs during the
development cycle with Full Debugging turned on. However Multi-Proj
generates Debug Free PRJ/CWPROJ files for us, which we compile just before
distribution (with the Multi-Proj Manager - a Batch Compiler). Thus our
clients get the leanest code possible - while we can make full use of
Clarion's native debug facilities.
Support
| CapeSoft Support |
| Email |
 |
| Telephone |
+27 87 828 0123
(087) 828 0123 |
How does it work?
Multi-Proj consists of 2 parts. Firstly it is an
extension template that is added to the global area of your application.
This template stores all the various project settings that are required to
build the various versions of your APP. When your application is compiled
a project for each version is created. A Batch file (.bat) is also created
for each version, which contains all the necessary distribution commands.
Note: This next part can be ignored for Clarion
7 (or later) users
The second part of Multi-Proj is the Multi-Proj Manager (MPM) . This is a
separate utility which is able to drive the Clarion IDE (Find it in your
Start | All Programs | Clarion 6 Accessories | MultiProj | Multi-Proj
Manager). This is where you can group APPs and PRJs together to form
Batches. Actually I should say that MPM groups them together for you -
part of what the Extension does is link all the dependencies together - so
adding just 1 PRJ file to your batch will add all the other PRJ and APP
files that are required.
- TIP : Many people ask us if they
can use the Batch Compiler without adding the extension. For various
technical reasons, we don't recommend this. There are several freeware
batch compilers available on the web for simple batch compiling. The
Multi-Proj Manager Batch Compiler is optimized to assume you are using
the Multi-Proj template.
If the application is a DLL a template to use the DLL is automatically
written for you. The template contains a global extension which will
activate the DLL in another application. This activation includes
prototyping all the functions exported by the DLL, and including the DLL
in the new application's Project settings. A code template for each
exported function is also included to simplify calling the functions.
To truly understand all the goodies that Multi-Proj offer, it is useful to
understand how DLLs are normally created, maintained, and used, in
Clarion. Doing things the hard way is the easiest way to see how
Multi-Proj makes it easier. Of course you can skip all the pain and simply
do it the easy way. If you want to dive right in, then a good place to go
from here is the
Tutorial. This walks you
through all the steps of turning a single APP into a Multi-DLL product. It
also shows you how to add Multi-Proj to a Multi-DLL product.
Multi-Proj Global Extension Options
General Tab
Project File Name : This is the name of the
overall project containing all the separate versions. This is typically
the same name as the APP.
Export File Structures : Exports file structures
so they can be used in other APPs using this DLL. Note that all the usual
Clarion settings and overrides still apply as they did before. (i.e.
Generate All File Declarations, Export All File Declarations, Individual
File Overrides etc).
Export Your Global Data : This exports the data
variables, contained in the Global Data area (i.e. the Data button) so
they can be used in other APPs using this DLL. It is recommended that you
only export data from your data DLL, however you can export data from any
other DLLs if you want to.
Export Template Global Data : The Clarion
templates typically generate 3 global variables (GlobalRequest,
GlobalResponse and VCRRequest) which are not visible in the Global Data
area. These must only be exported by 1 DLL in your product - although more
than 1 DLL can export YOUR global data. This should be set in your data
DLL and not in any other DLLs.
Export ABC library : If your APP is based on the
ABC library classes, then at least 1 DLL in your product (typically the
Root DLL) needs to 'export' the ABC library. All the other DLLs and EXEs
set the normal Clarion option "Generate Template Globals and ABCs as
External"
Export Procedures in Module Order : When making
a DLL it is important to always export the procedures in the same order.
This makes your DLL more compatible with programs compiled with a previous
version of your DLL. If you are adding Multi-Proj to an existing APP then
this is one way to force the order of the procedures. For more information
on compatibility see the section entitled
DLL
Backward Compatibility later in this document.
This APP has no _RD and _RU Files : This is for
Legacy Template APPs only. Click this option on if this APP uses no
Dictionary File Structures.
This APP has no _SF module : This module is
usually generated by the Clarion Legacy Templates. However in some APPs it
is not included. If your APP does not generate a _SF module then click
this on.
This APP has no BC modules : This is for ABC
Template APPs only. Click this option on if the APP has no BC modules.
Typically the data dll will have BC modules, whereas the other apps will
not. If you get this option wrong (by ticking it on when you shouldn't)
you will experience problem P1 as documented in the
Multi-Proj
Trouble-Shooting Guide.
Highest BC Number : This is only for ABC, and
only needs to be filled in in the Data DLL. The template will generate a
number of modules named xxxxxBC0.CLW, xxxxxBC1.CLW and so on. The exact
number of modules is dependent on your dictionary, and very hard to
predict reliably, so Multi-Proj needs you to fill in the number here. Note
this can change as your dictionary grows. If you get this number wrong you
will experience problem P2 as documented in the
Multi-Proj
Trouble-Shooting Guide.
Tip : Clarion counts them up from 0, to
9, then starts from A. You enter either the highest number, or if there
are letters, then the highest letter.
Export OW Classes : This is for apps that have
the Object Writer template included. If this item is ticked then the
Object Writer classes will be exported, regardless of the EXPORT setting
for these classes. If this option is not ticked then the classes will not
be exported, again regardless of the EXPORT setting for those classes.
Only Export OW classes : If this option is
ticked then only the class will be exported from the app. Use this option
if you are making a DLL, which contains a class, but nothing else.
Suppress ABC Init : This suppresses the
generation of all the ABC init code. Use this if your Object Writer class
does not depend on any ABC classes.
This is app number : When making DLL's
Multi-Proj supports a technique called Rebasing. This makes your apps load
faster, and they're generally more "Windows friendly". This only applies
to DLL's, Exe's and Lib's do not need to be rebased. For a detailed
discussion about rebasing see
ClarionMag
). While figuring out all the various rebasing numbers can be confusing,
Multi-Proj tries to simplify it for you. Here's how it works;
Each DLL in your application has a "Big Picture" number. It doesn't really
matter what the number is, but it's best to simply start with 1 and move
upwards from there. So the Allfiles app will be app number 1, then Procs
DLL will be app number 2 and so on.
Each number is good for 1 meg of virtual memory. If your DLL is more than
a meg big then skip a number in the next dll. So if this data DLL was say
1.1 megs in size, then the Proces DLL would be app number 3.
Note for debugging: Leave the number set
for the size of the non debug DLL's (i.e. compile the DLLs with DebugMode
turned off to get the size you need to use). The extra size on the disk
(when you compile with debugging turned on) is not loaded by windows. It
is only used by debuggers, and analysis tools (like GPF Reporter and
Profiler.)
Versions Tab
Versions : Click on this button to set up each
version. If you are creating a multi-driver suite of apps, then each
driver will need it's own Version.
Each Version has the following settings;
Title : This is the title on the list of
versions. This title is only used for display purposes. A typical title
might be "32-bit Stand-Alone, Debug Off, Version".
Set : If you are making a multi-dll,
multi-driver, suite then you need to specify the SET that each version
belongs to. Each different driver needs it's own SET name. For example, if
you have a set of apps using the Topspeed driver, and this version uses
the Topspeed driver then use a set name like TOPSPEED. It doesn't matter
what the set name is (it could be TPS) so long as all the APPS in the
suite use the same SET names.
Target Type : This is the target type of the
version. Choose from EXE, LIB and DLL.
Target OS : This sets whether the version is 16
or 32-bit. (note 16 bit is retained for backward compatibility, but
Multi-Proj no longer actively supports 16 bit programs).
Runtime Library : Set this to "Stand Alone" for
compatibility with applications compiled with DLLs. Set this to "Local"
for compatibility with applications compiled into a single EXE.
Debugging : Set this to On or Off.
Target Name : Enter the name of this version of
the project. A CWPROJ (Clarion 7 or later) or PRJ (Clarion 6 and earlier)
file along with an EXP and BAT file with this name will be created. Also a
EXE, DLL and/or LIB file will be made with this name. Each version thus
needs a different target name, and all the target names must be different
to the
Project File Name (as set above on the
general tab). If you are compiling EXE's then each version needs to have a
different name, although they can be renamed in the "Distribution"
settings. For more information on naming standards and strategies see the
section entitled
DLL Naming
Strategies later in this document.
Project Name : If the Project needs to have a
different name to the target name then you can enter the Project name
here. This is most often used when you are creating different versions of
the same DLL, and the DLL's have the same (target) name. In the case of a
DLL (unlike an Exe) renaming after the fact doesn't work well. But each
version still needs a unique Project name, so you can enter that here.
Suppress this version for now : If you no longer
want to generate a specific version, then tick this option on.
Driver Substitution to use: Pick the driver substitution
from the list of possibilities if you would like MultiProj to
automatically configure this version for driver substitution. This will
mean that the correct file driver will be added to the project, as well as
the project define.
Resources : Add specific resources here which
apply to this version. This would typically include other 3rd party
libraries. Note that it is now possible for 3rd party products to
integrate directly with Multi-Proj - saving you this step. For more
information see the section entitled
3rd
Party Support for Multi-Proj later in this document.
File Drivers : This lets you override the File
Drivers that will be linked into this Version of the project. This is
typically used when you're making use of the Driver Substitution
facilities in Multi-Proj. (For more information on
Driver
Substitution read the Section below). If you add
any
drivers here, then you must add
all the drivers here. None of
the detected drivers, or drivers set on the All Versions Resources Tab
will be included.
Defines : Add specific project defines here.
This is typically used when you want to do conditional compiles. For more
information on conditional compiles see the section entitled
Conditional
Compiles.
Distribution : This section allows you to copy
files (for this particular version) from one place to another. Typically
you might want to copy DLL, EXE or LIB files.
Resources Tab
File Drivers : Multi-Proj should detect all the
file drivers used by the project. If it misses one (or more) out then you
can enter them here. Enter the Driver name, not the library name (e.g.
TOPSPEED for Topspeed driver etc.)
Force : If you are generating the Prj in one
version of Clarion, but planning to actually compile it in another, then
set the actual compile version of Clarion here. This makes sure that the
correct file driver libraries are inserted ready for compiling. This
feature is mostly used by Clarion 3rd Party suppliers to compile their
DLL's in various Clarion versions.
Common Resources : These are resources that will
be used by all the versions of your APP. These are typically graphic
files, like ICOs, BMPs or GIFs.
External Source : This is for external source
files that may be used in your application. For example if you make use of
the resize support in Clarion 2 then you will need to add the
ResCode.Clw
file here. To see what other external sources your application uses, check
out the
External Source Section of your APPs Project settings.
Enable Override Drivers : Turn this on if you
want to enable the Override Driver support. For more information on
overriding drivers see
Driver
Substitution later in this document.
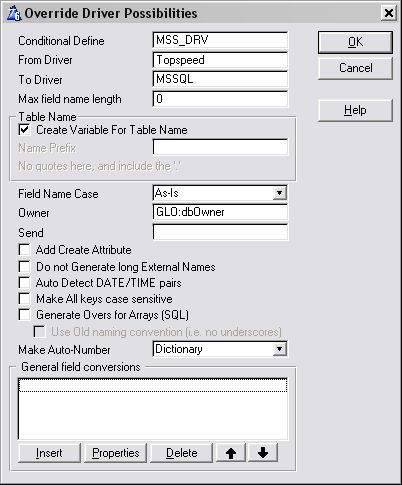
OverrideDriverPossibilites : This allows you to
create one, or more, Driver override Possibilities. Note this is not doing
the overriding - merely creating the possibility of an override. For each
possibility you need to set;
- Conditional Define : An equate to base the
substitution on. This equate can be anything, but must be unique in
your application. For example UseMsSqlDriver
- From Driver : Such as TOPSPEED
- To Driver : Such as MSSQL
- Max field name length : Some versions of
SQL limit the length of a field name. If you encounter such a driver
then enter the maximum length here.
- Create variable for Table Name : If this is on then
a variable for the table name will be generated for you.
- Name Prefix : This is the prefix added to
the front of all the table names. It depends on your database. For
MsSql a good one to try is dbo. (remember to include the .)
- The alternative to this is to check the Create Variable for
Table Name. This will work well with FM3 if FM3 manages
your table conversions.
- Field Name Case : when constructing the external
name for each field, and key, force the case of the name to this
value. This applies to fields in the dictionary that do not already
have external names set.
- Existing
EXTERNAL NAME Attribute Case : For the fields which do have
external names set, this forces the case of those external names to a
specific value.
- Owner : (Only necessary in the data DLL)
enter the variable here that contains the owner string for the
database.
- Send : Add any Send string commands here
that you might want to add. For example when using MsSql it's common
to use /ZEROISNULL=FALSE
- Add Create Attribute: Check this if FM3 is managing
your conversion and you don't want to check the create attribute in
your dictionary, as FM3 will need the create attribute added to the
table in order to create the table in the database.
- Call connect procedure (FM3): Check this if you
would this conversion requires the SQL_Connect procedure (for FM3
managed databases).
- Do not generate External Field Names : If this is
on then External names for each field will not be automatically
generated.
- Auto Detect DATE/Time Pairs :
- Make all keys Case Sensitive : Removes the NOCASE
attribute from all keys in all tables.
- Generate Overs for Arrays (SQL) :
- Make Auto Number : Choose between Dictionary,
Client Side and Server Side. If set as Server Side then all keys set
in the dictionary as AutoNumber will have AutoNumbering removed.
Template Tab
 Template Set Name :
 If this DLL is to be part of
a larger Template SET then enter the template set name here. This is
normally used when this is not a generic DLL, but rather a DLL specific to
an application. By creating one SET for all the specific product related
DLLs, the templates are grouped better in the template registry. This name
would probably be the name of the product. If you are creating a generic
DLL which will be used in many different APPs then leave this name blank.
NB - you will need to register this
template after it's generated the first time.
Template File Name : This name is typically the
same name as the APP file itself. If this DLL is not part of a Template
SET then this file should have the extension TPL. If it is part of a
bigger SET then it should have a .TPW extension. This template will
include a Global Extension Template (for activating this DLL in other
APPs) and a code template for each Exported Function in the template.
Note that if this APP is an EXE then it
makes no sense to have a Template - so leave this entry blank in that
case.
Don't Generate Code Templates : Click this on to
only generate the Global Extension, and not the Code templates. You would
typically do this if you are creating the Code Templates yourself (stored
in some other TPW file in the same SET).
Includes : If you are wise enough to add your
own, hand-written template files to this template set, then add a list of
your own TPW files here.
Don't generate Dependency defines : Part of what
Multi-Proj does is generate special defines into the generated PRJ's so
that the Multi-Proj Manager can figure out which apps are dependent on
which other apps. If you wish to suppress this feature then you can tick
this option on. This option is ignored in Clarion 7 and later.
Advanced Tab
MsSql : Real becomes Sreal: Tick this option on
if you are using driver substitution, to MsSql, and you are not using FM3.
This option automatically converts any REAL fields in your dict, into
SREAL fields when generating the MsSql file declaration. It needs to do
this because Clarion does not correctly convert REALS to FLOATS when the
file is created. (If you are using FM3 then you can leave this switch off,
as FM3 creates the table correctly.)
Bulk Generating and Compiling (Clarion 7 and later)
The Clarion 7 (and later) IDE contains a built-in
batch compiler. Indeed all compiles are really batch compiles, it's just
that in most cases the batch contains a single app file.
The name for a "batch" In the IDE is a "solution". A solution is thus a
collection of one, or more, CWPROJ files. Since Multi-Proj generates lots
of CWPROJ files for you, it is trivial for you to create a new solution,
containing any number of these CWPROJ files.
Once you have created a solution you can easily open it, and compile it,
thus compiling all the CWPRJ files that it contains.
Using a Multi-Proj DLL in another application
Because Multi-Proj writes a template for you, it's
quite easy to use the functions exported from your DLL in your other APPs.
- When you first write a new DLL, you'll have to register
the new template that Multi-Proj makes for you. Actually if the new
template is part of a Template Set then the Set has to be registered.
Once the Set has been registered it does not need to be re-registered
every time you add a new DLL to it. This is one of the advantages of
using Template Sets.
The name of the Template Set is what you set on the Template tab of
the Multi-Proj extension. Or if there is no Template Set entered
there, then use the Template File Name. (If there's also no Template
File Name then there's no template!) You only need to register the
template once - when you change your DLL the Template, and the
Template Registry are updated automatically.
To register a template go to the Setup menu
(in the Clarion IDE) , to Template Registry
option and click on the Register button.
- The first time you use the DLL in another application, go to the Global Extensions area. Then include the Activate_XXX global extension template. (XXX is
the name of your library). This extension adds the DLL to your current
APP, and prototypes all the exported functions, and data, for you.
If you are building a multi-driver system then you will need to set
the Driver Set that the app will belong to. In other words when you
compile the application itself, which driver do you want it to use.
The template will offer you a drop-down of the various sets that are
available for the DLL you are activating.
- When ever you want to use one of the functions in the DLL, then you
can either go to an embed point, and type the call in there, or you
can make use of one of the Code templates that Multi-Proj generated
for you. There is a code template for each generated function which
will prompt you with the parameters required, and the syntax for the
function.
External Functions in the Application
Tree
It's often useful to have some of your External
functions present on the Tree in the IDE. Clarion does this for you when
you use one of the template ways of one procedure calling another. For
example if you call a procedure, using the template, from a Frame or Menu,
then that procedure appears, as a To-Do, under the Frame in the
application tree.
When you're dealing with multiple DLL's you would usually go ahead and
define the procedure as being an ExternalDLL - and create a module, in
your Tree, for the DLL. However there is a problem with this approach. If
you do it this way, the name of the DLL is entrenched in the APP file.
This may seem like a good thing, but it's not. It makes it impossible to
create different versions of this App (which might use different versions
of that DLL) in a smooth and easy manner.
One way (and the way used in earlier Multi-Proj versions) was to simply
not allow Procedures to be created in this way. There is however a simple
work-around which lets you have your cake, and eat it.
Multi-Proj includes two simple templates which essentially allow
procedures to be defined as Externals and be visible in the tree, and yet
not complicate our multiple version approach. It's a bit of kludge, but
hey, it works.
Firstly create the External Module - using not one of the regular external
modules, but the one offered by the Multi-Proj template. ( i.e. Open the
App, Application menu, Insert Module, and select the Multi-Proj External
Module.) This Module MUST be called External.Ico
and you must make the Map Include file set to Empty.Clw
. Then you can click on each To-Do in turn, and make the Multi-Proj
External Procedures. As you do this make sure the Module name is
External.Ico - select it from the list if necessary.
But hold on - you say - What's this about an Icon. Well the truth is,
External.Ico (in your Tree) is NOT an icon. It's simply a convenient name
which the IDE is happy with. It's necessary to go with the strange name to
fool the Linker a bit later on. Unfortunately in this case the IDE is too
smart, and insists on adding whatever name we use to the Project ( the one
built into your application). Usually at this point it would be a LIB file
- which is what we're trying to avoid. By using the name of an Icon (
which does actually exist - it's shipped with Multi-Proj) - the linker is
happy.
The reason we use the Empty.Clw statement in the Map is because all of
these procedures are going to be prototyped by their respective Multi-Proj
generated templates. If we let Clarion do it's normal thing we'd get an
'Indistinguishable Prototype' error. So again to override Clarion's
cleverness we use this simple override.
Tips
- If you are creating a DLL / Lib combination then set the APP itself
to be a DLL. Then click the Export Function
switch for those procedures you want to export.
- If your program gets link errors when trying to compile the project,
but the application itself compiles ok, then check the "Project"
settings of the APP. Most likely you have omitted a resource in either
your Version Resources, or Common
Resources.
- If you want maximum value from the Code template then use the long
form of prototyping when you prototype your functions in the DLL. The
prototype for the procedure is set on the Procedure
properties window. Normally you only put the parameter types
in the Prototype e.g. (LONG, LONG, STRING)
. However you can also put the variable names here. For example (LONG
FromDate, LONG ToDate, STRING Holiday)
- If you are using FM3, and you are using Multi-Proj to create
multiple driver versions of your app, then you need to handle the fact
that each driver version of your file represents a different file
version number (as far as FM3 is concerned). To do this;
in your data dll
global embed point, called "program setup"
priority 10
put
compile('***',MsSQLDriver=1)
ds_VersionModifier = 1000
***
if you had a third driver, say oracle, then you'd also add
compile('***',OracleDriver=1)
ds_VersionModifier = 2000
***
and so on.
- If you are struggling to use the Multi-Proj Manager, because of DDE
problems, then try making a shortcut to the Mp.Exe on your desktop.
Running it from here, rather than from inside the IDE (Accessories
menu) seems to work better on some machines.
- If you have a lot of icons in your application, you should export
your txa and add the icons to the MultiProj Common Resource list using
copy and paste. You can then re-import the txa with the icons in the
list.
List of Errors
Compile and Link Errors
Make error: File "<filename>.exp" not
found: The target type in the Multi-Proj Global Extension does
not match the target type in the Project Properties. If you are building a
DLL make sure they are both set to DLL. If you are using Clarion 5.5
legacy, then you need to modify the buildexp.tpw to add an embed point as
follows (right at the end of the file):
#EMBED(%AfterClosingExports,'After Closing the
export file')
Execute of <filename>.DLL failed, File
not found: Make sure in the Project Properties, that you haven't
put the Target Name in the Programs to Execute section by mistake.
Link Error: Unresolved External NetDUNRename (and about
90 others): This is caused if this Application is a Data DLL,
and NetTalk is installed on your system, and neither the Activate, nor
Suppress NetTalk extensions are in this app. If you intend to use NetTalk
then add the Activate NetTalk Global Extension to the application,
otherwise add the Suppress NetTalk Global Extension.
Link Error: Unresolved External <$CUSTOMER> in
<filename>.obj: This may happen if you have not included
all the Global Templates for all the DLL's in your project. You should
have a Global Template for each DLL that this application is dependent on,
plus your template set name Global Template. (If this occurred when you
were doing the tutorial and you had not done the first part of the
tutorial, then you probably chose to Generate All, instead of the 'Just
This File' Generate option. If you are not working through the whole
tutorial and are just doing the Multi-Proj Manager tutorial, then
re-install Multi-Proj to restore the original tutorial files.
Link Error: Unresolved External ~<iconfilename>
in <filename>.obj: This will happen if you've put the tilde
character in front of icon files in your browse icons tab. You need to
remove the tilde characters from the front of the icon filenames that you
have used in your browse icons. These are icons are included in your
project and the icon used will be the one included in the project. Only
icons used in handcode require a tilde to use the icon included in the
poject.
Syntax error: Indistinguishable new prototype:
<procedure name>: You may have declared your procedure to
be an ABC External type when it should be a Multi-Proj ExternalProcedure.
Link Error: Unresolved External: Possible
causes:
- If you are using 3rdparty products that are adding items to your
Application's project and are not MultiProj compatible, then they will
be not be informing Multi-Proj about those LIBs.
- You have not informed MultiProj what the highest BC module is (that
is generated by your application).
- There are some file drivers/external resources that have been added
manually to your app's project, that MultiProj does not know about,
and is not adding to the Project.
- You have added a function to one of your DLLs, but the IDE is not
automatically updating your template chain. (See the FAQs
on overcoming this issue)
- You have a function with the PASCAL attribute, but you have not
specified a NAME attribute to the function (in the function
prototype).
How to resolve this:
- Open your application in the IDE and select the Export Project
File item from the File menu - and select a unique
project name.
- Open your Project (that you've just exported) - and compare it to
the Project that MultiProj generates (this is the name of the
Project/Target that you entered on the Versions tab of your MultiProj
template instance in your application). You can open the projects in a
text editor (like NotePad or the Clarion IDE).
- First check the LIB files that are added to the App's Project and
see if there are any of them missing from the MultiProj Project. If
there are, the best solution is to contact the 3rdparty vendor - and
inform them that there product is not compatible with MultiProj. This
is very easy to do, and can be done using the 3rd
Party support for Multi-Proj section of this document. If your
lib file needs to be added to the Multi-Proj project manually, you can
do this in the Common Resources button on the Resources
tab of your Multi-Proj template:

- Next check for any missing clw files. These could be additional BC
modules, which MultiProj does not know about. Find the highest BC
module number (this is in Hex):

(In this case it's B)
and enter it into the MultiProj template:

- Other missing CLW files can be added to your External Source
list on the Resources tab of the MultiProj template.
$VCRRequest is unresolved
for Export: This should only happen in old version of Clarion 2,
before this variable was introduced. To fix this error, go to the Global
Embeds, in the "Global Data" embed point add
VCRRequest long
Missing Global Variable Declaration:
GLO:<Filename>_Name: You are using Driver Substitution and
FM3, but you have not checked the "Create global variables for file names"
in the Multi-Proj global extension template.

You have not allocated a unique template name in the
Template
tab of the Multiproj Template.
My Compiler GPFs since breaking my app into DLLs.
- Are the first 5 letters of _every_ app unique? We've seen problems
where the first 5 are common and this leads to generated source from
one app ending up in another.
- Because MultiProj creates a code template for each function of the
DLLs (this used to be on by default, but is now off by default for
this reason) it manages - your template registry can get to a size
that Clarion cannot manage. Uncheck the "Don't Generate Code
Templates" checkbox, and then regenerate all your applications. Delete
your registry.trf file (located in the clarion\template directory) and
then re-register your templates (see www.capesoft.com\accessories\downloadFAQs.htm#FAQB5
for details).
- Does it GPF at the same place? i.e. could it be code related? We've
seen "bad" code sometimes GPF the compiler.
- Clean out obj32 and obj32\release from time to time, that can help
if you got a bad obj file.
- After a gpf go to the windows task manager and remove any process
called NTVDM or C6*
I get "Too many #Pragma defines" error message
On the "Template" tab of your Multi-Proj extension template, turn on the
'Don''t generate "Dependency" defines' switch.
<MemoField> Is unresolved for export
Your project is trying to export a MEMO field (declared as such in the
dct) - but has been converted to a CSTRING (or STRING) in the project. In
that project version (MultiProj template) uncheck the "Export Memos"
checkbox located on the File Drivers tab.
Driver Substitution
Driver Substitution (DS) is a Multi-Proj Advanced
Feature and may not be relevant to your situation. DS is useful however if
you are changing from one Driver to another - or you wish to support
multiple drivers in your application. For example if you have an existing
application using the TOPSPEED driver, but you wish to also have an MSSQL
version, then Multi-Proj will allow you to do this.
One point to note here however is that Multi-Proj does not optimize your
code at all for the drivers. There are some differences, internally,
between ISAM (Flat File) drivers like TOPSPEED and SQL drivers like MSSQL.
In time you may want to optimize parts of your code for the actual driver.
At this stage Multi-Proj merely performs the driver substitution. It is
however possible (using Conditional Compiles) to optimize your code for
both drivers. That will be discussed in a moment.
Note: Before proceeding with implementing
driver substitution, you must make your dictionary SQL compliant (see
https://www.capesoft.com/docs/fm3/fm3sql.htm#Convert). It is highly
recommended that you use FM3 to manage your data conversion, as doing this
manually will be very tedious (
www.capesoft.com/accessories/fm3sp.htm)
The Mechanics
Adding Driver Substitution to your application is a
2 part process.
- First on the Multi-Proj extension, on the Resources Tab, Click Enable Driver Substitution ON. Then click on
the Override Driver Possibilities button.
The idea here is to define which drivers might be
overridden. In our example (of having TOPSPEED and MSSQL versions)
we will override the TOPSPEED driver with MSSQL in some versions,
and in other versions we won't. We'll get to the versions in a
moment - for now we're just defining the possibilities.
With each possibility you'll need to enter a Conditional
Define. This is basically an identifier or an equate.
This equate will be defined for you. When the equate is 1 then the
driver will be substituted, when it's 0 it won't. You'll see how the
equate is set in a moment - for now though it's necessary just to
create the name. For the example I'm going to call it UseMsSql.
You'll also need to set the From and To drivers. If the SQL backend
restricts the number of characters (for example old versions of
MySQL has a 12 character limit) then enter that. In the case of most
SQL backends you'll need to enter a database prefix. For MsSql this
is most likely to be dbo. (including the .) but this does depend on
your database.
In the data DLL you'll also need to enter the Owner (usually a
variable that contains the database connection string) and
optionally a Send string.
- Add Create Attribute - If your
tables are not created in TPS - you may like to add the create
attribute for your SQL project.
- Do no Generate long External Names -
if you have already added an external name to your fields and
keys, then you can turn this off to prevent MultiProj from
tacking an additional name attribute on to the field and key
declaration.
- Auto Detect DATE/TIME pairs - only check this is if you have not
used a GROUP,OVER a STRING(8) in your dictionary for your dates
and you are using a version of SQL (MSSQL <2005) that does
not support individual DATE/TIMEs.
- Make All keys case sensitive - if
your keys don't need to be case-insensitive, then it's a good
idea to check this, as a case-sensitive key is far more
optimized that a case-insensitive key.
- Generate Overs for Arrays - SQL does
not support dimensioned fields (this includes PostgreSQL,
because the Clarion ODBC driver does not support arrays). This
means that you will need to create a group, and place the array
over the group, which Multi-Proj can do for you (as long as you
have not already done this in your dictionary manually).
- Make
Auto-Number - Dictionary | Server-side | Client-side.
This switch will enable you to turn off Client-side
Autonumbering in your SQL project. You will still need to create
the identity field (or tell FM3 to do it for you) in your
dictionary - but this will not affect your flat-file version.
NOTE: If you set this option to Server-Side, in Clarion 7 and
later, a change to the ABC classes is required. The declaration
of the FileKeyQueue structure needs to be moved from the ABFILE.CLW file to the ABFILE.INC
file. these files are in \clarion\libsrc\win.The
structure is;
FileKeyQueue QUEUE,TYPE,PRIVATE !
QUEUE of all keys in a file
Key &KEY ! Reference to a KEY
Description STRING(80) ! Key description text
(from Data dictionary)
Fields &KeyFieldQueue ! Reference to key
components queue
AutoInc BYTE ! Auto-increment flag (from Data
dictionary)
Dups BYTE ! Duplicates allowed flag (from
Data dictionary)
NoCase BYTE ! Case sensitive flag (from Data
dictionary)
END
- General Field conversions - This
allows you to form a list of field types that you want to force to
a specific type on the SQL backend (In conjunction with FM3). IOW
if you want all DATEs to be formed as datetime types on the
backend, you can specify this here.
- Different Owner Files
- this allows you to override the default owner variable for
specific files. This is useful if you want to connect to 2
different databases (for example, for global data). Note: If you
want FM3 to manage both databases, you will need to build an
upgrader application for this separate database, as FM3 can only
manage 1 database per application instance.
- The second part of the process is creating the actual MSSql
version. You do this by creating a Version in the normal way. In the
Driver Substitution droplist, select the driver substitution
possibility that you just created. Then go to the Resources Tab
(still in the same Version) and click on the Other
File Drivers button. Here you'll need to make sure that
your Export Memos is unchecked for SQL
versions.
Note (for FM3 users):
- You must make sure that your project defines in the MultiProj
extension template match those in the FM3 Connect window template
and that your dbOwner variable matches that set in the Override
Driver Substitution options.
Some tips for maintaining multiple projects
You can create conditionally compiled handcode
specific specific to one driver project set. This is typically useful
where you want to setup different filenames for each file driver
supported.
compile('****',MSS_DRV=1)
!MSS_DRV is the Conditional Define you used in the
OverrideDriverPossibilities template prompt.
CustomersFileName = 'dbo.Customers'
!****
omit('****',MSS_DRV=1)
CustomersFileName = 'Customers.tps'
!****
The Internals
If you look in your main module for your App you'll
see that Multi-Proj generates the file structures multiple times - once
for each possible substitution, and once for the actual dictionary set.
However ONLY 1 set of file structures is actually Compiled into
your application. By using Conditional Compiles, and the Conditional
Define, Multi-Proj allows for the different versions of your program.
Multi-Proj may have to change the file structure slightly in order to
accommodate the specifics of each driver. For example Topspeed files
support the MEMO data type - but MSSQL doesn't. So for MSSQL memo fields
are converted to CStrings. In addition some of the File attributes are
not supported by all drivers, so where necessary they are removed (for
example MSSQL doesn't support RECLAIM).
Other Issues
Your file structures needs to contain only data
types which are valid in both drivers. See the Advanced tab for specific
field overrides that Multi-Proj can do for you.
Overriding Driver Substitution for individual files
If you'd like to keep specific data files as a type (not being
influenced by the Driver Substitution), then you can add the following
File UserOption to your dictionary file declaration:
FIXDRIVER <DriverType>
Open your dictionary and right-click on the file that needs to be fixed,
go to the options tab and add a User option as follows:
 Note
Note, you must set the Value to what you
want it to be (typically the original FileDriver itself).
Overriding the addition of the NAME attribute (external name) to
fields and keys
To suppress MultiProj from adding the ,NAME('"externalname"') attribute
to fields and keys, Use the File User Option:
NoExternalName = 1
Handling Dynamic Indexes in your Dictionary
The easiest option is to remove the dynamic Index(es) - although this is
not always possible to continue supporting your TPS version. If you
cannot delete the dynamic index, then you need to do the following in
the Key User Options for that particular index:

Basically, MultiProj needs to force a field name into the Index, so that
a non-dynamic index will be created in the SQL project. The above
FieldName option is the name of a field in that table.
Browse Filtering in your app
In your browses, you may have used different keys in filters for the
browse. When using SQL, you need to use the primary key - or
alternatively add the primary key component field to the key that you
are using.
Secwin
Typically you would like your secwin files to exist on the new backend.
This is a simple process to set the new place for the Secwin files (just
check the Make Secwin files on the substituted database checkbox of the
Driver Substitution options), although exporting and importing your data
can be a little more complex. First up, is you need to export your
Secwin data from the previous application (using the ds_ExportTables - a
Secwin function that will export all the secwin data to a binary file).
This needs to be done in the old application, as the secwin file driver
needs to be set correctly. The new application then needs to call the
ds_ImportTables (another Secwin function to import from the binary file
that was exported).
Auto Numbering
Often it's useful to be able to use a AutoNumbered key in the TPS
version of your application, but transfer the autonumbering to the
server-side when compiling the SQL version of the project. This is
reasonably straight forward using Multi-Proj, but requires some changes
in your Clarion environment (since the Clarion templates themselves are
not aware of Multi-Proj). We have submitted a change for SoftVelocity to
attend to, and this should hopefully be included in future versions of
Clarion.
Note: If you are wanting to prime the record (for child browses) you
will need to use the driver options string as specified in the FM3 docs.
Firstly, what you need to change in your Clarion templates:
Open your ABPROGRM.TPW file in a text editor (you can use the source
editor in Clarion) and search for the following line (Clarion 6 users of
9058 and up):
#ERROR('An Identity Column can not belong to an
Auto Number Key (Key:'&%Key&' -
Column:'&%FileIdentityField&')')
#ERROR('Set the Auto Number option to false.')
An Identity Column can not belong to an Auto Number Key (Key:%Key -
Column:%FileIdentityField)
Set the auto Number option to false.
Comment out those lines as follows:
#!ERROR('An Identity Column can not belong to an
Auto Number Key (Key:'&%Key&' -
Column:'&%FileIdentityField&')')
#!ERROR('Set the Auto Number option to false.')
!An Identity Column can not belong to an Auto Number Key (Key:%Key -
Column:%FileIdentityField)
!Set the auto Number option to false.
Do the same to the CW.TPL file.
Secondly, what you need to change in your ABFILE.CLW and ABFILE.INC (at
the time of writing this clarion 6 9059 and below, and clarion 7.1 and
below):
Open your ABFILE.CLW file in a text editor (you can use the source
editor in Clarion) and search for the following line:
RelationQueue QUEUE,type
Cut the complete definitions of the RelationQueue, KeyFieldQueue,
FileKeyQueue, FieldsList, SaveQueue and BufferQueue queues (this should
be around 55 lines of code) and paste those definitions into the
ABFILE.INC
Thirdly, you'll need to setup your DCT for Server-side and client side
autonumbering as follows:
- Leave the auto-numbering on in the Primary Key (you can turn this
off in your MultiProj settings).
- In the autonumbered field, add the following Field
user options (Note: must be field user options):

Fourthly, open your application in the IDE, and go to the MultiProj
template (Global | Extensions | Activate MultiPrj):
On the resources tab, click the Override Driver Possibilities button,
and locate the SQL override that you want to make the numbering
server-side. Click the properties button, and in the Make Auto-Number
drop down list, select the "Server-Side" option.
Generate File
Declarations in Modules
In your application, on the Global Properties, File
Control Tab is an option to Generate File Declarations in Modules. As
from Multi-Proj 3.01 this option is supported, however a manual change
to the shipping templates is required to support this.
Template Change ABC
In ABFILE.TPW circa
line 568 you'll see the following code;
#EMBED(%BeforeFileFileStructRecEnd),%File,HIDE
#IF(%GetFileDeclareMode() = 'FILE')
%FileStructRecEnd
#ENDIF
%[20]NULL %(LEFT(%FileStructEnd))
This needs an extra line added to the bottom to become
#EMBED(%BeforeFileFileStructRecEnd),%File,HIDE
#IF(%GetFileDeclareMode() = 'FILE')
%FileStructRecEnd
#ENDIF
%[20]NULL %(LEFT(%FileStructEnd))
#EMBED(%AfterFileDeclaration,''),%File,HIDE #! MultiProj
A request for this to be added to the shipping templates has been made
(PTSS 43006). Hopefully future versions of Clarion will ship
with this embed point included.
Template Change Clarion (Legacy)
The exact same change as for ABC (described above)
is required in File.TPW circa line 135.
The same code exists there, and the same embed needs to be added.
3rd Party support for Multi-Proj (Clarion
7 and above)
Note - Clarion 7 introduced a new project format, so
developers should implement the instructions below if their template
supports C7 or above. In addition, if supporting C6 and below, see the
previous section.
One of the features in Multi-Proj is the addition of a number of Embed
points. These allow other 3rd party products to interact with Multi-Proj,
which saves you a lot of time and effort. The following section deals with
these features, and is directed primarily at Template Authors. If you do
not write templates then you can safely ignore this section. However if
you're a user of other 3rd party products, and the product is not MP
compatible, then you might want to direct them to this document so they
can add compatibility.
The primary goal of the compatibility features is to reduce the amount of
work required by the User to add resources to the application. In the
template language this is taken care of using the #Project command.
Unfortunately there is no way to Read the contents back from #Project -
and indeed in certain cases this would be insufficient anyway. In order
for you, the Template Writer, to afford the user maximum computability
between your product and Multi-Proj you need to add some extra code in
addition to each of your #Project statements. Lets look at each type of
resource in turn;
Graphics Resources
These are files such as BMP, WMF, GIF, ICO ,CUR and so on. These files are
"version independent" and so are added to a single Embed point - called
%mpRscAll7
If your template has a statement like
#Project('Cool.Ico')
then you need to add the following to your template
#AT(%mpRscAll7)
<Library Include="Cool.Ico" />
#ENDAT
If you have added a File Driver to your project, using say
#FIX(%Driver,'TOPSPEED')
#PROJECT(%DriverLib)
then you need to add the following to your template
#AT(%mpRscAll7)
<FileDriver Include="TOPSPEED" />
#ENDAT
Source Code Resources
These are CLW files which your template might use, but which are not added
to the Application Tree. Your template code might typically look like
this;
#Project('Tag.Clw')
then you need to add the following to your template
#AT(%mpCompileAll7)
<Compile Include="Tag.Clw" />
#ENDAT
Note that the above embed point is used for
Source files which are included
Regardless of the Runtime
Library (i.e. Stand-Alone or Local). There are also embed points which are
only used in specific cases - i.e. if the your external source file is
dependent on the Runtime Library then you can use the following embed
points;
#AT(%mpCompileX7) #! 32-bit DLL
#AT(%mpCompileXL7) #! 32-bit Local
LIB and OBJ Resources
These resources are almost always dependent on the Runtime library of the
program being compiled. Your template code will probably look something
like;
#PROJECT('whatever.lib')
In this case you can use the All embed. The only complication is that each
% character in the code above needs to be expanded to %25 in the code
below. Like this;
#AT(%mpLibAll7)
<Library Include="whatever.lib" />
#ENDAT
There are also two additional embed points if you are directly deciding
between Lib mode and DLL mode. You can use
#AT(%mpLibX7)
<Library Include="C%%25V%%25NET.Lib" />
#ENDAT
for DLL mode and
#AT(%mpLibXL7)
<Library Include="C%%25V%%25NETL.Lib" />
#ENDAT
for Lib mode, respectively. (In the Above examples the CLANET and CLANETL
Libs are being included.
Project Defines
These are template driven defines that are placed in the Project Defines
section. Typically your code might look like this:
#pdefine('MyDefine=>1')
Leave this define as is for non-Multi-Proj users, but for Multi-Proj
users, add the following:
#AT(%mpDefineAll7)
%%3bMyDefine=>1%%3b
#
endat
Notice the leading and trailing
%%3b (which
is a ;) and the encoding of the > sign to
>
Global Data
This is common between Clarion 6 and below, and Clarion and below. See the
details in the Clarion 6 section above.
DLL Backward Compatibility
One topic worth discussing briefly is that of making
sure your DLLs are backwards compatible. What I mean by this is that you
are able to ship a more recent version of your DLL, into an existing
client, without there being any side effects. This is a very powerful
approach because it allows you to distribute bug fixes, and minor updates,
of your product in pieces, rather than requiring a whole new install.
The key to this compatibility issue is the items which are Exported from
the DLL. This can get quite complicated, so I'm going to stick to the
basics here. The items exported are stored in the EXP file. If new stuff
is ONLY added to the bottom of the EXP file, then the DLL will be forwards
compatible. In other words the new DLL will work with programs compiled
earlier.
However, the stuff in the export file is stored by Number, not by Name,
and it is usually listed as first data, then procedures, then classes and
so on. Thus if you add data to the DLL, all the procedures will get a
different number.
For this reason it's a good idea to restrict the exporting of data to the
Data DLL. All the other DLLs should export only Procedures. Then items
added to the DLL will be at the bottom of the EXP file, and the DLLs will
be completely forwards compatible.
Conditional Compiles
In Clarion it is possible to conditionally compile
code, depending on some settings in the CWPROJ/PRJ file. Remember the goal
of Multi-Proj is to allow you to compile multiple versions of the same APP
- from the same source files. This implies that the source files must
contain all the possible flavors of the code. However, of course, only one
flavor must be compiled in any given situation.
For Example : If you are using any Windows API
calls, then in all probability these calls are slightly different in
16-bit and 32-bit. So a 16-bit DLL needs to compile slightly different
code to a 32-bit DLL. this is an example of where using a Conditional
Compile is very useful. To use the GetWindowsDirectory call you would need
to do the following in the Global Map;
Module ('Windows')
COMPILE('***',_WIDTH32_=0)
GetWindowsDirectory(*CSTRING,USHORT),USHORT,PASCAL,RAW,name('GetWindowsDirectory')
***
COMPILE('***',_WIDTH32_=1)
GetWindowsDirectory(*CSTRING,USHORT),USHORT,PASCAL,RAW,name('GetWindowsDirectoryA')
***
End !Module
In the above example we make use of the _Width32_ define (this is a built
in define) to determine if the DLL is compiling in 16 or 32-bits.
This approach is however very useful in other circumstances. For example,
say you wanted to create a debug version of your program, and a non debug
version. Then you could add the following code to your APP;
COMPILE('***',_Debg_=1)
stop('The variable x = ' & x & ' here ')
***
Or you might want to create a message screen for non-registered versions,
like this;
COMPILE('***',_Demo_=1)
Message('Come on! Please send me money!!')
***
One useful tip is that Defines used in this way are automatically assumed
to be 0 if they don't exist. Thus you only have to add them to versions
when they must be set to something other than 0. To add a define to a
version, go to the Multi-Proj extension, go to the specific version, go to
the defines tab, and simply set the Define to 1 there. For example;
_Demo_=>1
Notice the somewhat unusual => sign
(which means equals).
Also remember that _Width32_ is set for you in 32-bit compiles.
If you are doing a multi-driver system and you want to add code for a
specific driver, then you can use the Conditional Define that you created
on the OverRide Driver Possibilities list. For example if you used UseMsSqlDriver
then you can encapsulate some code in a conditional compile. For example;
COMPILE('***',UseMsSqlDriver )
myview{prop:sql} = 'Select * From Customers'
***
This code will then only be executed when the MSSql driver is being used.
DLL Naming Strategies
It is useful to follow a strategy when naming DLLs.
You can use whatever strategy you like - some common strategies are listed
here for your convenience. Obviously your naming strategy will depend on
you specific requirements.
Clarion style
This was introduced with Clarion 7, and is still used with Clarion 8.
CLAaaaL.DLL
- aaa is the name of the DLL, for example RUN for the Runtime library,
TPS for the Topspeed file driver, OLE for the OLE support and so on.
- L is included in the name if the LIB is a Local Mode compile. It is
omitted for Stand-Alone compiles.
Clarion Old style
This was introduced with Clarion 4, and is also used with Clarion 5, 5.5
and 6.
CnaaaXL.DLL
- n is the version of Clarion - 4, 5, 55 or 60
- aaa is the name of the DLL, for example RUN for the Runtime library,
TPS for the Topspeed file driver, OLE for the OLE support and so on.
- X is included in the name if the DLL is 32-bit. it is omitted for
16-bit DLLs
- L is included in the name if the LIB is a Local Mode compile. It is
omitted for Stand-Alone compiles.
Clarion Older style
This is the Style used with Clarion 2.
Ct2aaann.DLL
- t is the Type - W for a Stand-Alone compile, L for a Local compile
- aaa is the name of the DLL
- nn is 16 for 16-bit, and 32 for 32-bit DLLs
FAQs
Copyright and License
Multi-Proj and
Multi-Proj
Manager are copyrighted © 2025 by CapeSoft Software CC. All
rights reserved.
This product, and all the files contained therein, is copyrighted by
CapeSoft Software.
Each developer needs his own license to use Multi-Proj. (Need to
buy more licenses?)
This product is provided as-is. CapeSoft Software and CapeSoft Electronics
(collectively trading as CapeSoft), their employees and dealers explicitly
accept no liability for any loss or damages which may occur from using
this package. Use of this package constitutes agreement with this license.
This package is used entirely at your own risk.
Use of this product implies your acceptance of this, along with the
recognition of the copyright stated above. In no way will CapeSoft , their
employees or affiliates be liable in any way for any damages or business
losses you may incur as a direct or indirect result of using this product.
For the full EULA see
https://capesoft.com/eula.html
Templates written by Multi-Proj are your property and can be distributed
as you wish.
Version History
Download latest version
here
3.07 - 27 May 2025
3.06 - 2 November 2023
- Change: Generates the Template Name into the description of child
#Extension templates.
3.05 - 12 October 2022
- Change: Do not generate support for Secwin 6, if Secwin 7 is
installed.
3.04 -3 April 2022
- Change: Legacy apps now generate Long File Names if IDE is set to
Long File Names.
3.03 -4 Jan 2022
- Fix: Template error: Redeclaration of %FieldStructTMP in same scope
3.02 - 24 May 2021
3.01 - 5 March 2020
- Add: Support for "Generate File Declarations in Modules". Not that
this support requires an embed point to be added to your shipping
templates. See here.
- Add: "Other Included Files" option added to Resources tab. These
other files will be linked into the project(s).
- Fix: Quotes automatically added around Sendstrings sent to Secwin
tables.
3.00 - 13
Sept 2018
- Add: Clarion 11 to install.
2.99 - 6
Sept 2018
- Add: File User Options for a Table cascade down to Alias's on that
table.
2.98 - 19
July 2017
- Add: Template option
to force the case of existing "External Names" in the Dictionary.
- Fix: Support for Legacy shortname / longname generation for _SF and
_RD files.
2.97 - 7
January 2016
- Fix: Overriding auto-number when doing Driver Substitution applied
to all tables, not just substituted ones.
2.96 Released 19 August 2015
- NoExternalNames file user attribute allows you to override the
generation of the NAME attribute (for fields and keys) for a specific
table.
- Can generate the MPRJ.$$$ temp file into a location other than the
app path.
2.95 Released 25 February 2015
- Clarion 10 support in Installer.
- Allows you to connect to 2
different databases (Driver substitution)
- Additional support for Secwin (you can add the Secwin libraries
manually in case you want to use a file driver other than what
multi-proj selects).
2.94 Released 15 April 2014
- Application icon gets assigned in the cwproj if set in the resources
of the project.
2.93 Released 31 January 2014
2.92 Released 7 October 2013
- Support for Secwin tables for driver distribution. Overrides the
Secwin template settings for the ds_SetOwner and ds_SetPath calls, and
uses the driver substitution settings.
- A Version can be set to use a specific driver substitution. This
replaces the need to set the driver substitution project define for
the version, and add the new file driver.
- New driver substitution option to call the FM3 connect procedure
(requires FM3 5.13 or later).
- For Btrieve substitution - only add .dat filename if the filename is
not a variable.
- Fix for project defines - was not always including the %3b separator
for all project defines.
- Fix - does not repeat filedriver includes in the cwproj creation.
- Fix - Clarion 9 legacy application cwproj generation, was generating
long names for _rd, _ru and _sf files when longnames are set to
generate in the IDE. In legacy, these are generated as concatenated
filenames, even if longnames are selected for the clw generation.
2.91 Released 13 June 2013
- Template option: 'Do not add Batch file to end of compiles' to
global template (so you don't need to check it on each version).
- Clarion7 and up fix: determines if long filenames are used or not
- Cleans out invalid characters in the project and target name (so
that a valid cwproj file can be made).
- Clarion7 and up fix: #embed for %mpDefineX7 and %mpDefineXL7 was not
defined in the template (so other templates using these embed points
did not have their project defines added to those cwproj files).
- Tidied up the generation of project defines into the cwproj file
(no <13,10> and removed duplicate %3b symbol separators).
- Clarion 7 and up - application icon added to the cwproj file.
- Clarion 7 and up - new pre-build event template option to add code
to run before building.
- Clarion 7 and up Template fix - Does not export memos for
non-FixDriver files (where memos are not supported by that file
driver).
2.90 Released 2 May 2013
- Clarion 9 compatible build.
2.89 Released 26 February 2013
- Add: CwProj not generated if version name matches app name (in
Clarion 8)
- Remove: "Procedures" (documentation) tab from generated templates.
Makes the templates larger and it's unlikely this tab is useful.
- Remove: work-around of template deleting cwProj files to force
reconversion from .Prj.
2.88 Released 6 August 2012
- Added support for generating CWPROJ files in Clarion 7/8, rather
than PRJ files.
2.87 Released 20 July 2011
- Fix for C8 for redeclaration of %AlternateOwner and %AlternateFile
error.
2.86 Released 19 May 2011
- Fix for C7 and up. Deletes cwproj files to force regeneration of
them from the .prj files.
- Fix for C7 and up. Run bat file without calling command.com (was
calling in wrong folder).
- Added C8 support.
- Force '()' into proc definition if non-existent in the prototype
(required for C8 support).
- Validate a procedure description for correctly formatted Clarion
string.
2.85 Released 9 November 2010
- Fix for FM3 support for FIXDRIVER table support. Does not generate a
filename equate in the Connect to SQL window.
2.84 Released 14 October 2010
- Driver substitution support: Uses the ds_AlternateFileNameAndOwner
function (rather than the ds_AlternateFileNameEx) so that TPS files
with encryption can be automatically converted to SQL.
- Adds the FieldIcon to the project, only if the '!' does not exist as
the first char.
- Driver substitution support: Adds an additional
ds_AlternateFileNameAndOwner call if the oldname attribute is already
present on the file user options.
2.83 Released 6 October 2010
- Dependancy Defines defaults to '0' - not really required, and just
adds a ton of #pragmas to large multi-dll projects.
- TPL fix - for Date/Time pair detection where 2 Date/Time pairs are
simultaneous in the record declaration.
- TPL fix - when using driver substitution in conjunction with FM3 -
where Date/Time pairs are created, set the RealField/UnRealfield
options for FM3
2.82 Released 21 September 2010
- C7 support - delete the cwproj file so that a new cwproj is
generated from the prj file generated.
- Tweak to export Memos - Clarion7 support.
- Tweak to only set the pdefines in the generated template for the set
that each version belongs to.
- Warn if no %ControlFieldIcon template variable exists.
2.81 Released 29 March 2010
- Can use old naming convention for overs (i.e. no underscores) in
Driver Substitution.
- In Driver Substitution, you can convert all of one dct variable type
to a SQL variable type. The FM3 ForceSQLDataType will override this
setting on a field level.
- Exclude 'icon:' from adding to the resource list.
- Limit Projecting of Drivers to one instance.
- Add InMemory to driver option list.
- Create list of procedures in the generated template that are
exported. This makes it easy for other templates to use this list of
procedures.
- USEPREFIX file user option for driver, allows you to use a different
file prefix for each driver instance of the file in the project set.
- Legacy: If file is a threaded file, then declare the used variable
as a threaded external variable in other dlls.
2.80 Released 19 February 2010
- Included missing Empty.Clw in C7 installs.
2.79 Released 8 July 2009
- Changed NAME in EXP file to LIBRARY to better support C7v6 mode.
2.78 Released 29 May 2009
- Clarion 7 fix (was not including the latest template in the Clarion
7 build).
- Template tweak - exports method names correctly (that include
additional dots) in C5 and C55.
2.77 Released 27 November 2008
- Bug fix in LongFileName support.
2.76 Released 10 November 2008
- Clarion 7 compatible install.
- Template change - TargetName and Set in the Versions list
description.
- Template change - for Driver Substitution, you can select whether
AutoNumber is client side or server side.
- Don't generate code templates checkbox defaults to 1.
- Use full application name (if GenerateLongFileNames is set).
- Template change - don't include a module (that has no name) - and
don't link in a resource with no name.
- Omit duplicate File drivers in the project.
- Allow drivers (in the apps project) to be generated into all
projects.
- Template fix - For IPdriver - DriverBinMemo is always 0. Don't use
this to test.
- Remove invalid name chars from a name when create an external name
for SQL.
- If no external names, don't generate external name for Memos.
2.75 Released 18 July 2007
- Fix can omit common drivers from specific projects (or include
Common drivers in all projects).
- Fix - override export corrected.
- Fix - if external name already exists in field or key, don't add one
(if adding names).
- Check that Project name does not match the application name (and
generate warning if it does).
2.74 Released 12 June 2007
- Fix for External names - when not checked, does not generate
external names.
- Fix for multi-dll apps that require FM3 in the non-data dll apps.
Uses the filename externally (i.e. defined in the data dll)
- Allows long Project and Target names.
- Fix for legacy apps that include abc classes.
- Allow common defines to be entered.
2.70 Released 12 April 2007
- Fix for Multi-Proj and FM3 interaction (M'Proj detects if FM3 is
present) - M'Proj allows FM3 to do data type conversion.
- Feature - Driver Substitution allow generation of arrays for file
drivers that don't support arrays (checkbox in the global extension
template).
- Driver Substitution Fix - if you have a dynamic index, then you need
to add the UserOption SQL to the key. M'Proj will now complain if this
does not exist in the dct.
- Fix - M'Proj ignores quotes in the DriverString (which Clarion
treats as blank).
- Fix - quotes in omit ends (incase omits is not added).
- Fix - only declares the project define mpDLLMode if required.
- Removed Clarion2 support and implemented the start of Clarion7
support.
- Option - allows batch file to be omitted from the project (switch in
global extension template).
- Priority in FM2/3 Init code.
- MAVODBC support - disable Driver Substitution in MAV applications.
2.66 Released 8 May 2006
- Fix for Clarion5 template errors (regression in 2.65)
2.64 Released 6 Aug 2004
- Added support for In-Memory-Data-Driver
- Added support for Clarion 6.1
- Added support for FM3's "ForceSQLDataType" attribute (where data
type = BINARY )
- Improved generation for systems with multiple Data DLL's (thanks to
Steve Rothkin)
- Added support for Clarion's Version resource template
- Added support for Fomin Report Builder Suppression template.
2.63 Released 12 Jan 2004
- Added support for Application Icon into Version files
- Added support for data in dictionary, generated _after_ file
declarations
- Added support for optional CREATE attribute to be added to file
declarations when doing different driver versions
- Added support for forcing the field names to UPPER or lower case.
- Added automatic conversion of DECIMAL to PDECIMAL in ORACLE
declarations
- Added automatic conversion of PDECIMAL to DECIMAL in TOPSPEED
declarations

