What we are about to do
In order to split this Single EXE application into a multi-DLL application we
will need to do the following things that are explained in greater detail in the
following sections:
- Create the DATA DLL from scratch (which we will call AllFiles.app). This will
create a template for us to use in the other apps.
- Register this new template.
- Create the "other" DLL (which we will call Procs.app).
- Import functions from the existing Single EXE application into the Procs Application
(part of our new Multi-DLL application).
- Create the EXE (which we will call Main.app)
- Import Functions into the Main Application
1. Creating the Data DLL
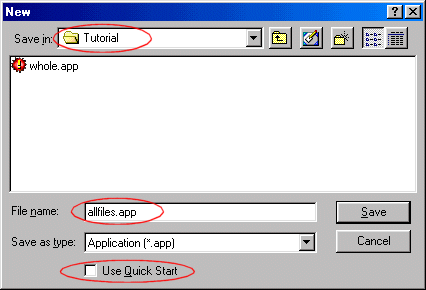
The first step we need to do is to create a new application from scratch that
will be our DATA DLL.
- Run Clarion and choose New Application.
- go to your \Clarion\3rdParty\Examples\MultiPrj\Tutorial
directory
- type in AllFiles.app as the File name.
- make sure Quick Start is off.
- press Save.
When the Application Properties screen appears:
- fill in the dictionary file as Tutorial.dct (which is found in the
Tutorial directory)
- also note that the First Procedure entry is left blank
- the Destination Type is set to DLL
- make sure the Application Wizard switch is off
- press the OK button

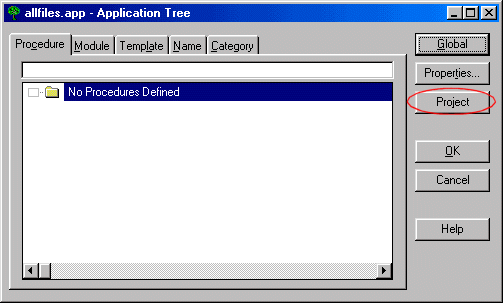
Okay - so this creates a small APP which looks like this:
 Using the Multi-Proj Global Extension Template
- Click on the Global button in the Application Tree. This takes you
to the Global Properties screen.
- (One Tip : On the General Tab, leave the option Generate Template Globals
And ABC's External Off. For this DLL they aren't external - they're internal.)

- Click on the File Control Tab
- Set the Generate All File Declarations On
- set the Export All File Declarations On
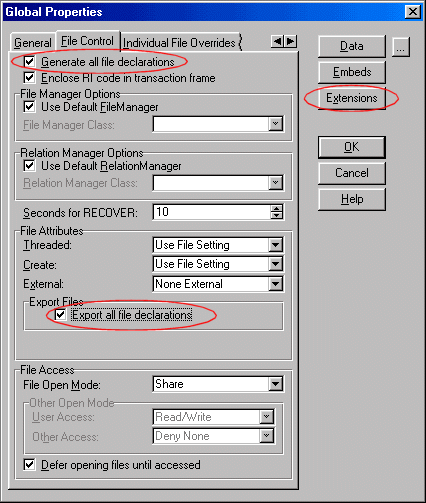
- Click on the Extensions button to go to the Extensions
NETTALK TIP : If you have
installed NetTalk on your system, then go ahead and add either the Suppress
NetTalk or Activate NetTalk global extensions here. Because this is a Data DLL
you need to add one of these 2 extensions.
TIP : If you open the AllFiles.app, from the
CompletedTutorial folder, and you do not have NetTalk installed (shame on you)
then you will get a Generator warning : "
Unknown Template Type Activate
NetTalk". You can ignore this error by clicking on OK.
Now we get to the really nice bit - this is where you add Multi-Proj to this DLL.
To add the template:
- Click on Insert
- select Activate Multi-Prj Support from the list and press the Select
button.
- note the Help button.
- in the General Tab type allfiles as the Project file name
- set Export File Structures to On
- set Export Your Global Data to On
- set Export Template Global Data to On
- set Export ABC Library to On
- set the Highest BC number to match the app (in this
case it's 0) - see below for more on this if you're unsure...
- set the Big Picture App Number to 1 (this is the first
DLL in the suite)

To determine the Highest BC number, click on the
Project button, and inspect the window that opens.
 General Tab Options Explained
The General tab contains a number of options - most of which are
used in special circumstances. The first few however are used a lot in Data
DLLs. This is what all the options mean:
Export File Structures : All the files structures used in
this DLL are going to be exported (i.e. made available) to other DLLs and EXEs.
As this is a Data DLL this is exactly what we want. In all the other DLLs and
the EXE this will be off. Also if you were making some sort of utility DLL though
you might chose not to export the structures, in which case you'd leave this
off. An example of this is our Secwin utility. It makes use of a Security file
in the DLL, but the Security file structure is not exported to apps that use
Secwin. The apps use the Procedures in Secwin, which in turn use the files.
Export Your Global Data : The same as for files. Again because this is
a data DLL, we do want to export any global data we define here. Otherwise this
would typically be Off.
Export Template Global Data : This should be ticked on only in the data
DLL. Everywhere else it must be ticked off.
Export ABC Library : This applies to ABC apps only. Basically in ABC
apps this is ticked on for Data DLLs - and Off in all the other DLLs. Remember
I said the ABC library was Internal to this APP? Well this is where we make
it available to other DLLs (to them it is External).
Export Procedures in Module Order : This is here for backward compatibility
reasons. Basically it lets you govern the order in which the Procedures are
exported from this app. It is very unlikely that you will use this switch. See
the section on Backward Computability for more information on this.
This app has no _rd or _ru modules : This is for Legacy apps only. Tick
this on if this DLL doesn't use any files.
This app has no _SF module : This is for Legacy apps only. Tick this
on if there is no _sf source module generated with this application. This is
quite rare, but can occur.
This APP has no BC modules : This one is for ABC applications and again
is quite rare. However if your APP doesn't generate any BC modules then tick
this on. BC modules are typically created if the APP uses one or more file structures.
Highest BC number : If this is an ABC, Data DLL, then you
need to find out the highest BC number and enter it here. To do this
click on the Project button, when viewing teh application, and inspect the
Generated Source Files section. In this example this number should be 0.
Big Picture App Number : In order to do rebasing
Multiproj needs each DLL app to have a unique number, starting with 1 and
counting upwards, for each app in the suite. For more information on
this option see the Multi-Proj documentation.
Template Tab
At this point I'm going to skip right over to the Template Tab. We'll come back
to the other tabs in a moment. I mentioned earlier that Multi-Proj makes
using
a DLL much easier. Well it does this by writing a template for you. The template
will contain everything we need to make using the DLL, and it's data, trivial.
By default the template will contain a Global Extension to Activate the DLL (Add
the Library to the Project, Prototype the Functions etc) and also a Code template
for each procedure to make calling the procedures in this DLL trivial.
- Switch to the Template Tab
- type in DllTutor.tpl as the Template Set name
- type in AllFiles.tpw as the Template Filename
 Template Tab Options Explained
Template Set Name :
Template Tab Options Explained
Template Set Name : This is the name of the template set to
which this DLL belongs. One of the features in Multi-Proj is that it lets you
build up a template set made up of all the templates for all the DLLs in a product.
This makes things easier to manage, and also cuts down on the number of template
sets in your registry. Multi-Proj version 1.3 users will see the difference
here - in the past Multi-Proj made a separate set for each DLL - This could
result in a lot of sets for products with lots of DLLs. I've used the name of
the eventual product here as the Set name, but you can use any name you like.
All the DLLs in the product can have the same Template Set name. Incidentally
you can add your own templates to this set as well - See the Section entitled
Expanding the Generated Template.
Template Filename : This is the name of the file which contains the template
for this DLL. Each DLL must have a unique name. The most obvious name to use
is the name of the APP.
Don't Generate Code Templates : As I mentioned, by default Multi-Proj
will generate a code template for each procedure which is exported from the
APP. Occasionally you might want to code these templates yourself, by hand.
In this case tick this option on to prevent Multi-Proj from doing it for you.
Includes : This is an advanced option. It allows you
to manually add hand-coded TPW files to this template set.
Don't Generate Dependency Defines : This is also
an advanced option. If this is on then Multi-Proj does not generate dependency
information into the template files.
TIP : If you
are creating an EXE then there is no benefit in creating a template. So if APP
was an EXE then we would leave this tab blank.
Resources Tab
On to the Resources Tab. This is where you get to add stuff to the APP which it
must compile into the finished DLL. This is the same sort of stuff which in the
past (and you still) have to add to the PROJECT button for your APP. These are
things like Extra BMP files, or ICO files, Extra File Drivers and so on. If you
have External Source modules being used by your APP then you can add that here
as well. There are a couple of advanced options on this tab as well - they'll
be discussed in more detail later.
- You don't need to make any changes here.
 Resources Tab Options Explained
File Drivers :
Resources Tab Options Explained
File Drivers : This button allows you to add File Drivers
to the APP which the APP doesn't know about. For example if you are using our
EzHelp product then you might need to manually add the TOPSPEED driver ( which
EzHelp uses ) to this button. This would only happen if your APP doesn't
normally make use of this driver, and if the 3rdparty
product in question doesn't support Multi-Proj directly. (All CapeSoft
products naturally support Multi-Proj directly, as do a number of other 3rd
party products. Information on how to support Multi-Proj can be found in the
Multi-Proj documentation.)
Common Resources : This section is for resources such as Bitmaps, Icons
and so on. We're going to talk about Versions in a minute, and each version
can have it's own resources, but the resources on this tab would be Common to
all the versions.
External Source : This button allows you to add external source files
to your APP. Actually it also lets you add support for a Range of files (i.e.
for example DET001.Clw to DET023.Clw) without having to add each on
individually. For the most part however you just enter the name of the file
you wish to include.
Enable Driver Substitution : If this is ticked on then you'll be able to
substitute one file driver for another when the application is generated.
As this is the basic tutorial, we'll leave this option off for now. The
Driver Substitution Tutorial
shows these substitution features in action.
Versions Tab
Finally we get to the Versions tab. However before we look at the options here
a short aside is in order.
It's not commonly known, but inside each APP file is a PROJECT. In fact it is
the Project that you see when you click on the Project button - and it is the
Project which the
Compiler and
Linker use to create the end
product DLL or EXE. Now you may have noticed that Clarion also supports separate
Project (PRJ) files. This is primarily there for those folks who don't use the
generator, but who rather hand-code their products. It is however this feature
which Multi-Proj uses (and where the name originally came from). Multi-Proj allows
you to generate PRJ files from your APP. This means that instead of compiling
your APP you can compile a PRJ.
Why is this useful? Well Multi-Proj lets you set different settings in your PRJ
than are in the APP itself. So the PRJ might (for example) have the Debugging
turned off, while the normal APP has it turned on.
But wait - there's more. Multi-Proj lets you create Multiple Projects from the
same Application. This means (for example) that you can create a Registered
version of your DLL, and an Unregistered version, from the same source code -
but 2 different projects.
However even if you don't use the Multi part of Multi-Proj it's still useful to
have a project which is different to the APP. Each time you add Multi-Proj to
an application you need to add at least 1
version.
- Move to the Versions Tab
- click on the Versions button
- click on the Insert button to insert a new version
- type in 32 bit Topspeed as a title for your version
- change the Target Type to DLL
- change the Target OS to 32 bit
- set the Runtime Library to Stand Alone
- debugging to off
- target Name to allfil32 (This will be the name of the DLL we will create)
 Versions Tab Options Explained
Most of this is very familiar.
Title : This is a name you give to this version. It is just used here
for display purposes, so use anything you like.
Set :
This is only used if you are making different versions, of the same DLL, with
different Target Names. This is covered more fully in the Driver Substitution
Tutorial. For this example leave this field blank.
Target Type : Is this a DLL, LIB, or EXE. In
this example we're making a DLL.
Target OS : 16-bit or 32-bit (16 bit is included for
backwards compatibility, but is no longer actively supported)
Runtime Library : Stand Alone, Local or External. Stand Alone is used
when you're making a DLL to be used in other Stand Alone Apps - Local is used
to make a LIB which can be used in other Local Apps.
Debugging : On or Off
Target Name : This is the name of the DLL you are going to create. NOTE
This is NOT the same name as the APP file!! Each version must have a unique
target name. (In this case I'm going to call this AllFil32)
Project Name : If you make 2 versions, with the
same Target name (for example a debugging and non-debugging version of the
same DLL) then enter a separate project name here. Project names need to be
unique across all versions. If the Project name field is blank then the Target
name is used for the Project.
Resources : This tab lets you add resources which are specific to this
version. This would typically be any external LIB or OBJ files. Note that this
tab is only for resources which are version specific. Resources which apply
to all versions can be added to the "Global" Resources tab.
File Drivers : This tab lets you add any File
Drivers which might be specific to this version. Usually the File Drivers
needed by the version will automatically be included, but this tab gives you
the opportunity to override the drivers that are linked in.
Defines : In a project it is possible to define what are essentially
equates, which can be used in your program. For example if a particular version
is a demo version, then you might create a define called Demo. To set the equate
here you use a slightly different syntax to the normal way of programming. Instead
of saying
Demo=1 you rather say
Demo=>1
Hey I didn't invent this - this is just how it's done .... In your code you
can use this to include or exclude code. For example to add some code if this
is a demo version...
COMPILE ('***',Demo=1)
Message('This is a Demo version. Please Pay!')
***
Distribution : After compiling a particular project it is often useful
to copy the resultant files to another directory. For example DLL files are
often sent to the Clarion\Bin directory, Lib files to Clarion\Lib - EXEs and
DLLs to a distribution directory, and so on. On this tab you can enter as many
of these distributions as you like.
TIP : This is also a great place
to copy other files which belong to the project, but which may have changed.
For example Help files, or sample data files etc.
Target name of the Application
Okay, now we've seen the Multi-Proj extension, we're almost
ready to continue splitting the original
app. Before we go any further though there's one last thing to do, and that is to set
the name of the Target in the Application itself.
By default Clarion creates a DLL with the same name as the App file. So in this
case it would create AllFiles.DLL. But in the version above we asked it to create
AllFil32.Dll. Remember I started this tutorial by saying that there is already
a project in the APP file - Multi-Proj is simply adding
More projects.
What we're going to do now is adjust the APP's project to fit in with our new
naming scheme.
- To do this, go to the Application Tree by clicking Ok 3
times.
- Then click on the Project button.
This takes you to the Project Editor. Remember we're editing the Project inside
the APP file now.
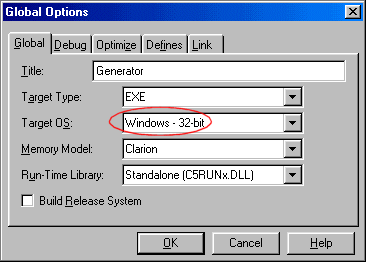
- Click on the Properties button to bring up the Project Properties
(Global Options) window.
- Make sure the Target OS is 32-bit

- Click on the Debug Tab
- Turn On the Debug options
- Click OK

In this editor you use the Properties button to set the APP to be similar to one
of your versions. I say similar because you probably won't make it exactly the
same. One obvious change is to turn the Debugging options in the APP On, but leave
them off in the Multi-Proj project (We're going to continue using the APP as normal
during the development process - we're just going to use the new Multi-Proj PRJ
file for the final release).
- Remove the Target File by selecting it (allfiles.dll) and clicking the Remove
File button.
- select Target File
- click the Add File button
- type in allfi32.dll (it won't exist so that's why we need to type it in)
- click the Save button
- click OK to return to the Application tree

We set the Target File of the Application to match that of the the Multi-Proj
one. This allows us to create and use the same name for the DLL when we develop
and when we ship (release) our product. (In the case above the Application's DLL
(allfil32.dll) is set to 32-bit with debugging on, while the Multi-Proj one (also
allfil32.dll) is 32-bit with no debugging. The later is the one you will use when
you release your product.
Creating the Template
As we explained earlier Multi-Proj creates a template for you. This is automatically
created when you generate and compile your project.
- At this point go ahead and save and compile.
This will build your new template as well as your new Data DLL (allfil32.dll)
NETTALK TIP : If you
get about 95 errors, starting with one similar to;
Link Error: Unresolved External NetDUNRename
then you probably have NetTalk installed on your system.
Because NetTalk is an ABC compliant object, that uses a compiled DLL, AND this
is a Data DLL, you must add either the Activate NetTalk Global Extension, or the
Suppress NetTalk Global Extension to the application. See the
list
of errors in the Multi-Proj Complete Documentation for
more information.
Should you have any other compile errors, look here at the
list
of errors in the Multi-Proj Complete Documentation.
2. Registering the New Template
You now get to register the new template.
To do this:
- Close AllFiles.app (or any other app you may have open)
- go to the Setup menu, and choose Template Registry
- click on the Register button
- select DllTutor.Tpl from the list, and open it. Remember the name comes
from the Template Set name as you set it way back on the Template Tab of the
Multi-Proj extension.
- click on the Close button
You won't have to re-register the template again - and any other DLL's we add
to this template set will automatically be registered for you. We'll see that
when we create the next DLL.
3. Creating the Intermediate "Other" DLL (Procs.App)
Each Multi-DLL product consists of at least 2 parts - the Data DLL (which we've
just made) and the EXE (which we'll make later). In-between these 2 pieces you
can create any number of Intermediate DLLs. In this example I'm only going to
make 1 - but you might make more. Each one is created along the same lines so
this example should be all you need to get going.
As before create a new APP (I'm going to call it Procs).
- Run Clarion and choose New Application.
- go to your \Clarion\3rdParty\Examples\MultiPrj\Tutorial directory
- fill in Procs.app as the File name.
- make sure Quick Start is off.
- press Save.

When the Application Properties screen appears:
- fill in the dictionary file as Tutorial.dct (which is found in the
Tutorial directory)
- also note that the First Procedure entry is left blank
- the Destination Type is set to DLL.
- make sure the Application Wizard switch is off.
- press the OK button

Okay - so this creates another small APP which looks like this:

As before the APP tree will appear, and the first thing to do is :
- Click on the Global button
This is where we come across the first difference between the Data DLL and a Procedures
DLL.
- Click on the Extensions button
- in the General Tab
- turn On the Generate template globals and ABC's as EXTERNAL in DLL

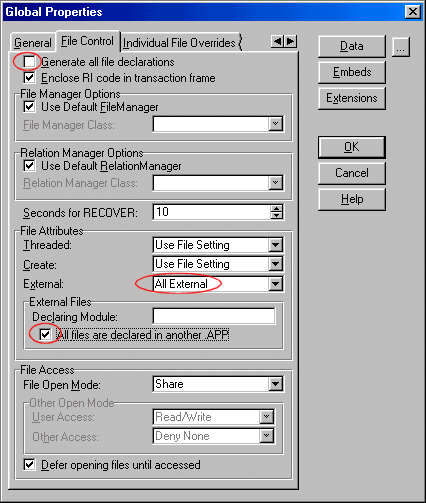
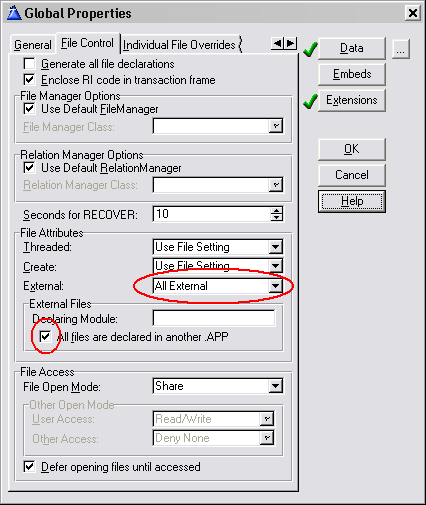
- Click on the File Control Tab
- make sure the Generate all file declaration is Off
- change the File Attributes External to All External
- Set All files are declared in another APP to On
Now we add the Multi-Proj template again.
- Click on the Extensions button to go to the Extensions and Control Templates Window
- Click on Insert
- select Activate Multi-Prj Support from the list.
- in the General Tab type procs as the file name
- note that this time the "Export File Structures", "Export
Your Global Data" and "Export Template Global Data" options
should all be Off
- note that this app is set as having no BC modules
(because it's not a Data DLL)
- note that the Big Picture App Number is set to 2. (The
Data DLL was number 1)

- Switch to the Template Tab
- type in DllTutor.tpl as the Template Set name (this is the same as the last time)
- type in Procs.tpw as the Template Filename

You do not need to do anything in the Resources Tab
- Move to the Versions Tab
- click on the Versions button
- click on the Insert button to insert a new version
- type in 32 bit as a title for your version
- change the Target Type to DLL
- change the Target OS to 32 bit
- set the Runtime Library to Stand Alone
- debugging to off
- target Name to Procs32 (This will be the name of the DLL we will create)
- click OK
- click OK to get back to just the Extensions and Control Templates Window
 Adding the AllFiles Template
Once the Multi-Proj extension is added, we need to add the AllFiles Template that
we created when we compiled the Data DLL (AllFiles.app). Because this APP is going
to make use of the Data DLL (AllFil32.DLL) you need to add its
Activate AllFiles
Functions Extension.
- Click on Insert button in the Extension and Control Templates Window
- select Activate AllFiles Functions (Under the Class DLLTutor Template
Class) from the list.
- Note that This _APP_ using the blank Set. This
is referring to the APP itself, not any particular version.
- press OK
- press OK to return to the Application tree

Application Project Properties
As before we need to change the application's project target name.
- To do this click on the Project button.

This takes you to the Project Editor. Remember we're editing the Project inside
the APP file now.
- Click on the Properties button to bring up the Project Properties
(Global Options) window.
- Make sure the Target OS is 32-bit
- Click on the Debug Tab
- Turn On the Debug options
- Click OK
- Remove the Target File by selecting it (procs.dll) and clicking the Remove
File button.
- select Target File
- click the Add File button
- type in procs32.dll (it won't exist so that's why we need to type it in)
- click the Save button
- click OK to return to the Application tree
- save the application now

Okay - that's the setup out of the way - as you can see it becomes a lot easier,
and quicker, as you get used to it. Now lets import some of the functions from
the Whole.App into this DLL.
4. Importing Functions into the Procs Application
What we want to do now is to import the functions in the existing Single EXE (Whole.App)
into our Multi-DLL application.
- Make sure that Procs.App is loaded
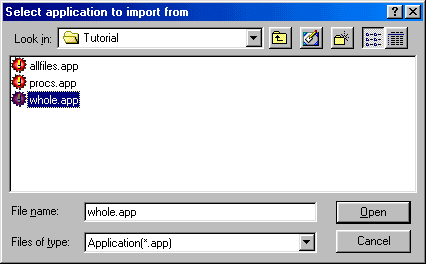
- Goto the File Menu, Import From Application
- Choose Whole.app
- Click Open (or double click whole.app)
In this case we're going to import all the functions, excepting the Main and Splash functions.
Clarion 2 Users: You will not have a Splash function in this tutorial.
- click to the Name Tab
- click the Select All button
- click on the Main procedure to highlight it
- click on the Clear button to de-select it
- do the same for the Splash Screen (i.e. de-select it)
- click on the OK button

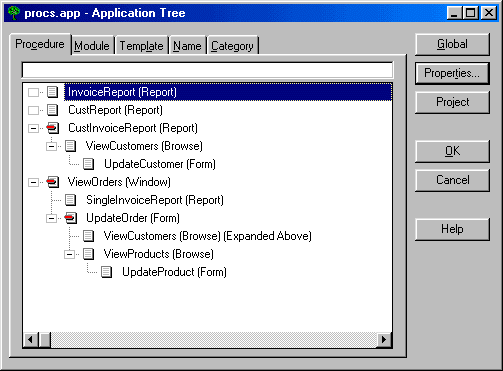
This will result in the APP tree looking like this:
One important point to note here is that currently NONE of these procedures will
be exported to other applications. So at this point you have to decide which functions
should be Exported (and hence available to other APPs). The simple answer is "All
of them" - and there's not much wrong with that.
To set a procedure as exported
- (Clarion 4 users do not need to do the following 4 steps as Imported functions
are marked as exported in Clarion 4.)
- go to the Procedure Properties for the InvoiceReport procedure
- set the Export Procedure switch On.
- press OK to return back to the application tree
- repeat this for every procedure

- When the procedures are all exported then go ahead ahead and click the Save
and Compile buttons.
Should you have any compile errors, look here at the
list
of errors in the Multi-Proj Complete Documentation
5. Creating the Main EXE Application
The last step is to create the EXE Application which will use the DLLs. This is
a pretty straight forward process. As before we create an app - I'm going to call
this one Main.
As before create a new APP (I'm going to call it Main).
- In Clarion close any applications that are open
- choose New Application.
- go to your \Clarion\3rdParty\Examples\MultiPrj\Tutorial directory
- fill in Main.app as the File name.
- make sure Quick Start is off.
- press Save.

When the Application Properties screen appears:
- fill in the dictionary file as Tutorial.dct (which is found in the
Tutorial directory)
- Fill in First Procedure as Main (which will be the main procedure)
- the Destination Type is set to EXE.
- make sure the Application Wizard switch is off.

Okay - so this creates another small APP which looks like this:

As before the APP tree will appear, and the first thing to do is :
- Click on the Global button to open the Global Properties Window
- in the General Tab
- turn On the Generate template globals and ABC's as EXTERNAL in DLL.

- On the File Control Tab
- set the Files to be All External
- Set "All files are declared in another app" on.
Now we add the Multi-Proj template again.
- Click on the Extensions button to go to the Extensions
- Click on Insert
- select Activate Multi-Prj Support from the list.
- in the General Tab type Main as the file name
- note that this time the "Export File Structures", "Export
Your Global Data" and "Export Template Global Data" options
should all be Off
- note also that the App Number is not entered. This is
because this is an Exe, and Exe's don't need to be rebased.

- Leave the Template Tab blank.

You do not need to set this up for an EXE, as other parts of your project can
not talk to an EXE. This is what DLLs are for, and so we can leave this blank.
You do not need to do anything in the Resources Tab
- Move to the Versions Tab
- click on the Versions button
- click on the Insert button to insert a new version
- type in 32 bit as a title for your version
- leave the Target Type as EXE
- change the Target OS to 32 bit
- set the Runtime Library to Stand Alone
- debugging to off
- target Name to Main32 (This will be the name of the EXE we will create)
- click OK
- click OK to get back to just the Extensions and Control Templates Window
 Adding the AllFiles Template
Once the Multi-Proj extension is added, we need to add the AllFiles Template that
we created when we compiled the Data DLL (AllFiles.app). Because this APP is going
to make use of the Data DLL (AllFil32.DLL) you need to add its
Activate AllFiles
Functions Extension.
- In the Extension and Control Templates Window click on Insert
- select Activate AllFiles Functions from the list.
Adding the Procs Template
Once the Multi-Proj extension is added, we need to add the AllFiles Template that
we created when we compiled the Data DLL (AllFiles.app). Because this APP is going
to make use of the Data DLL (AllFil32.DLL) you need to add its
Activate AllFiles
Functions Extension.
- In the Extension and Control Templates Window click on Insert
- select Activate Procs Functions from the list.
- press OK
- press OK to return to the application tree
 Application Project Properties
As before go we need to set the Application Project Properties.
- To do this click on the Project button. This takes you to the Project
Editor. (Remember we're editing the Project inside the APP file now.)
- Click on the Properties button to bring up the Project Properties
(Global Options) window.
- Make sure the Target OS is 32-bit
- Click on the Debug Tab
- Turn On the Debug options
- Click OK
- Remove the Target File by selecting it (main.exe) and clicking the Remove
File button.
- select Target File
- click the Add File button
- type in main32.exe (it won't exist so that's why we need to type it in)
- click the Save button
- click OK to return to the Application tree
- save the application

6. Importing Functions into the Main EXE Application
What we want to do now is to import the remaining functions (Main and Splash)
from the existing Single EXE (Whole.App) into our Main application.
- Make sure that Main.App is loaded
- Goto the File Menu, Import From Application
- Choose Whole.app
- Click Open (or double click whole.app)

In this case we're going to import the Main and Splash functions.
- click to the Name Tab
- click on the Main procedure to highlight it
- click on the Select button to select it with a tick
- do the same for the Splash Screen (i.e. select it)
- click on the OK button

- If a Procedure Name Clash window appears choose the Replace All button

This will result in the APP tree looking like this:
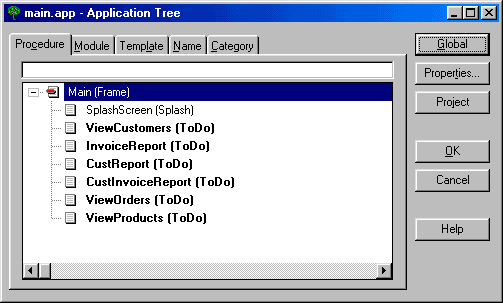
The last thing to do is handle all of these ToDo's. Actually this part might also
crop up when you split up the Procs DLL (if you do that). The method of getting
rid of these ToDo's is slightly different to the normal Clarion method. To set
these procedures as external, repeat the following process for each ToDo procedure:
- Go to the Application Menu and choose Insert Module.
- Choose Insert Module
- Choose ExternalModule in the MultiPrj Class
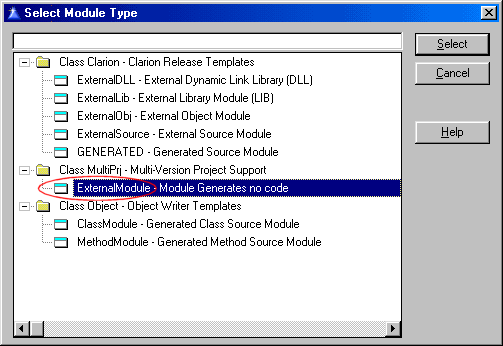
- set the name to be external.ico
- set the map include file to be empty.clw

- Double Click on the View Customers ToDo procedure
- TIP : In the following step do
not select the first ExternalProcedure that you see in the window. This ExternalProcedure
belongs to the ABC (or Legacy) Set.
- select the ExternalProcedure from the MULTIPRJ
class, not the ABC class or the Clarion class if you are using Legacy.

- click the Select button in the Select Procedure Type window
- make sure the module name in the Procedure Properties window is set to external.ico
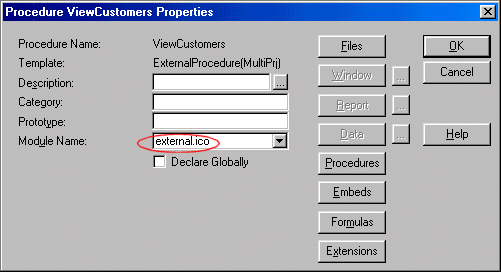
- click the OK button in the Procedure Properties window
- repeat this for each of the ToDo procedures
This is done so that you don't have to go to the extra step of adding each external
Library manually to the Application Tree. This is normally a requirement - especially
for ABC applications - but effectively prevents you from creating multiple versions.
Multi-Proj saves you time, and adds functionality, if you use this External Procedure.
You should now end up with an application tree that looks like this:

Okay, that's the EXE taken care of.
- now you can save and compile and run the EXE.
What have we done so far?
We have split the whole.app application into 3 separate applications. Two of these
are DLLs and the other one is the main.exe

We have compiled the two DLLs (allfil32.dll and procs32.dll) and main32.exe in
the Clarion IDE. This results in us having a debug version of the DLLs and the
main32.exe so that we can debug our project. The next section will show you how
to use the Multi-Proj Manager to produce non-debug versions of these DLLs and
main32.exe so that you can ship your product to your clients.
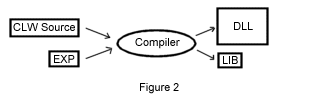
The Data DLL
The Procs DLL
This Tutorial starts where the Basic Tutorial finishes.
The goal of this tutorial is to create 2 sets of the program, where each set
uses a different File Driver.
A completed set of files for this tutorial can be found in
the \Clarion\3rdparty\Examples\Multiprj\DriverTutorial filder.
During this tutorial we will take the original application
(already split using the Basic tutorial) and set it so that it generates both a
TOPSPEED version, and a MSSQL version.
The Data DLL - Multi-Proj Extension
Open the Data DLL (Allfiles.App) in the Clarion IDE.
Go to the Global Extensions
Highlight the
Multi-Proj extension, and go to the
Resources tab.
Tick on the option
Enable Driver Substitution.
Then click on the
Override Driver Possibilities button. Click on Insert
to add an override possibility.
Tip : In this example
I'm only going to create 1 override, changing Topspeed files to MsSQL files.
However you can add as many different overrides as you like here. I
recommend doing one at a time though until you get the hang of it.
- Set Conditional Define to MSSQLDRIVER (
- Set the From Driver to TOPSPEED (this is the driver
actually set in your dictionary).
- Set the To Driver to MSSQL (This is the new driver we
want to support)
- Set Max Field Length to 0. MsSql has no maximum field
length, but some backends do.
- Set the name prefix to dbo. (including the .) This is
dependant on your MsSQL setttings, but dbo is the most common setting.
- Set the owner field to a valriable called glo:owner.
(We'll make a glo:owner field as well if you haven't done so.)
- Set the Send parameter to any options you want for the
file. I like the /ZEROISNULL setting for MsSQL because it allows character
zero in my strings. Read the Clarion driver docs for the settings available to
each driver.

Ok, That's the resources tab taken care of, now move to
the Versions tab.
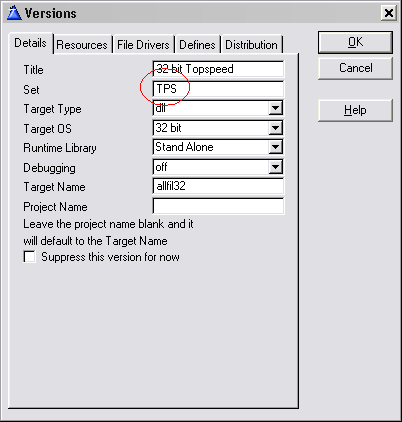
First make 2 changes to the version that is already there.
- On the Details tab set the set to be TPS. In a multi-dll
situation the SET issue becomes quite important. We're ultimately going
to make 2 versions of the data dll, 2 versions of the procedures dll, and 2
versions of the exe. Somehow we need a way to link the exe with the
right procedures dll, and with the right data dll. We do this using the
SET. ie items in the same set are linked together. the set name is
arbitrary.
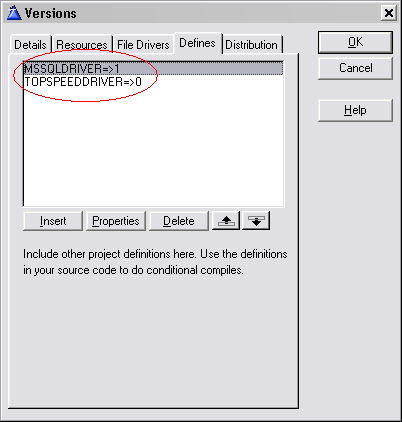
- Then on the defines tab set the various defines for all
the versions. These compile options tell the compiler which set of files
we're going to use in this application. Notice that all versions have
their own define, and only one is set to 1. In this case this is the
Topspeed version of the data dll, so the TOPSPEEDDRIVER define is set to 1.
All the other defines are set to zero.

Ok now we're ready to add the second version. In
many ways this is similar to the first;
- Notice we've included what it is in the title.
- The SET is set to MSSQL this time, instead of TPS.
- The Target Name is set to AllFilMs instead of AllFil32.
The names can be anything, but obviously each version needs a different name.

On the File Drivers Tab Add the MSSQL driver, plus any
other driver that this version will need. Almost always the DOS driver is
necessary.

On the Defines tab notice that this version has the
MSSQLDRIVER define turned on and the TOPSPEEDDRIVER turned off.
The Data DLL - Global Data
If you don't already have one, create a global data
variable called glo:owner. this should be a String 255. Remember we used
this on the Resources tab when we created the MsSQL option.
The Data DLL - The Connect Procedure
When you are going to use a SQL backend, instead of a
Topspeed backend, then you'll need to add a Connect procedure to your
application. I like to put this in the Data DLL, because it s
fundamentally related to the data.
The exact way you do your connect procedure will depend on
your particular circumstances. If you have File Manager 3 (for example) then it
already has features to help you make this procedure.
The goal of the Connect procedure is simply to set the
glo:owner variable appropriately, and then to open a file. This procedure
can be very simple, or more complicated depending on your personal style. In the
completed tutorial you'll find a Connect procedure that I use.
Notice particularly the way you can use conditional
compile statements to make the behaviour different in each version. For
example in the Topspeed version the connect procedure actually does nothing, it
simply returns to the caller.
The Connect procedure needs to be called, and a good place
to call it from is the Global Setup Program Embed (in the Data DLL).
Tip : What a lot of
people don't know is that in a multi-dll situation the code in the Data DLL is
actually run, before the start-up code in the exe. Since you need to connect to
the database before pretty much anything else happens, a good place to call the
Connect procedure is in the Data DLL.
The Data DLL - Project Settings
As you know by now Multi-Proj generates a number of PRJ
(Project) files - one for each version you are making. But in the APP
itself is also a built-in Project. Since it's important that the App
continues to compile, it's a good idea to set the DEFINES in this project as
well.
With the App open
click on the Project button
click on Properties
and go to the Defines tab.
there, set the 2 defines.
We could choose either of the versions, but in this case I'm going to set the
APP to compile the Topspeed version.

Now go ahead and compile the Data DLL, to make sure it
still compiles ok.
The Procs DLL - Activate Allfiles Extension
The last thing we set in the Data DLL was the settings for
which version the Data APP will actually make when it is compiled.
Similarly we need to set the Procs DLL. The first place to do this is on the
Activate AllFiles global Extension. Select from the list of SETS, and set this
APP to use the TPS set.

The Procs DLL - Project Settings
In the same way as we did for the Data DLL, The Procs DLL
needs to have the internal project settings set.

The Procs DLL - Multi-Proj Extension
The necessary additions and changes here are exactly the
same as for the Data DLL. In summary;
- Resources Tab;
- Enable Driver Substitution ON
- Override Driver Possibilities;
- Settings as below. Note that because this isn't the
Data DLL, the Owner and Send settings are not required.
- Versions Tab;
- Change SET and DEFINES for existing version
- Add new version, paying particular attention to the
SET, TARGET, DRIVERS and DEFINES.
The Main EXE
The settings for the Exe, follow the same as for the Procs
DLL.
In summary;
- Set the Defines for the Internal Project
- Set the SET for both the Activate_AllFiles, and Activate_Procs extensions

- Set the Driver Substitution parameters on the Multi-Proj Resources tab
- Set the SET and DEFINES for the existing version
- Add the new MSSQL version.