Introduction
Office Communication Made Easy...
CapeSoft Office Messenger is a peer to peer office instant Messaging
program. It's great for sending all sorts of messages instantly
to your office colleagues and it's easy enough for everyone to use.
We've designed CapeSoft Office Messenger to offer you all the functionality
of a high-quality Office Messaging application, while keeping the
setup and options to an absolute minimum. This means anyone in your
office can use Office Messenger with little or no training required.
Trial Version and Pricing
CapeSoft Office Messenger installs with a 30 day trial license.
To continue using Office Messenger after 30 days purchase a full
license for just US $6. Non-profit organizations and educational
institutions can purchase NFP licenses for just US $4 per seat.
See the
Downloads section
to download the latest version. Upgrades to new versions are
FREE.
Downloads
See the
downloads section for downloads.
What People Are Saying
- "We originally downloaded Messenger as a trial because
we needed something like that for one particular day. But
we ended up everyone wanting it and now we cant live without
it! The saving on yellow post-it notes alone will easily
pay for it!" - Stuart Begg
- "We are using it for internal office communication
and it works well, plus no worries about viruses using it
to propagate. Simple to use, does not try to do anything
but basic messaging, and this makes it successful."
- Daan Marais
- "Works as intended and designed (it's a CapeSoft
product - what do you expect!) :)" - Benjamin
Krajmalnik
- "Use it every day, very effective tool for my small
company." - Don Harvey
- "Every day. Works great. Just as advertised."
- Dave Schwartz
Purchase
CapeSoft Office Messenger is available in two version,
Office Messenger and
Office Messenger Professional.
In addition to the features provided by Office Messenger the
Professional Edition provides:
Automated Address Book (contact) updating across
the network.
This allows contacts to be marked as shared. Shared contacts are
automatically kept up to date for all instances of Office Messenger
on the LAN.
Contact sharing is fully configurable, and each user can choose
whether to send out contact updates, and whether to accept updates.
If updates are accepted the user can choose how updates will be
handled and what information can be updated.
Address Book Import
Import contacts from Microsoft Outlook.
Other Available Versions:
Not For Profit Version - CapeSoft Office Messenger NFP is available in two versions:
CapeSoft Office Messenger is available for purchase by
NFP (Not for Profit) institutions at $4 per seat from
our secure site:
www.clarionshop.com
Please note: you will initially need
to purchase two copies for the Office Messenger to work. |

www.clarionshop.com |
CapeSoft Office Messenger Pro is available for purchase by
NFP (Not for Profit) institutions at $7 per seat from
our secure site:
www.clarionshop.com
Please note: you will initially need
to purchase two copies for the Office Messenger to work.
|
www.clarionshop.com |
Source Code
Purchase the Clarion source code, you can then modify it and build your own
tailored application.
Important: Please read the
Source Code Requirements and License before purchasing. |
www.clarionshop.com |
Features
CapeSoft Office Messenger Provides:
- Automatically detects other users. No configuration
necessary. See which users are online.
- Messages are sent instantly or queued until the recipient is
online. You get a confirmation that your message was sent successfully.
- Stores message history for later retrieval.
- Has a simple-to-use interface which offers all the power of
a full instant messenger application, but all available through
this intuitive interface.
- Runs in your system tray.
- Automatically pops up on top when a message is received.
- Remote administration means you can set options
and register etc. without having to visit every machine.
- Automatic upgrading. Only one person needs to run an upgrade
(when new versions are released) and all the machines get upgraded.
- Automatically primes your message to allow you to reply with
the least effort.
- Does not require a server application. Just install the application
and it runs. No customization necessary.
- Features a full address book, automated sharing (Professional
edition), contact pictures, groups and more.
- Professional Edition provides automated Address Book sharing
across the LAN
- Professional Edition supports importing contacts from
Microsoft Outlook
- Supports Address Book export to CSV, HTML, PDF, XML, Word,
Excel and text, sending it via email, or printing it.
- Allows you to define your own groups and to send a message
to multiple users and/or groups at once.
- Avoid unwanted eyes from catching a glimpse of your message
by sending the message as "private".
- Printing of messages.
- Allows bulk deleting of messages from your message history.
- Has a 30-day demo license, allowing you to try out this cool
product before registering it.
- Application can automatically check for updates online,
download the updates, install them and automatically send the
update around the LAN.
License and Copyright
This program is protected by copyright law and international treaties. This means that after the 30 days evaluation you should only use this software if you have paid for it. One license is required for each copy that you run. i.e. If you are running this program on three machines you need to purchase three licenses.
If you need more than 30 days to evaluate the product please contact for an extended trial period.
License Agreement
CapeSoft Software, employees
of CapeSoft Software and Dealers of CapeSoft Software products explicitly accept no liability for any loss or
damages which may occur from using this package. This package is
used entirely at your own risk.
Use of this package constitutes agreement with this license.
Please contact

should you have any queries.
Source Code License
Purchase the Clarion source code, you can then modify it and build your own tailored applications.
Requires:
Clarion
6.1 or up ,
NetTalk,
WinEvent
and
HyperActive.
The price of $499 does not include these products.
Recommended: Secwin
is not required but recommended and can be used for registration
features.
SendTo
is used to allow the address book and other information to be exported
to MS Word and Excel, PDF, printer, email or CSV files. In addition
version 3.01 adds CapeSoft
SafeUpdate
support for fully automated and secure downloading of cryptographically
signed updates.
To purchase CapeSoft Office Messenger Source,
go
here.
The source code ships under the following license agreement: You
may add this code to your own applications, and ship those applications
without paying any royalty to CapeSoft, as long as the primary function of the application you are shipping is not Instant Messaging. If
Instant Messaging is the primary purpose of your application, then
you need to pay a $3 royalty fee to CapeSoft, per copy of your application
that you distribute. Please contact CapeSoft for more information.
Free Updates Policy
CapeSoft Office Messenger has a free updates policy, once you have paid for a version of Office Messenger you receive updates for that version for free.
Screenshots
The Main Window
The main Office Messenger window, which provides access to all
the Office Messenger functionality.
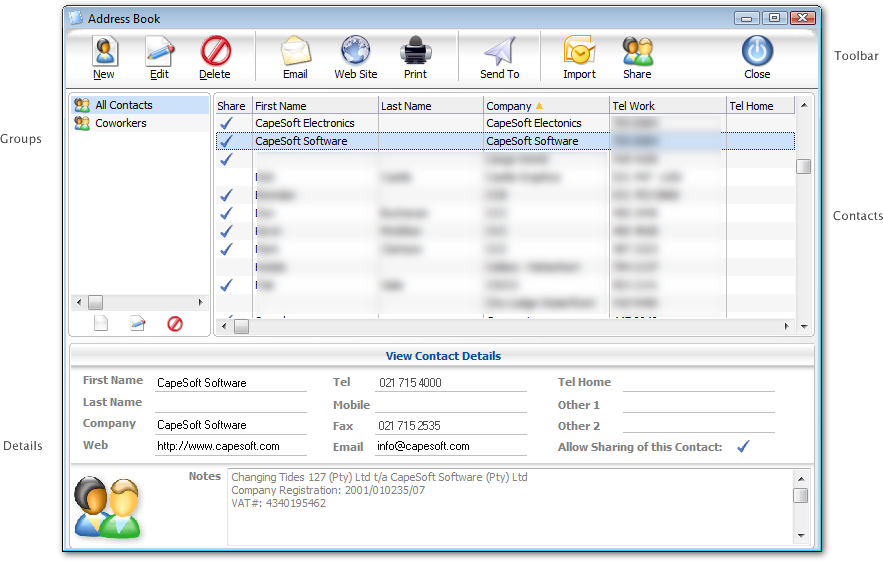
 Address Book
The Address Book is used to capture general contact information
and can be shared between all the users of CapeSoft Office Messenger.
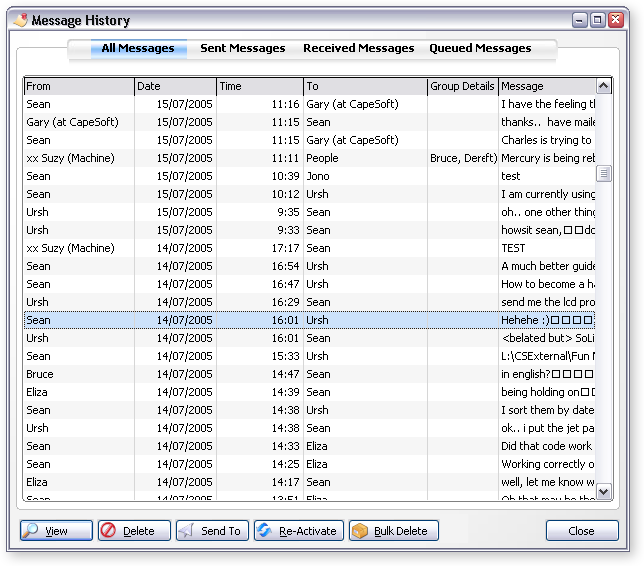
 Message History
The Message History window displays all the the sent and received
message, as well as messages waiting to be sent.
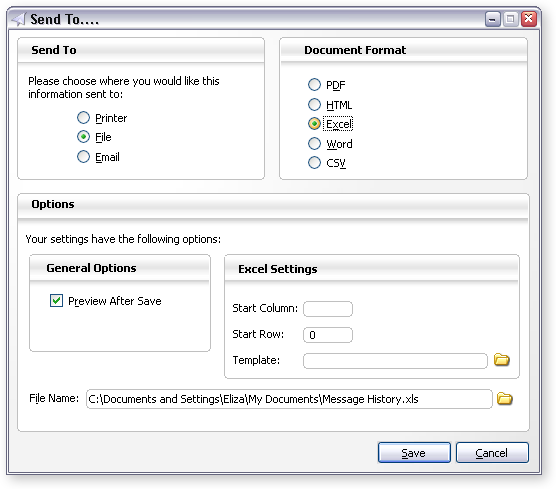
Send To
The
Send To button on the
Message
History and
Address Book windows allows
you to send the list to a printer, email or file. A number of file
formats are supported, including PDF, HTML, Microsoft Excel ®,
Microsoft Word ® and CSV (Comma separated fields in a text file).
Please note that Microsoft Word and Excel both require Microsoft
Office ® 2000 or newer.*
Installation
System Requirements
- Runs on 32 and 64 -bit Windows platforms (e.g. Windows 95, 98, ME, NT, 2000, XP & Vista)
- Needs TCP/IP Installed.
TCP/IP runs on most networks now-a-days. If you need help installing
TCP/IP click here.
- At the moment Office Messenger won't work through a WAN (Wide Area
Network) router, but will run on most LAN's (Local Area Networks).
This basically means that it will run on most office network setups.
Installation Instructions
Once you have downloaded the file, please run the executable file and
the install program will guide you through the installation.
First-time Installation
- Install Office Messenger on each machine. (Office Messenger must
be installed on at least two machines to work).
- If you can't see anyone in your "To:" list then look at
the TCP/IP section.
Subsequent Upgrades
- You only need to upgrade one machine
and all the other machines will be upgraded when they send to or receive
from the upgraded machine.
- Shut-down Office Messenger.
- Run the Office Messenger setup program.
Registration
This software is copyright. This means that after the 30 days evaluation
you should only use this software if you have paid for it. One license
is required for each copy that you run. i.e. If you are running this program
on three machines you need to purchase three licenses (i.e. 3 Users).
To register your required copies of CapeSoft Office Messenger, proceed
as follows:
- Go to the CapeSoft Office Messenger program page and purchase the
program using the shopping basket.
CapeSoft Office Messenger Order Form
- Select the Order link and scroll down and complete the On-line form
and then press the "Place order" button.
- Once you have placed your order and payment has been confirmed, your
Activation code will be e-mailed to you.
- Select the Register Product
from the Help drop down menu
and the following window will be displayed.
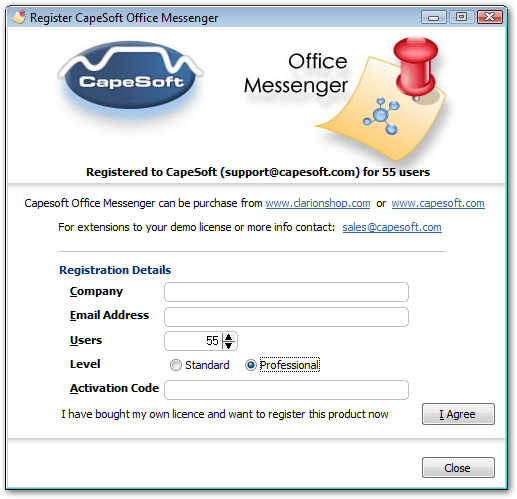
- Type in your Company name and e-mail address as it is provided to
you on the Activation e-mail/fax sent to you. It is important to remember
that all the Registration inputs are case sensitive and must be typed
in exactly as per the Activation notice.
- Type in or use the arrows to set the Users field for the correct
number of users Office Messenger has been registered for.
- Select either Standard or Professional depending on the version you
have purchased.
- Enter the activation code and click the I agree button.
How to add TCP/IP to your network
Note: Windows XP, Windows Vista and Window Server
always have TCP/IP installed, so you don't need
to install it if you are running Windows XP or Vista.
For Windows 95/98/Me, follow the steps described below.
Should your company have a network administrator,
please consult them before making changes to a computer's network settings!
- Select the Windows Start
button, then the Settings
menu, and then the Control Panel
from the Settings menu.
- Double click on the Network icon.
- Click Add and then select
the Protocol option from the
browse box and click Add.
- Select the Microsoft option
from the left-hand browse box.
- Select the TCP/IP option
from the right-hand browse box and click OK.
- The TCP/IP protocol is now added to the Network components browse
box on the Configuration tab
on the Network screen.
- Highlight the TCP/IP protocol
and click the Properties button.
- Select the IP Address Tab
and click the Specify an IP address
radio button.
- In the IP Address field type
in the IP Address ( e.g. "192.168.2.4" - 192.168.2.* is
a fixed local address in terms of IP addressing, so you can use the
last digit to set the unique IP address of each local user), and in
the Subnet Mask field enter
the mask "255.255.255.0". Note: Each user must have a unique
IP Address.
- Click the OK button.
- Click on the Identification
tab on the Network screen
and check that the computer name, workgroup and computer description
are correct (this will be used for identification purposes for servers
and clients).
- Click the OK button and exit
from the control settings screen.
Important:
You do not have to have a network card or be on a network to make CapeSoft
Office Messenger work, as long as at least one TCP/IP adapter is setup.
An adapter is a physical device like a Network card or a Modem. If you
don't have a modem or a Network Card in your computer. You can still add
a Modem in your Network settings even though it's not present. (CapeSoft
Office Messenger works when a TCP/IP modem adapter is setup in the Network
properties even if the Modem is not plugged into the machine or connected
to the Internet.)
How to check if TCP/IP is installed on your computer
Note: Windows XP and Windows Vista always has TCP/IP installed, so you don't need
to check this if you are running Windows XP and Vista.
To check if your computer has TCP/IP installed you can do the following:
- Select the Windows Start
button, then the Settings menu,
and then the Control Panel from
the Settings menu.
- Double click on the Network
icon.
- Look in the top list box in the Configuration
tab.
- If you do not see an entry that starts with TCP/IP then you have not installed TCP/IP.
You can install it using the How to
add TCP/IP instructions.
If TCP/IP is installed on your computer and you still cannot see anybody
in your Office Messenger "
To:"
list, then it might be the case that you have a personal firewall installed
on your computer. You need to make sure that the firewall has been configured
so that the following ports are available for Office Messenger to use:
UDP port number (streamed port): 2230
TCP/IP port number (datagram port): 2240
Operation
General
Once CapeSoft Office Messenger has been installed, a CapeSoft Office Messenger
icon will be displayed in the taskbar status area as shown below.

Left-clicking on the icon will open the CapeSoft Office Messenger window.
Right-clicking on the icon will bring up a pop-up menu that enables you to:
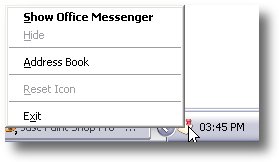
- Show Office Messenger. This
option will open the CapeSoft Office Messenger window and bring it
to the front so that you can compile and send a message.
- Hide. This option is used
to hide the CapeSoft Office Messenger window (minimize).
- Address Book. This option
will open the Address Book.
- Reset Icon.
If the program status area icon has been changed, selection this option
will revert the icon to the original.
- Exit. This option closes
CapeSoft Office Messenger. To restart, click Start, then
Programs,
then to the Startup menu and
select the CapeSoft Office Messenger
option.
Whenever a message is received, the CapeSoft Office Messenger Info
Window window will appear and the Receive Message alert will sound:
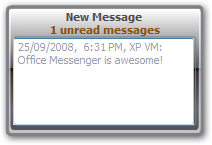
Clicking on the Notification window will display the main Office Messenger window:
When CapeSoft Office Manager is installed, a
shortcut is automatically added to the Startup program. This ensures
that CapeSoft Office Manager is always started when the computer
is started / restarted.

Main Window
Below is the main CapeSoft Office Messenger window. By clicking on the image a pop-up will provide information each that option (such as the buttons, menus etc.).
Also see below for more information on each option.
 |
Send
Send the current message to the selected recipient.
You can also use this to "Forward" a received message
- simply select the recipient to forward it to and press the Send
button. |
 |
New
Creates a new blank message. Creating a new message
will not overwrite or clear a received message. |
 |
Address Book
Displays your address book, which stores Addresses,
Telephone number, etc. |
 |
Back and Forward
The back and forward buttons allows you to navigate
through all received and sent messages that have not been marked
as read by pressing the "Done" button. |
 |
Recipients
Allows you to select multiple recipients for the
current message. You can also edit your groups from the Multiple
Recipient window using the Edit Groups button. |
 |
Done
Marks the current message as Done (Read). The
message will no longer display in the main window (you can still
view read messages by selecting View History from
the Tools menu, or by clicking on the History button. |
 |
History
Displays the History window with all message
sent, received and queued (waiting to be sent). |
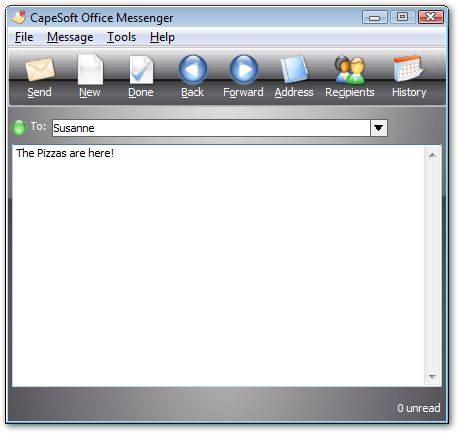
Send a Message
To send a message to a recipient, proceed as follows:
- With CapeSoft Office Messenger window open, use the To:
drop-down list box and select to whom the message is to be sent. All
users of CapeSoft Office Messenger will be listed and also if they
are currently online or not. Also any defined Groups will be listed
for selection. You can also use the Send
to More than One Person button to select and send the message
to more than one person or group.
- In the text box type in the message you wish to send.
Tip:
Clicking the New button
will create a new blank message. When you create a new message
the recipient selection drop down will automatically be selected.
When the recipient drop down is selected you can jump to a person's
name by typing the first letter of the name.
Tip:
All the list boxes and drop downs in Office Messenger provide
"locators" to allow you to get to an entry quickly
and easily. Simply type the first letter of the entry that would
like to jump to.
- If required, use the Send As
indicator and select how the message is to be sent:
- Green and the message will be displayed as
normal on the recipients screen.
The icon will change to green:

- Red and the recipient must click the View
Message button for the message to be displayed.
The icon will change to red:

- Click Send
and the message will be sent to the selected recipient.
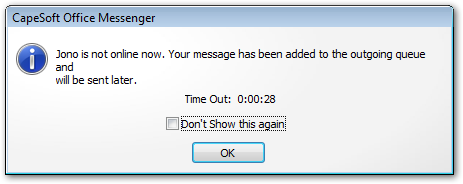
Tip: If the recipient to whom
the message is sent is currently off line, the message will
be queued and the following will be displayed:
Multiple Recipients
To send to a group that you have already defined select the group name
from the recipients drop down list and send the message as normal, it
will be send to everyone in the group. To manage your groups, send to
multiple groups, or send to multiple recipients who are not in a single
group:
- Click on the Recipients button
on the main window and the following window will be displayed.
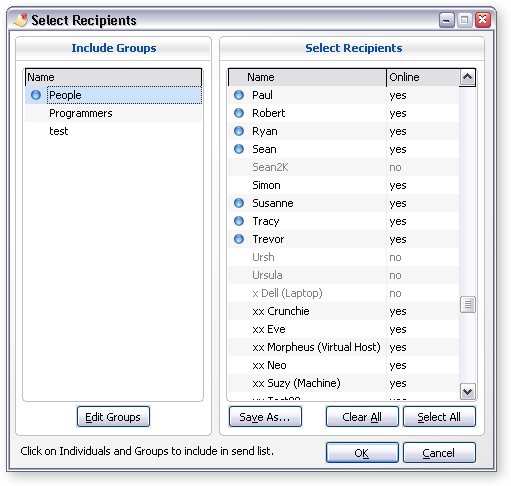
- Click on the Recipients
and Groups listed to whom
the message is to be sent (selected recipients are identified by a
blue dot). Clicking a second time on a recipient will deselect them
from the list. Any combination of Group and Recipients can be selected.
When you select a group, all recipients in that group will be added
to the current selection, deselect the group to remove the members
of that group from the current selection. To view or edit groups press
the Edit Groups button below the Groups list box.
- If you wish to save this selection as a new Group, click the
Save
as button and define the new Group.
- Click the OK button once
all recipient to whom the message is to be sent have been selected.
- Type your message in the text box and then click Send
and the message will be sent to all the selected recipients.
Receiving a Message
When a message is received, and audible notification will sound and the message will be displayed.
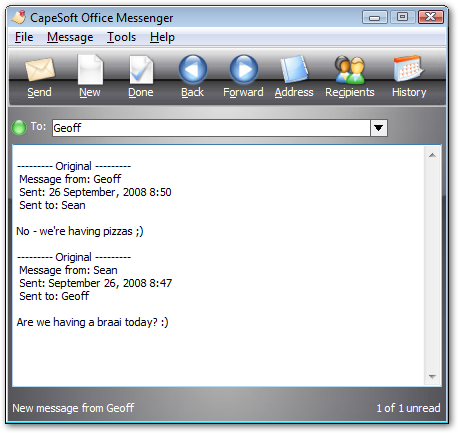
The following actions can now be performed:
- Close the message by clicking Done
and the message will be added to the History list and Office Messenger
will close.
- Respond to the message by typing in additional text and then clicking
Send to send the response
back to the originator of the message received.
- Print the message using the Print
option from the File drop
down menu.
- Restore the original message that you have received by clicking
Restore.
This is useful if you wish to send the same message to another recipient
without the message "to" and "from" information
being included.
Hidden / Private Messages
When a Hidden or Encrypted message is received, an audible notification
will sound and the following will be displayed:
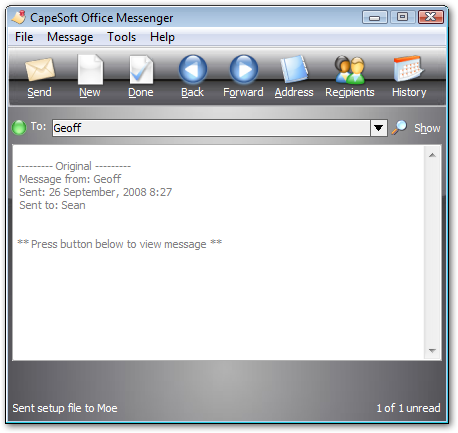
Clicking Show Message will enable the message to be viewed as per a normally received message.
Tip: You can receive all messages in this way using
the "Receive all messages as private" option from the CapeSoft Office Messenger Options window (To open the Options window
select Options from the Tools menu on the main window).
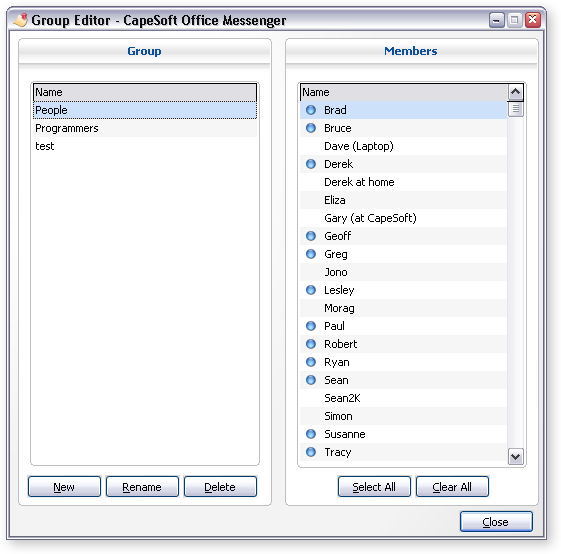
Working with Groups
Address Book
The Address Book is used to capture general contact information and can
be shared between all the users of CapeSoft Office Messenger.
- To open the Address Book, click the Address
button or select the Address Book
option from the Tools drop
down menu.
The order in which the details are listed
can be changed by clicking the the Header at the top of the window. For
example click on the "Company" header will sort by company,
clicking on the Company header again will reverse the sort order.
To find an entry in the list start typing
and the list will jump to the entry that matches what is typed. The
current search text is display on the View Contact Details header bar on
the right hand side. The search is based on the current order that the
list is sorted in, so to search on first name click on the First Name
header to sort the list by first name, and then starting typing the name
that you would like to find. The list will jump to the current matching
contact as you type.
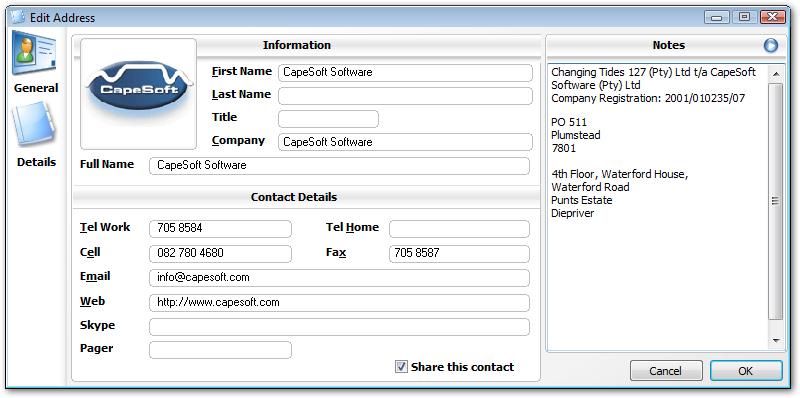
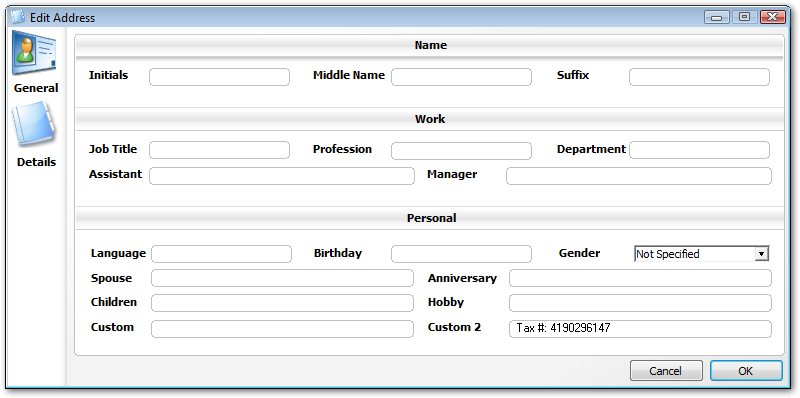
- To add to the Address Book, click the New
button and a field entry window will be displayed that is used to
enter the required contact information. To Edit and
address click on the Edit button, or double click an entry to edit
in the address list. To Delete an entry press the
delete button. You can also right click on an entry and select the
desired action from the popup menu.
Sharing Contacts
Office Messenger Professional edition supports
automated Contact Sharing, which allows shared contacts to be updated
across the network as they are added and maintained. This is disable
by default and can be enabled by opening the main Office Messenger
window, selecting the Tools menu, and then selecting the Options..
menu item. Click on Sharing on the left to display the Sharing
options
When a Contact Update is Received
Determines the application behaviour when a
contact update is received from another instance of Office Messenger:
- Ignored: Ignore all contact
updates. The address book will not be updated.
- Only New Information: accepts
contact updates, but does not modify any existing information. New
information is added to existing contacts, and new contacts are
added.
Contact Notes
Determines how Notes are updated.
- Do Not Update: never update
Notes fields (other field can be update, but not the Notes field)
- Append Notes: add any new
notes to the existing notes. This option is not used in most cases,
becuase every update will append the entire notes field to the
existing notes, which can result in duplication of notes.
- Overwrite Notes: replace any notes with those from the update.
Which Contacts to Update
Determines which contacts are updated
- All Contacts: Update all contacts if an
update is received.
- Only Shared Contacts: Only update contacts
that are marked as shared. New contact will still be accepted.
Sending Contacts
- Do not send contact updates: No contact
updates will be sent when contacts in this address book change.
Does not affect received contact updates.
Enabling Sharing for a Contact, and Manual Sharing
When creating and editing contacts, in order to share a contact
tick the "Share this contact" box on the Contact editing window. The
Shared status will be display as a blue tick in the Contacts list,
and in the Contact Details section at the bottom of the Address Book
window.

Manually sending a Contact Update.
To manually send a contact update to all other instances of
Office Messenger without updating the contact details press the
Share button on the Address Book toolbar.
Message History
To view the History file, proceed as follows:
- Select the View History option
from the Tools drop down menu.
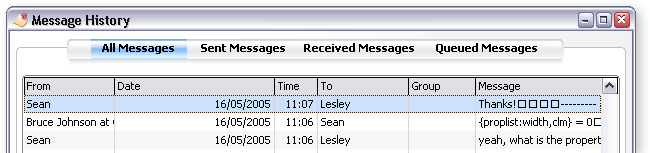
The
Message History window provides the following:
- A list of all messages received and sent
and the details of each.
- Message type options (click on the headings
at the top of the window) to select which messages are to be viewed.
- View
button that enables you to open and view
a selected message.
- Delete
a single message that has been selected and highlighted or Bulk
Delete messages that are older than a particular date.

- The Send
To button. This allows you to send the history list to a printer,
email or file. A number of file formats are supported, including PDF,
HTML, Microsoft Excel ®, Microsoft Word ® and CSV (Comma separated
fields in a text file). Please note that Microsoft Word and Excel
both require Microsoft Office ® 2000 or newer.*
- The Re-Activate
button. This allows you to re-activate a message that you have marked
as done, to mark it as "unread" so that it displays in the
main windows again. This does the opposite of pressing the Done button
on the main window (which marks a message as "read").
* Microsoft, Microsoft Office, Microsoft Word and Microsoft Excel are
register trademarks ® of Microsoft Corporation.
View a Message
To view a message in the Message History list, proceed as follows:
- From the Message History
window, select and highlight the message to be viewed and then click
the View button, or double click on the message.
- This will display the details for the selected message:

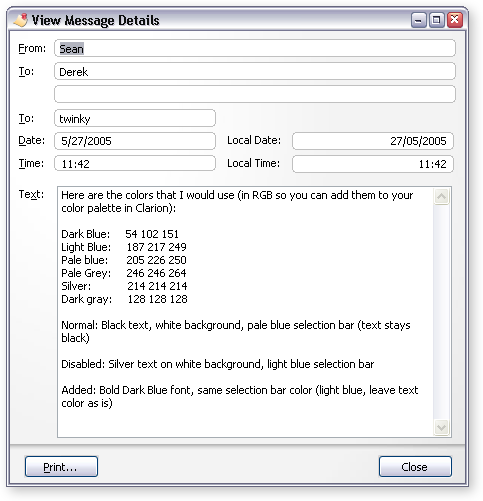
The
View Message Details window provides the following:
- The contents and information of the selected message.
- The ability to Print the message (including the header information,
such as the sender, recipient etc.).
- The ability to Re-Active the message (only for received messages).
This marks the message as unread and displays the message in the main
Office Messenger window. Essentially this does the opposite of the
Done button on the main window.
Options
The
Options window is used to
select how CapeSoft Office Messenger is to perform.
- To set the operating options select Options
from the Tools drop down menu.
Options: Messaging
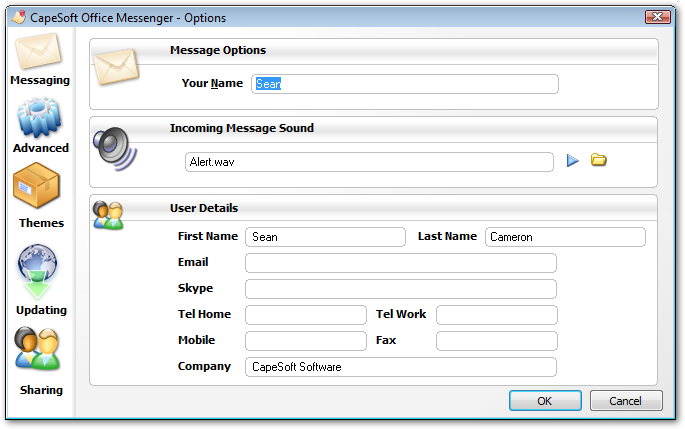
- Your Name.
This text box is used to type in the name that you want to use to
identify yourself and will be the name listed in the
To
drop down select box of all the other Office Messenger users.
- Incoming Message
Sound. This option allows you to specify a sounds that will
be played when you receive a new message. You can use any WAV file.
Use the yellow folder icon to browse your computer and select a WAV
file to play when a message is received. You can play the currently
selected sound by clicking on the blue play button. If you do not
want to have any sound play when a message is receive then leave this
box blank.
- User Details: The details for the
current user.
Options: Advanced
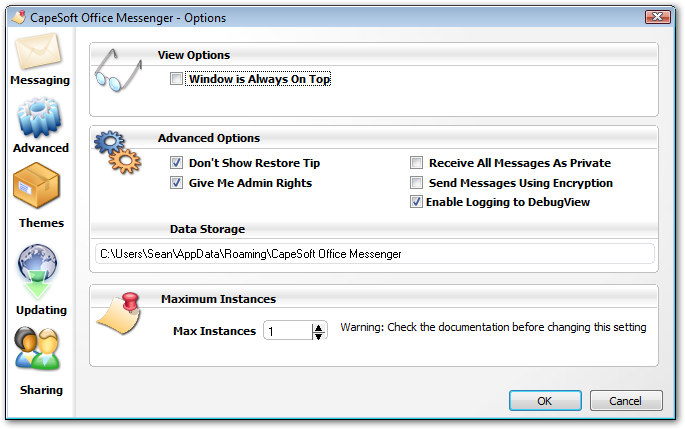
- Window is Always
On Top. This option enables you to select if the Office Messenger
window is always to remain on top (in the front of other windows).
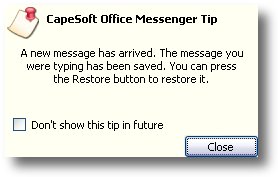
- Don't show Restore Tip. This option is used to select if the warning tip message,
that you will see when you receive a message while you are currently
typing a message, is to be displayed or not:
- Give me Admin Rights.
This option enables you to administer all copies of Office Messenger
that are currently running on computers that are connected to the
LAN to which you are connected.
- Receive All Messages
as Private. Used to select if all messages you receive are
to be Hidden.
- Send Messages Using
Encryption. This option is used to select if all messages you
send are to be encrypted or not. Encrypted ensures that message are
safe during transfer across the network.
- Enable Logging to DebugView:
Sends debug output to the Windows system debug output. This can be
viewed using the free DebugView tool from Microsoft. These logs can
then be sent to CapeSoft to allow debugging if an error occurs. This
only would typically only be used if CapeSoft support has requested
a debug log.
- Data Storage: The location of
Office Messenger's data files.
- Maximum Instances: This is only
display if Give Me Admin Rights is ticked. This option limits the
number of copies of Office Messenger than can be run at the same
time on a single machine. This is only needed when multiple copies
of Office Messenger are run on different accounts using Fast User
Switching, Terminal Server, Citrix etc. Do not change this value
unless you need to, as it will create additional network traffic.
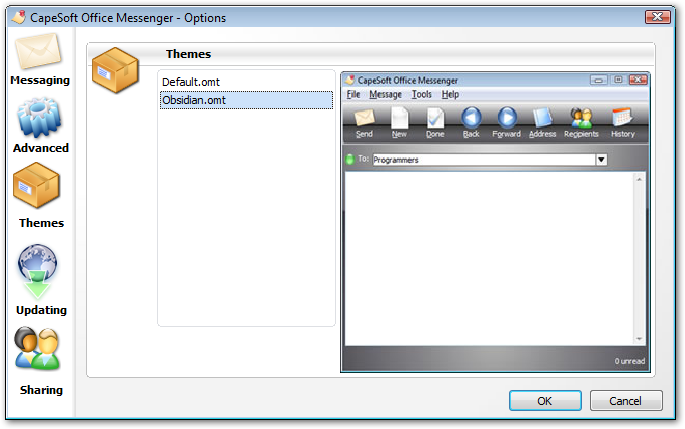
Options: Themes
Allows you to pick which theme to use with Office Messenger.
Click on the theme to select it - a preview will be displayed.
Options: Updating
Office Messenger can check for updates, download them and
automatically install them. From the Help menu on the main window
select the Check for Updates option.
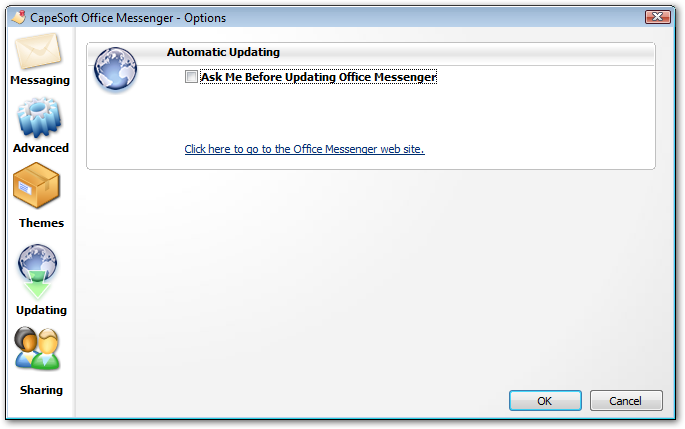
- Ask Me Before Updating Office Messenger:
When an update is found this will prompt you before downloading it.
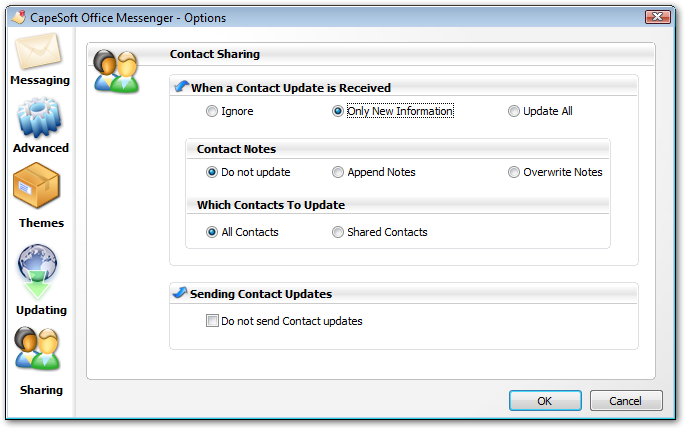
Options: Sharing
Contact sharing is only available in the Professional edition of
Office Messenger. Click here for a comparison between Office
Messenger Standard and Professional editions.

When a Contact Update is Received
Determines the application behavior when a
contact update is received from another instance of Office Messenger:
- Ignored: Ignore all contact
updates. The address book will not be updated.
- Only New Information: accepts
contact updates, but does not modify any existing information. New
information is added to existing contacts, and new contacts are
added.
Contact Notes
Determines how Notes are updated.
- Do Not Update: never update
Notes fields (other field can be update, but not the Notes field)
- Append Notes: add any new
notes to the existing notes. This option is not used in most cases,
because every update will append the entire notes field to the
existing notes, which can result in duplication of notes.
- Overwrite Notes: replace any
notes with those from the update.
Which Contacts to Update
Determines which contacts are updated
- All Contacts: Update all contacts if an
update is received.
- Only Shared Contacts: Only update contacts
that are marked as shared. New contact will still be accepted.
Sending Contacts
- Do not send contact updates: No contact
updates will be sent when contacts in this address book change.
Does not affect received contact updates.
Administration
Remote Shutdown
If you have been allocated Administration Rights (an
Option
selection) you will be able to remotely shutdown Office Messenger on other computers.
To remotely shutdown Office Messenger, proceed as follows:
- Select the Remote Shutdown
option from the Tools
drop down menu and the following window will be displayed:
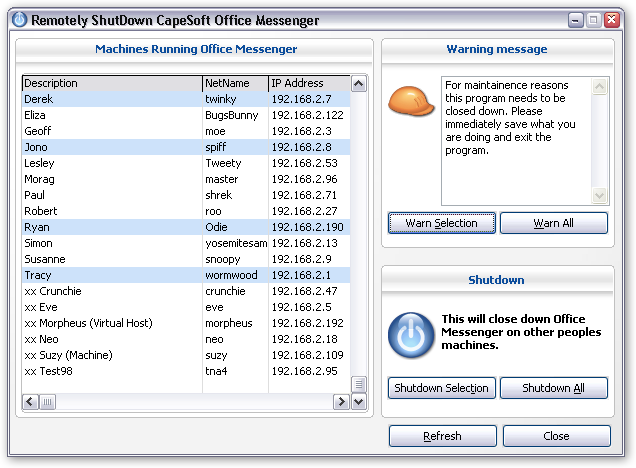
- Select and highlight the particular users of Office Messenger
that are to be shut down (only users who are currently running
Office Messenger will be listed).
- Type in a Warning message in the text box provided (or use
the default message) that will be sent to the selected users
notifying them that you are about to remotely shut down Office
Messenger currently running on their computer.
- Click Warn selection
and the Warning message will be displayed on the selected users.
The Warn All will send the message to all Office
Manager users whether selected or not.

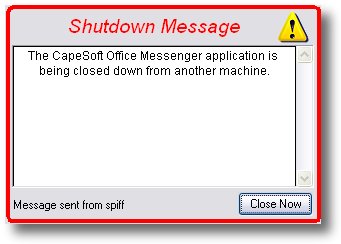
- After a few minutes (time enough for the users to respond to
the warning message) click the Shutdown
Selection button. A message will be displayed on the
remote users selected and Office Manager will also be shutdown.
The Shutdown All button
will shutdown all users whether selected or not.
- Clicking the Refresh
button will refresh the list of users who are currently using
Office Messenger.
FAQ
-
Question: Can I change
the sound file that is played when a message arrives?
Answer: Yes, you can put a different alert.wav file in the application
directory. This is the sound file that is played.
-
Question: If I am
typing in a message and a new message arrives, the message I am
typing in seems to disappear. Is this meant to be like this?
Answer:
If this is still happening to you, please download version 1.4
as there is now a restore button that allows you to restore to
the screen the message you were previously typing.
-
Question: Once I receive
a message, what can I do then?
Answer: Once you receive a message, you can:
- Mark it as Done (press the Done button) this removes the
message from the list of messages that you can look through
by pressing the Next & Previous buttons. You can view
old messages in the Message History (in the Tools menu).
- Add some text and press the Send button which will reply
back to the person who sent you the message.
- Print the message using the Print option from the File drop
down menu.
-
Question:
How to I tell Office Messenger to load a different Address Book application?
Answer:
You can override the existing Address Book, by placing a shortcut
to your own address book application in a shortcut called 'Address
Book' in the application folder.
-
Question: I get an
"Installation Corrupt" error?
Answer:
The file that you are using to install Messenger may be corrupt,
try downloading the MessengerSetup.exe installer again from the
web site.
-
Question: I'm running Windows XP and get
a message during installation saying I need to run this as an
Administrator?
Answer:
You're probably using a Limited User account. Office Messenger
has an auto upgrade feature. The simplest way to fix this is to
switch the current user to a Computer Administrator (from the
Control Panel-Users), or customize the Limited User account to
allow it to install files into Program Files.
-
Question: How can
I make CapeSoft Office Messenger work with XP and Vista Fast User Switching,
Terminal Services and/or Citrix?
Answer: This code is still in beta, but you'll need to follow the following
instructions:
- You need to get hold of v2.25 or later and
install this on your machine.
- You need to go to Tools|Options and turn on
the "Give Me Admin Rights" option, then set the Max
Instances option to the number of maximum instances that will
run on one box. For Fast User Switching you'll probably want 2
to 5. For Citrix or Terminal Services, you'll need to set this
to the maximum number of folk that connect through one Citrix
or Terminal Server machine. Click OK.
- Restart your Office Messenger.
- Then you need to send around a message to everyone
(this will send out your Max Instance value to everyone else (unless
they already have a higher number). In the message it will be
worth asking people to shutdown their Office Messenger (File |
Exit) and then to restart it again (Start | All Programs | StartUp
| CapeSoft Office Messenger).
- All installations must be installed as a Computer
Administrator (not a Limited User account).
- Once everyone else has restarted their Office
Messenger they should be able to see multiple instances of Office
Messenger on the same machine.
-
Question: I am getting
"CapeSoft Office Messenger is already running on this machine.
Press Ignore to allow this program to run (but you won't be able
to send or receive messages), or press Cancel to quit the program
now" messages, what should I do?
Answer: You can get these messages when you are doing either of two things:
- You have run the application twice on the same
machine, and it's giving you the chance to cancel this if you
don't want to run it twice.
- lf you are purposely trying to run multiple
copies (for instance you have fast user switched to another account,
or you are using Terminal Services or Citrix). Then you'll need
to do the following:
- Press Ignore - to allow the application to run
(although it can't send or receive messages yet)
- Go to Tools | Options and turn on the "Give
Me Admin Rights" option, then set the Max Instances option
to the number of maximum instances that will run on one box. For
Fast User Switching you'll probably want 2 to 5. For Citrix or
Terminal Services, you'll need to set this to the maximum number
of folk that connect through one Citrix or Terminal Server machine.
Click OK.
- Restart your Office Messenger.
Tip: Also have a look at FAQ 6.
Contact Information
| CapeSoft Support |
| Email |
 |
| Telephone |
+27 21 715 4000 |
| Fax |
+27 21 715 2535 |
| Post |
PO Box 511, Plumstead, 7801, Cape Town, South Africa
|
| CapeSoft Sales |
| Web |
www.capesoft.com |
| Email |
 |
| Telephone |
+27 21 715 4000 |
| Fax |
+27 21 715 2535 |
| Post |
PO Box 511, Plumstead, 7801, Cape Town, South Africa |
Download
Click
here to Download Office Messenger
(Full version and Trial version)
Once you have downloaded the file, please run the executable
file and the install program will guide you through the installation.
For further information please consult the
Installation
section in this documentation.
The same setup program installs
the full version, the free 30 day trial version and upgrades
older installations to the latest version.
Version History
Office Messenger 4.12 (16 March 2011)
New in this release
- New: Import Old Address Book option in the
File menu. Used to import very old Address Books that aren't
migrated automatically when installing a new version.
Office Messenger 4.11 (16 March 2011)
New in this release
- New: Optional administrator password
- New: Administrator settings
- New: Option to limit the deletion of History items to users with
Administrative permissions
Fixes
- Fixed: a potential "security file corrupt" error preventing
program registration when a new version is installed during the
demo period (installing a new version will not extend the demo
license, but it will upgrade the current copy to the latest
release).
- Fixed: Inability to automatically upgrade
over the LAN as a result of a path error. Note that if the
version being upgraded from has this bug, the installer will
need to be run manually on affected workstations.
Office Messenger 4.07 (26 September 2008)
New in this release
- New: The notification methods for new messages has changed. A
small popup window is now displays in the bottom right hand
corner of the primary monitor (above the taskbar if there is a
taskbar on the bottom of the primary monitor). This notification
window is always displayed on top of other windows and does not
grab focus or otherwise interfere with the whatever application
currently has focus. When the window is clicked on it displays
the main window.
- New: Office Messenger is now available as both
Standard and Professional editions.
For information on the differences between Standard and
Professional editions, and the upgrade options
click here.
- New: The Note field for each Contact can now contain up
to four time more data than previous releases.
- New: New backend and automated upgrader for version 3
data. The new backend provides a large number of additional
fields for the Address Book as well as support for new features,
integration with CapeSoft FeMail, Address Book import from
Outlook (Professional Edition only) and more.
- New Mess4Upgrade application that the installer calls
during the upgrade process to handle intermediate file upgrades
that must be done separately:
- Rename Groups to ToGroups
- Groups.tps becomes ToGroups.tps (prefix stays as GRO)
- All code that references the Groups tables changes to
reference the ToGroup table
- The installer runs the upgrader if the old version is a
version prior to 4.00
- New: Auto upgrades the data and adds the required new
tables and structures:
- Address table becomes Contact
- Address Prefix changes from ADD to Contact
- Address.tps becomes Contact.tps
- Completely new contact table that contains all the old
fields and a number of new ones, as well as name field
changes: TelHome -> HomePhone, Tel -> BusinessPhone, Cell ->
Mobile, Fax -> BusinessFax, Email -> EmailAddress and Web ->
WebPage.
- This provides compatibility with FeMail as well as
Outlook (to provide import and export of Contacts to and
from Microsoft Outlook).
- New: Groups table (group.tps) provides Groups in the
Address book, allowing contacts to be sorted into groups for
easy management. A contact can be in multiple groups.
- New ContactGroup table provides group functionality for
contacts.
- New ContactImage table provides images for contacts.
- New ContactAddress table allows any number of addresses
to be specified for each contact.
- New: Office Messenger and FeMail now share the same data
structures.
- New: "Remember this" option for all message and alert
windows.
- New: Auto close for all warning and message windows.
- New: Groups for contacts, to allow contacts to belong to
one or more groups. By default all contacts are added to an 'All
Contacts' group. As many groups as desired can be added and
contacts can be dragged and dropped between groups, or
Control-dragged and then dropped to copy the contact into a new
group (the contact is then a member of both groups). This allows
a contact to be a member of any number of groups, even
though there is only one actual contact record. Contacts are
always a member of the 'All Contacts' group, and can optionally
also be a member of as many other groups as desired.
- New: Automatic upgrading for the Contacts, all contacts
are automatically added to the All Contacts group.
- New: New Address Book window and Contact update window
- New: Group Update window.
- New: Address Import from Microsoft Outlook
(Professional Edition Only).
- New: Themes, which allow the look of the application to be
changed on the fly by selecting the desired theme from the
Themes tab on the Tools->Options window.
- New: Options window adds Themes support, and cleans up
the window into specific sections
- New: Code signing certificate for the application,
installer and automatic update process.
- New: New installer.
- New: New fields to the Contact update window, the ability to
set a picture for contacts, and split the fields into two
sections (Details)
- New: New Tools Options window, now split into separate
sections.
- New: New "Obsidian" theme.
- New: Automatic Contact Sharing (Professional Edition Only).
When a contact is edited that has the Shared This Contact option
enabled (tick) then if the changes are saved, the new details
are automatically sent to all other instances Office Messenger
running on the local network. Only instances running
Professional edition support automatic contact sharing, this
feature is not available in Standard edition. For information on
the differences between Standard and Professional editions, and
the upgrade options click here.
- New Options window provides separate sections for each set
of options, as well as providing new options for Contact Sharing
(Professional Edition Only), user details, themes, and more.
Changes
- Changed: The security file is now stored in the application
data directory rather than with the application.
- Changed: Auto updated no longer use the Program Files
directory, allows for fully Vista and Windows Server 2008
compatibility.
Fixes
- Fixed: Office Messenger window not popping to the front
when a new message was received, and the main window was open,
but not topmost.
- Fixed: Auto update code crashing the application on a small
number of systems.
- Fixed: A focus bug that could cause the focus the get
"stuck" on the application until any control other than the
Recipients dropdown was selected.
- Fixed: New Automatic Update code to allow updates to be
checked online and automatically downloaded and installed if
available. The previous version was causing the application to
crash on a small number of systems.
- Fixed: "Application still active" message on Windows
shutdown/restart.
- Fixed: New version of the security library, resolves
problems and errors with activation and licensing.
Office Messenger 3.02 (19 September 2005)
- After completing an automated update the program could display
an erroneous error message.
- Fixed an incorrect "Error 47" message when upgrading
from an older version of Messenger.
Office Messenger 3.01 (12 September 2005)
- Automatic updating - Office Messenger will now automatically
check for a new update when requested to do so. Office Messenger
can then automatically download and install the new version. Downloads
are cryptographically signed, and the update check also ensures
that a valid signature is present when checking for a new version.
This ensures that a legitimate file is downloaded and run, and
that the file is valid and correct.
- Added CHM file download link to the documentation. PDF coming
soon!
- Minor corrections to documentation (primarily typographic).
- When selecting a message that was sent in the History window,
the "reactivate" button is now disabled. Only received
messages can be reactivated.
- Added new icons to the main window menu.
- Updated header sorting for the Address Book (click the heading
for each column to sort using that field. Click again to reverse
the sort order).
Office Messenger 3.00 (11 August 2005)
Messenger General
- Fixed the program causing an error when exiting.
- Add all commands to menu( public/private/new etc.)
- Numerous fixes an improvements to ensure that messenger comes to
be front without grabbing focus
- The messenger window now appears "out of focus" when it
is (rather than appearing in focus, even though it never received
focus).
- The new version of Messenger has a large amount of new "internal"
functionality, in order to make sure that It Just Works. If you never
notive this then we will consider it a job well done!
- Data is stored in the Documents and Settings folder for newer versions
of Window (Windows 2000 and later), and copies the old data across
if it exists. This allows each user to have their own data. Upgrading
to the new file format and storage location is fully automatic.
- Support for multiple users on a single machine, note that you can't
use multiple copies at the same time (for example with fast user switching),
other than that you can have any number of people on the same computer
who use Office Messenger, each will have their own data storage.
- Fixed blank message arriving (no sender, no body content etc.).
- Fixed a GPF when the Windows firewall was and there was no license.
If searching for a license was cancelled the registration windows
would open and the application would cause a GPF when the window was
closed.
- Fixed the message not always sent to the correct recipient (the
entry in recipient drop down was not correctly reflecting the selected
recipient).
- Added code to save the column width on list boxes.
- Fixed problem with the recipient drop down opening when the down
arrow key was used after the window was closed by pressing the Esc
key rather than using the close button.
- Added styles to all the list boxes (alternate rows are colored
differently, text is styled to indicate it's type etc.)
Register Window
- Fixed colors and links
- Fixed incorrect capitalisation
- Fixed wrong cursor when moving the mouse over links
- Cleaned up position of information on the window
Documentation
- Fully updated docs, with more information and new screen shots of
the 3.0 interface. More changes to come.
Main Window
- New icons
- New look and feel, the list box now displays groups and special
entries in different colors, adding colors to alternate rows and offline
users are now grayed out.
- If the program exits incorrectly or an error causes it to close
nd error report is created and the program will restart itself.
- The groups and multiple recipient buttons have been merged to a
single "Recipients" button and the interface for managing
recipients and groups cleaned up
- Added a print preview and a Printer Setup option.
- Fixed a problem with users sometimes disappearing or going offline,
fixed a number of issue with the automatic detection of users.
- Menu items now have icons
Multiple Recipient Selection
- Added coloring and styles to the list boxes (alternate rows colored
differently, groups and special entries highlighted etc.).
- Fixed typographics errors
History Window
- Bulk delete, added instructions to make the date format etc. clearer
- New styling for list box and window
- New style header bar sort added, sort is now faster.
- Added the ability to reactivate a message without opening it
- Change the code so that it selects the first item in the browse
when changing keys if the current record will be filtered out with
the new key.
- Added a locator for the list box (allows the first few letters of
an entry to be typed in to select that entry, works for all sort orders)
- Don't allow the message to be re-activated if it was sent (only
received messages).
- Added SendTo, which allows the list to be exported
in a number of formats including HTML, Excel, PDF, Word and CSV. In
addition you can send the entire list to a printer or email. (Exporting
to Word and Excel formats require Microsoft Office 2000 or later)
Group Editor
- One global selection color (same style settings for all windows).
- Deleting a group could cause the application to close, this has
been fixed.
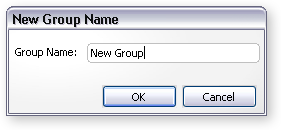
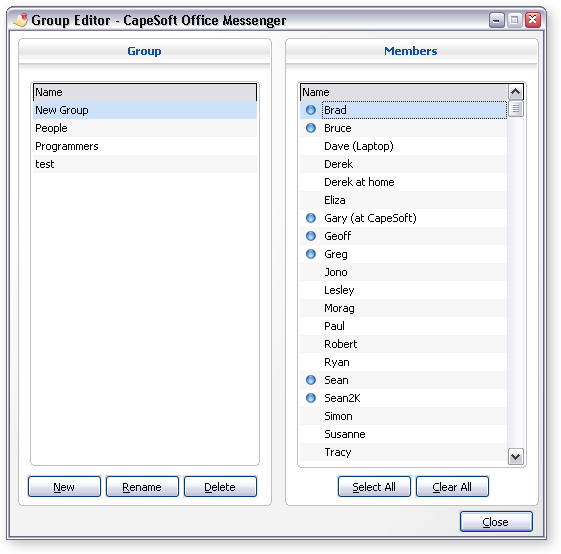
- Creating a new group now selects the newly created group after creation.
- The "Deselect All" button on the Group Editor did not
work, this is now fixed
Remote Shutdown
- New layout, fixed a few missing hot keys
Options window
- Removed the Maximum Instances section as this is not used.
- New layout, larger buttons, divided settings into appropriate section.
- Fixed coloring, spacing, icons etc.
- Some options were saved even if the cancel button was pressed this
has been corrected.
Address book
- Added SendTo, which allows the address list to
be exported in a number of formats including HTML, Excel, PDF, Word
and CSV. In addition you can send the entire list to a printer or
email. (Exporting to Word and Excel formats require Microsoft Office
2000 or later)
- Added buttons to go to a contact's web site, send an email to the
select contact etc.
- All new layout, new options, with the selected recipient's details
show below the address list allowing quick access to notes etc,
- The address book now has a print button to print the current selected
entry.
Previous Version of Office Messenger
Version 2.22 (12 October 2004)
- Adjusted date display format to use Windows short date format in the
View History Details.
- Slight cosmetic adjustments.
- Added source code version checking for the our third party accessories.
Version 2.21 (1 October 2004)
- Fix for the Notification Tray Icon, which sometimes did not appear.
Version 2.20 (30 June 2004)
- Changed the Hyper-Threading functions, so that the Office Messenger
can still run on Windows 95.
Version 2.14 (19 May 2004)
- Fixed the "Window is Always On Top" option, so that the
Window stays on top, when a new message arrives.
Version 2.13 (18 May 2004)
- Tools-Options now allows you to choose your own sound file, which
is played when a new message arrives.
- Works with Hyper-Threaded machines.
- Slight modification. When you click on the icon in the task bar notification
area, and there are no messages to read, the focus now goes to the recipient
list.
Version 2.12 (8 September 2003)
- URL fixed in registration screen.
- New CHM Help File.
Version 2.11 (2 September 2003)
- File-Print minor improvements
- View History - when you double click (or View) an old message, you
can now Re-Activate it back into your current list of un-done items.
- You can also print a message from the View History window
- Improved look-and-feel of the View-History window.
- Added a Bulk Delete option on the View-History window that allows
you to delete messages older than a certain date.
- Fixed a bug where To List would gain focus while you were typing a
message
- The whole application shuts down now when you choose File-Exit and
not just the main window.
- Fixed "Sending setup file to ..." which was reporting the
local machine and not the destination machine.
Version 2.10 (28 August 2003)
- Fixed bug, where sometimes you would have a message from John, but
it would say Paul in the To: list.
- Cosmetic improvements, included groovy progress bar
- Groups have been fixed, and work much better and also automatically
update if people change their display names
- Improved speed when saving To List
- Adding Printing functionality (see the File - Print menu)
Version 2.08 (20 May 2003)
- Stopped Office Messenger from grabbing the focus when a new message
arrives while you are typing something else.
Version 2.07 (14 May 2003)
- Fixed licensing bug, where a machine could ask for a new license every
time the application loaded.
Version 2.06 (28 March 2003)
- Bug fix with respect to the "Send to All" option - stops
error message from popping up
- Bug fix: sometimes the "To" entry box contained a different
name than what was highlighted in the drop down list
Version 2.05 (18 March 2003)
- Increased dramatically the speed at which information is updated when
your "To:" list has changed
- Some bug fixes with regards to groups
Version 2.04 (13 February 2003)
- Removed some options as they were only making life complicated
Version 2.03 (11 February 2003)
- Fixed bug that gave a file access error on startup
Version 2.02 (7 February 2003)
- Some minor adjustments in the Multiple Send window
- Option to leave out wallpaper on main window (especially for Windows
9x users)
- Option to reduce the size of the toolbar and main window ("Compact
View")
- Updated documentation shipped with product
- Bug fixes in the group editor window and "Sent to" field
in a received message
- Bug fixes on the Back/Forward buttons
Version 2.01 (22 January 2003)
- The check box on the tip appearing when the first message arrives
is no longer blacked out
- Some minor fixes in the about screen
Version 2.0 (7 January 2003)
- Supports user-defined groups and sending a message to multiple users
and/or groups
- Allows a user to send a "private" message - upon receipt
the recipient will be notified but the actual message contents is hidden
from view. The message is then displayed by clicking a button that appears
with the message.
- Allows a user to specify that all messages are received as though
they were sent as "private".
Version 1.7 (2 August 2002)
- Supports Windows XP buttons
- Updated web links in application
Version 1.6b (12 July 2002)
Version 1.6 (2 May 2002)
Version 1.5 (18 April 2002)
- Fixed a bug where sometimes the list of recipients was not auto-detected
the first time Office Messenger was run.
- Added links on Help menu to this documentation,
www.capesoft.com and the download area.
Version 1.4f (14 March 2002)
- Optimised the amount of memory that is used by Office Messenger
Version 1.4e (3 January 2002)
- Options allows for sending messages using encryption.
Version 1.4d (28 December 2001)
- Remembers Address Book width & height, and grid widths.
- Minor tweaks and adjustments
- Taskbar icon refreshes itself if lost.
Version 1.4c (18 December 2001)
- Remove duplicates from the recipients list
- Prompts you before you clear the text
Version 1.4b (27 September 2001)
- Minor tweaks and improvements.
- Improvements to the installation file.
- Source code now available for sale.
Version 1.4a (26 June 2001)
- Minor tweaks and improvements.
- When you edit the To List it also has a status of either "yes"
or "no".
Version 1.4 (19 June 2001)
- We've added a Restore Button. When a message arrives while you are
typing in a message to send, your message is saved and the New button
turns into a Restore button. You can restore the contents of your original
message by pressing the Restore button, or by pressing the Done button
(which marks the message that arrived as Done).
Version 1.3a (14 June 2001)
- To List has Online status as either "yes" or "no"
(not "1" or "0" anymore)
- Few internal changes.
- Improved Remote closing on Win2K machines.
Version 1.3 (7 June 2001)
- View History now sorted by date.
- Improved program stability.
- See who's online in your To List.
- Small cosmetic changes
- Some underlying changes to the auto-updating mechanism. See how to
install this application.
Version 1.2c (18 Jan 2001)
- Fixed bug where if a duplicate message arrives, the tune plays, Office
Messenger leaps to the front, but no message is visible. The action
has been corrected to do nothing when a duplicate message arrives. A
duplicate message is a message that has the same message ID and has
been received before, but was not acknowledged properly.
- Added the override Address Book feature (see Feature
List)
- Various other minor bugs fixed.
Version 1.1 (23 Nov 2000)
- Fixed some bugs that prevented Office Messenger from running and closing
down on Windows NT and Win2K machines.
- Worked on removing duplicate entries in the Recipients list.
- Changed the error messages you get if you run more than one copy on
one machine.
- Various other minor bugs fixed.
Version 1.0 (9 Nov 2000)