NetTalk WebServer - Using Reports in a Webserver Application
Introduction
There are various way to approaching printing in a
WebServer application.
Firstly it should be remembered that the printing is a function of the
browser. Which means that any page your application delivers is
intrinsically a report. The user can click on the browser print option at
any time. By careful design, and attention to the information you are
presenting, you can make many "reports" obsolete.
There are times though where a specifically formatted document is
necessary. In these cases HTML doesn't necessarily offer the degree of
control that you need. The best option in this situation is to create a
PDF file, and have the browser display this.
Since Clarion 6, Enterprise Edition contains a Report-To-PDF extension,
this seems like a good place to start. You can take existing report
procedures in your application, and with minor additions make it generate
a PDF file, and also allow the NetTalk WebServer to send the PDF file to
the browser. PDF makes an excellent format for this sort of thing because
most browsers already know how to display a PDF and you have 100% control
over how the page will be displayed, and importantly 100% control over how
it will look when printed.
If you don't have Enterprise Edition, then there are other third-party
tools that can be purchased that do a similar thing. Support for PDF-Tools
by Tracker software, and wPDF by Klarisoft are both supported "out the
box". In addition a generic template is provided so that support for other
engines can be added with a minimal amount of code.
Adding
SoftVelocity PDF functionality to your report
Clarion 6 Enterprise Edition includes functionality to
turn an existing report into a PDF file. If you only have Clarion 6 PE
then this is available
separately.
Example 13 (ABC), and Example 38 (Legacy) in the list of NetTalk Web
Server examples are examples of doing this.
Note Legacy Templates: In order to use the
SV PDF Global Extension you will need to go to Global Properties, Classes
Tab, And tick on the option "Enable the use of ABC Classes. This
explanation assumes you have a report procedure already, based on the
normal Report template.
- Add the Report to PDF Global global
extension to your application.
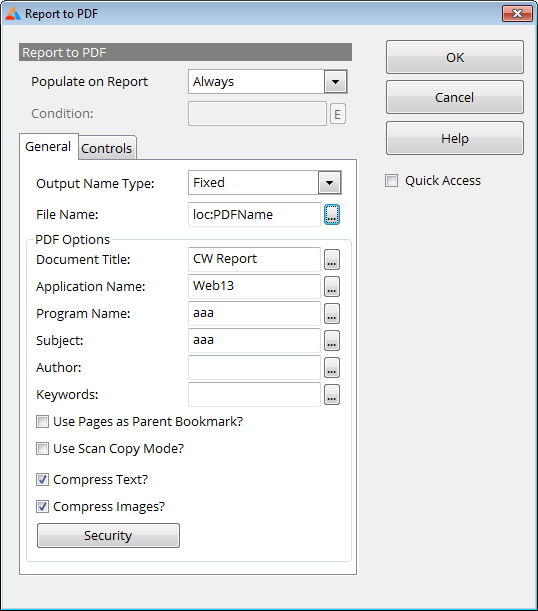
- In the report procedure, go to extensions. You'll see the Report
to PDF extension already there.
Change the OutPut Name Type to Fixed.
Set the File Name to
Loc:PDFName.
You can set the other settings for this extension as you like. (See SV
docs and help files for what the extension can do).
- Add the NetTalk extension NetWebReportABC
(NetTalk Extension to report procedure with SV PDF Generator)
to this procedure. The extension works with both ABC and Legacy
reports. There are slight variations of this extension name for CPCS
and FRB reports.
- On the properties screen for the procedure set the Prototype to
(<NetWebServerWorker p_web>)
and (if in Clarion 8) set the Parameters to
(<NetWebServerWorker p_web>)
In Clarion 9 and higher the parameters will set themselves based on
the prototype.
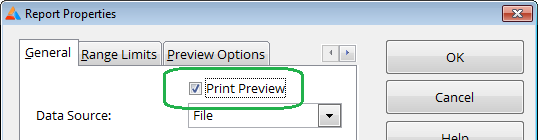
- Note: Make sure the Print Preview
functionality for the report is turned ON. The PDF engine requires
this. The NetTalk template will suppress the actual preview though -
since the preview would appear on the server (where no-one is
looking.)
- Click on the Project menu and select Generate All.
Now that your report procedure is ready, all you need to do is link it
from a web page.
In the example, the report procedure is called MailboxesReport.
The menu for this application is in the PageHeaderTag
procedure. One of the menu items there calls the report (by
setting the URL to 'MailBoxesReport'. Also
notice that the Target is set to '_blank'
which will cause the finished PDF file to open in it's own browser
window.
It's also possible to make the report appear inside a NetWebForm - read
the sections below for more information on that.
Adding
PDF-Tools functionality to your report
An alternative to the built-in Clarion Enterprise
Edition PDF functionality is
PDF-Tools
SDK, from
Tracker
Software. Although this can no longer be purchased, users with
existing copies can continue to use it in any version of Clarion.
Example 14 in the list of NetTalk Web Server examples is an example of
using this to generate the PDF files.
- Add the Global template "PDF-Tools Report Global Extension 4.1" to
your application.
The default settings for the extension should be fine.
- Add the PDF-Tools local extension to the report.
The defaults will be inherited form the Global Template. Most of the
defaults are fine, however make sure the following items are set
correctly:
General Tab:
Set FileName to !loc:PDFname
Previewer Tab:
| Generate PDF: |
Yes - Always |
| Show Generate PDF: |
No - Never |
| PDF Viewer Option: |
None |
| Run Print Previewer: |
No - Never |
| Print Hardcopy: |
No - Never |
- Add the NetWebReportABCxc41 (NetTalk Extension to report
procedure with PDF-XChange Generator 41) to the report
procedure you wish to add PDF output to. (There are slight variations
of this extension name for CPCS and FRB reports.)
- On the properties screen for the procedure set the Prototype to
(<NetWebServerWorker p_web>)
and set the Parameters to
(<NetWebServerWorker p_web>)
- Click on the Project menu and select Generate All.
Now that your report procedure is ready, all you need to do is link it
from a web page.
In the example, the report procedure is called MailboxesReport.
The menu for this application is in the PageHeaderTag
procedure. One of the menu items there calls the report (by
setting the URL to 'MailBoxesReport'.
Also notice that the Target is set to '_blank'
which will cause the finished PDF file to open in it's own browser
window.
It's also possible to make the report appear inside a NetWebForm - read
the sections below for more information on that.
Adding wPDF
functionality to your report
Adding Other
PDF functionality to your report
While there are three popular PDF engines used in
Clarion reports, you may be using another engine to the ones directly
supported above.
A generic template is provided which will add most of the functionality
you will need to support any engine. some hand-code will generally be
required though to handle the specifics of your engine. This section
attempts to explain the report/PDF process in general terms, so you will
more easily be able to figure out what embed code is needed to support
your engine.
- It is assumed that the global extension (if one exists) and the
local extension (if one exists) for your engine has been added to the
report in the normal way. The goal is to have the report procedure
generate a PDF file, and then add NetTalk code to serve that file to
the browser.
- Add the NetWebReportGeneric (Generic NetTalk
Extension to report procedure) to the report
procedure.
- On the properties screen for the procedure set the Prototype to
(<NetWebServerWorker p_web>)
and set the Parameters to
(<NetWebServerWorker p_web>)
- Set your engine to generate a PDF file, and have it use the name of
the file which is stored in loc:PDFName.
In other words, NetTalk will populate loc:PDFName with a specific
value, and that is the name (and location) of the PDF file that the
engine must create.
Report Progress Bars
NetTalk 6 introduced the ability to display a progress
bar when a Report (or any other sort of file) is being created. This gives
more feedback to the user in cases where the generation of the file may
take some time. Rather than display a blank page until the file is
completed, a progress bar is displayed. Once the progress bar reaches
100%, the bar is replaced with a URL which the user can click on to
download the file.
Progress Bars work in conjunction with a Button control. They are designed
to be used when a task is started (by a button) that may take some time to
complete. This task is almost always the creation of a file, perhaps a PDF
Report file, or an Excel spreadsheet, or something like that.
- First add a Progress Control to a form.
Create a local variable (say Loc:fileName) to hold the name of the
PDF.
Make sure the field has an Equate name (we'll use that again in a
moment.)
Set the timer to an appropriate number. The value is in
thousandths-of-a-second so setting it to 1000 = 1 second. Bear in mind
that frequent progress bar updates place a load on the server, so
don't be too aggressive with this number.

You can choose to leave the Create Hyperlink option on or off. If it
is on then a hyperlink will be created, with the newly created
filename when the report is completed. The user can then click on the
link to download the file. If you set the target to '_blank' then the
report can be opened in another tab. The user can also save the report
to disk.
If this option is left off then no hyperlink will be created,
presumably because you are going to display the PDF directly on the
form. (See step 4 below for more information on doing that.)
- Second add a Start Button to the form. This is what the user will
click to Start the action. Set the button to be of type START, give it
a name, and put some text on the button.
If you want the report generation to begin immediately when the form
opens, then tick on the option, on the button tab, Start
Automatically when Form Generates.
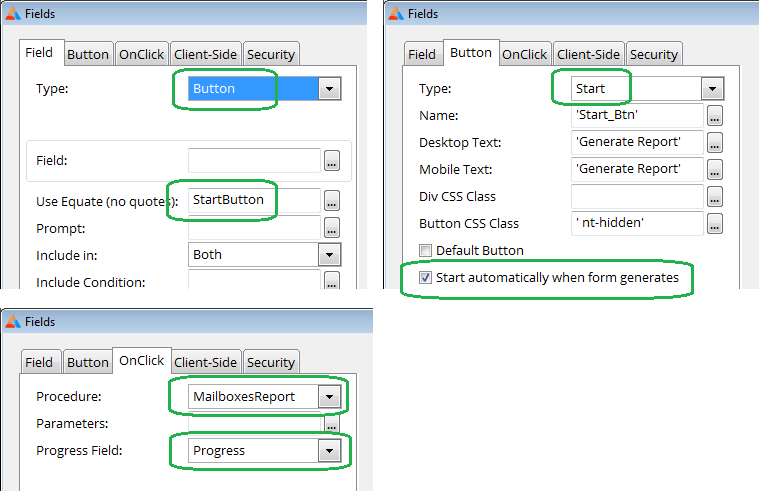
On the OnClick tab set the Procedure name, and the Progress Field
options.
Adding the Resultant (PDF) directly to
the Form
NOTE: To use the
media control on a procedure the Media Script needs to be included in the
program. This script is off by default, so make sure it is on by going to
the WebServer procedure, NetTalk Extension, Scripts tab, and make sure it
is on.
To add a PDF directly onto the form takes two steps. A Media control is
added to the Form, and the Progress Bar control is updated to refresh the
media control when the report is ready.
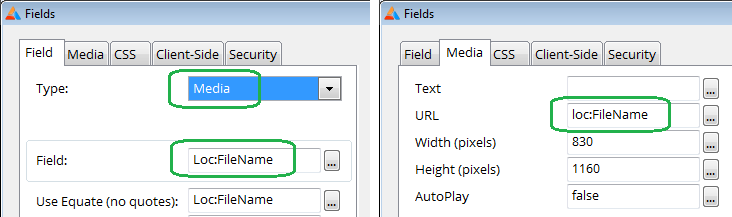
- Add a Media field to the form. Set the Field, and URL settings to be
the same as field used earlier for the Progress control.
- Add the Media field to the Reset List of the Progress Control
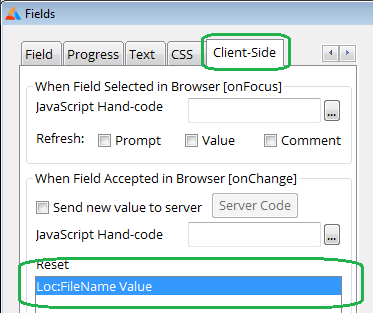
this means that when the Progress Bar completes (ie gets to 100%) the
Media field will be refreshed. Since Loc:FileName
(which is the FIELD of the media control) contains the PDF file name,
the media field thus displays the PDF.
Updating the Progress Bar From a
Procedure
Report procedures (with the NetTalk Report
extension) will automatically include the code necessary to update the
progress bar. The progress of the report is taken from the same progress
bar that would normally appear if the report was called from a windows
program.
If you have a hand-coded procedure, which is generating a file, then you
can add the following to it so that it also supports the progress bar.
a) Make sure the procedure has (NetWebServerWorker
p_web) as the first parameter.
b) When the procedure starts make a note of the Progress Bar Name,
and store this in a local variable
loc:ProgressName = p_web.GetValue('_ProgressName_')
c) Put the following code when your procedure starts;
p_web.SetProgress(loc:ProgressName,1,'')
d) During the creation of the file update the progress by calling
p_web.SetProgress(loc:ProgressName,xxx,'')
where xxx is a number from 1 to 99.
e) when the file is completely generated, and ready for download call
p_web.SetProgress(loc:ProgressName,100, url)
Where url is the filename relative to the
Web folder. Note this isn't the "full path" of the actual filename, only
the part relative to the web folder. This name will be the URL that the
user clicks on to download the generated file.
TIP: Remember a file which start its name with the characters $$$
will be deleted after a single download.
[End of this document]