NetTalk WebServer - The Basics
Introduction
The goal of this document is to show you how to use
the NetTalk NetWebServer class to create an interface in your program,
that can be accessed by a user using a web browser. We have tried to write
this from the point of view of a programmer who has never done web
programming before. So some of these concepts may seem trivial to you.
Before you can begin writing a Web Server, there are some general ideas
and concepts that are worth understanding. This document will cover the
basics, as well as discuss some NetTalk specific conventions and features.
Other documents will cover each of these items in more depth, the goal
here is not to cover every possibility, but rather to get a good grounding
in what is available.
The NetTalk Web Server is provided as two layers. The first layer is the
NetTalk Web Server classes. These classes are the foundation of any
NetTalk web server program.
The second layer is the template framework. It must be stressed that this
framework is not prescriptive in the sense that this is not the only way
to build your web server. It is offered rather as a particular way you may
want to build your server. We have found it very useful when coding our
own web applications, however you will need to evaluate it carefully to
see if it meets your needs.
The best way to learn the class layer in more detail, is probably to start
by using the template framework layer. Once you are comfortable with that,
and how that works, then you can experiment a bit with different
approaches. One positive aspect of the template framework is that you can
use all of it, some of it, or none of it, depending on what you prefer.
You can also mix “hand-coded” pages with template pages without any
problems.
There isn’t a lot of structure in this document, many different and varied
topics are discussed. We recommend reading through this document as you
would a book. If you’re not 100% sure about something then skip over it
for now and keep reading. Later on, especially once you’ve built a couple
applications of your own, much of it will make sense.
We recommend returning to this document from time to time as the
understanding of it will grow as your experience grows.
Acknowledgements
There is no point in re-inventing all the really cool
features that are currently available to web developers. What we’ve done
is integrate the ones we really like into NetTalk. A full list of the
scripts, their owners and licenses are
included
here. Our grateful thanks go out to all the authors involved in
these projects.
If you find scripts that you think should be integrated into NetTalk Web
Server, and if they are suitably licensed, then please let us know. No
promises, but we’re always open to suggestions.
There have been numerous dedicated web developers who have fed me more bug
reports, and feature suggestions than I could possibly handle. You know
who you are. My thanks to you all.
The
Web is a different country, and things are done differently there…
Traditionally in striving to make web development for
Clarion programmers as simple as possible every attempt has been made to
hide the differences (between Win32 programming and web programming) from
the programmer. However for some of the other Clarion web options
available in the past this has lead to inefficient models, which sooner or
later result in programmer frustration. We hope to avoid this problem, and
so at some times the differences between web and Win32 become visible.
Thus understanding some of the crucial differences is important to
understanding how the server works, which in turn leads to easier
programming.
Before we start discussing how to build the web server using NetTalk, we’d
like to take a moment to highlight some of the differences between a Win32
application, and a web application. We’ll also cover some basic web
server/web browser concepts. You’re probably aware of some of these,
but they’re worth mentioning again.
Caveat: Some of the statements below are untrue. Like the way that saying
"the world is round" is untrue. In some cases details that are unimportant
to the point being discussed are either ignored or conveniently forgotten.
Web Browser / Server
Interaction
A web browser is an incredibly simple beast. A Server
is even simpler.
Despite all the really fancy things you’ve seen web pages do, underneath
the skin the Browser and Server follow very simple ideas. So simple in
fact that most often people are left asking “is that all?”
A web browser can only do 3 things:
1.
GET a page from a server.
2.
POST information to a server, accepting whatever page the web
browser sends in reply.
3.
Display the page.
On the other side all a server does is:
1. Respond
to a GET by loading that file off the disk and sending it to the
browser.
2. Respond
to a POST by doing “something” and loading a file off the disk and
sending it to the browser.
This is remarkably simple, yet at the same time remarkably powerful. But
not, as it turns out, powerful enough. In order to make it more
powerful a small, subtle, change was added on the server side.
1.
Respond to a GET by loading that file off the disk, parsing
it, and sending it to the browser.
2.
Respond to a POST by doing “something”, load a file off the
disk, parse it, and send it to the browser. OR
3.
Respond to a GET or a POST by generating a page dynamically,
and returning it to the browser.
The server-side power, sometimes called server-side-scripting is in the
small Parse step above. Note that the client does not see the unparsed
page. As far as the client is aware the page came off the disk just like
that.
Of course for the parsing to be useful, the page needs to contain
instructions that the server understands. Thus if your server is IIS you
can use ASP instructions. If your server is Apache then PHP is ideal. The
NetTalk web server uses its own special tags – and we’ll cover those in
more depth in a moment.
The Browser Interface is
Limited...
This is the most obvious statement of all. The set of
native controls available in a browser are limited. This is both a
positive thing (you are forced to redesign your interface to reduce
complexity) and a negative thing (you can get fancy, but only by using
client-side tools, like JavaScript).
The immediate temptation is to spec your Browser interface to have all the
bells and whistles of the Windows interface. Before you go too far down
that road, I recommend making your first iteration of the site as “clean”
as possible. Start by making the site work. Then work on making it slick.
One big plus in using templates is that changing basic behavior on a
global level is not too difficult.
...But not as Limited as you Think
Most customers, and most developers dismiss web
programming as providing exceptionally poor performance and usability to
the user. The early decades of bad web apps convinced developers that the
fundamentals of the web itself do not allow for good quality applications.
This belief is just wrong. The web is capable of highly interactive,
highly responsive applications. It's not the same as the desktop, that's
true, but the abilities of the web go far beyond what most web apps aspire
to.
Ajax / Web 2.0
You may have heard much recently about the so-called
Web 2.0. Or you may have heard of the term AJAX. You may also know that
both of these items are very loosely defined, and seem to apply to a broad
spectrum of functionality rather than any one specific thing.
The NetTalk Web Server uses AJAX techniques in many of the templates that
are provided. However the mechanics of this are completely invisible to
you the programmer. If asked, yes, your application uses AJAX.
Fancy though this may seem, it’s ideal if your client does not notice that
your site employs the latest, greatest technology. Frankly he probably
doesn’t care about the technical details. (And to some extent, neither
should you.) AJAX techniques are not impressive to end users because they
accomplish things that have been happening in Windows programs for over 10
years. Getting those effects in a browser may impress the techie in you,
but don’t expect your customers to leap with wild unabandoned joy.
The Web
Browser Interface has its own Navigation
Although the web browser “Back” and “Forward” buttons
can be hidden, the user can still do these options by right-clicking on
the page. When a user does this no request is sent to the server. The
browser simply changes page without the server knowing. Thus for the
server to attempt to know “where” the client is, is useless. The client
browser may be literally anywhere in the program at any time.
To make matters worse, clients can “bookmark” a page and return there at
any time in the future. They can type any URL into the address bar at any
time. They can abandon a form, or indeed your whole site, without letting
you know.
In short, the navigation around your web application is a lot more fluid
than the fixed navigation around a Windows application. This has an effect
on the way some things are constructed, and some items (which may seem
strange at first) are designed to cope with this issue.
The Web Browser
Interface is Stateless
The most basic concept of a program that you have deep
in your subconscious is that a program is stateful. By that I mean it not
only always knows “where” you are, but if you depart (for example to a
lookup) you can always return, and local variables will be as they were
when you left them. Consider the following situation (in regular Windows
programming):
- You are on a menu, and you click on the Employee Browse button.
- Up pops the employee browse.
- You enter a locator and jump to the people starting with J.
- Clicking a lookup button, you select the date range for when the
employee was hired.
- Returning from the date lookup, you notice the J employees are
still located.
- Highlighting an employee, you click on Update, change the phone
number and click Ok,
- and go back to the Browse.
- The J’s are still located, and the date range is still as you left
it.
- This is all so normal you don’t even notice it.
This scenario can be drawn something like this:
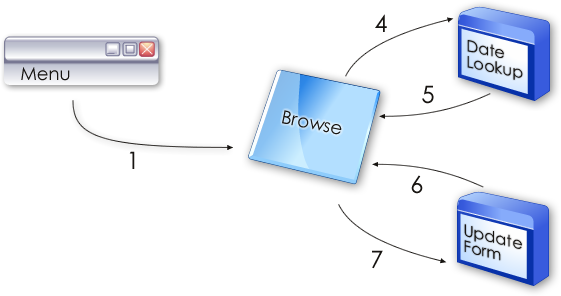
The sequence shown above is so basic it’s almost the first thing you
learned when you were programming. It’s so basic that you’ve forgotten
it even exists. That’s simply how things are.
If you like, take a moment now to consider what you’d need to do if the
following restriction was added to your programming language:
“Only 1 window can be open at a time – If you make a call to 1
procedure, you must at the same time, close the existing procedure.”
In web programming, specifically stateless web programming, that’s
exactly the restriction that is added. Actually it’s slightly worse than
that, but we’ll get to that in a minute.
The browser, as a client-side tool, has absolutely no idea where it is in
the program. And the server sees each specific request (from the browser)
in isolation. In the windows program above, the lookup, and form, knew to
return to the browse when done. The range and filter set on the browse did
not change simply because we went to the form.
Let’s consider the same set of actions as seen by a web server.
- The user goes to the menu.
- Clicks a button which goes to the Browse. (The menu closes.)
- Enters a letter, and goes to the Browse (The original browse
closes.)
- Clicks the lookup-date-button and goes to the calendar screen. (The
browse closes.)
- Clicks the OK button and goes to the Browse. (The lookup closes.)
- Clicks the update button and goes to the Form. (The browse closes.)
- Clicks the OK button and goes to the Browse. (The form closes.)
Drawn, it looks like this.
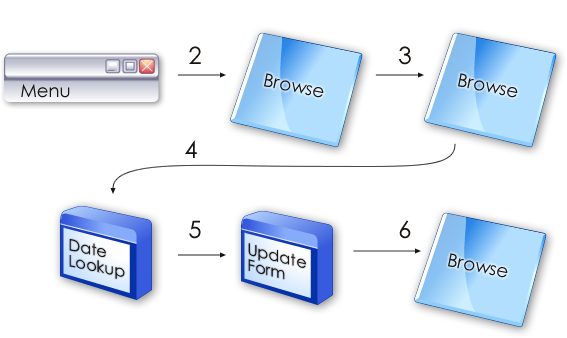
Notice that in a web server program, you never go back. In the
description and picture above you never go back to the browse. You
always go forward to the next browse.
In a purely stateless world, the date lookup would clear the locator.
The Form edit would clear the locator and the date filter. Not
surprisingly programs written in a purely-stateless world are extremely
limited (at least for what we’re trying to do.)
The solution to this issue always falls into one of the following 3
approaches;
1.
Store variables in the browser, as cookies. This works as long
as the data being stored is very limited, and as long as the user has
cookies turned on.
2.
Pass all the necessary variables from one page to the next on
the “command line” ie as part of the page address. While workable, and
infinitely scalable (from a number-of-servers point of view) there are
limits to the length of the command line.
3.
Create a “session” on the server. Store all the variables
inside this session. All you need to know is what Session belongs to the
client (which is passed in a cookie), from this you can set appropriate
default values onto pages being delivered. This is the primary approach
taken by NetTalk.
Probably the closest equivalent is writing a program where there are
only global variables, and procedure parameters, but no local variables.
Unfortunately with web programs there is one more wrinkle. There may be
more than 1 user accessing the same program at the same time. Each user
needs his own variable space. For this reason we use a Queue, and hence
we talk about the SessionQueue.
[Aside: Later on we’ll see that this may not be a Queue at all, but
that’s not important right now. Think of this big variable storage area
as a Queue.]
Sessions
The single biggest difference between a Windows
program, and a Web-Program is the issue of persistence. In a Windows
program one person is running a copy of the program, and that copy belongs
to them. When they’re done they close the program. With the web there’s
only one program, being shared by many users at the same time.
This would be fine if each page was completely independent of each other.
But in even simple programs this is not the case.
In order to maintain the state of all the server-side variables for each
user, the idea of a Session is used. As long as the user keeps passing
their session number with each request then the server is able to keep
track of the user. In NetTalk the session ID is passed as a cookie with
each request, so the mechanism for this is completely invisible to you.
Internally the settings (variables) are stored in a Queue, called the
Session Queue. You can also use the Session Queue yourself to store your
own variables for each user. There are methods to read and write values in
the Queue.
Note: If a user (or bot) is accessing
your server then a Session for them is created. This has nothing to do
with logging in or logging out. A session exists for each client. the
session may be logged in, or the session may be logged out. Logging in or
(by default) logging out does not clear the session.
The SessionID is not necessarily a fixed value. By default, if the user
logs in or logs out, the SessionID changes. This prevents a
Session-Fixation attack. The session information is not lost when this
happens, the data is moved from the old SessionID to the new SessionID.
Session Tables
For various reasons you may find yourself in a
situation where is is desirable to hold data temporarily in a table,
linked to the SessionID. This can be useful when the temporary data is
linked to actual table data, or is in some other way temporary data
being stored for the session. The Tagged (48) example is a good example
of this - the user tags number of records, and those tags are stored in
a table.
The session table is a regular table in the dictionary. It can make use
of any file driver (including MEMORY, TOPSPEED or SQL drivers). Memory
driver provides the fastest access to the data, but memory is the
primary constraint of the web server so it may not be ideal to use a
Memory driver in all situations. The Session Table must have a field to
hold the SessionID (a String field, usually 255 chars long) and should
have a single-component (non unique) key on this field.
Naturally this temporary data should be deleted when the session ends,
and if the SessionID for a session changes, then this data should be
updated to match the new SessionId. [Aside: Session ID's can change on a
login or logout to prevent Session Fixation attacks.]
As of NetTalk 12 you can register this table in the WebHandler procedure
(Actions, Session Tables list) and this deleting, and updating will be
done for you automatically. For this to work the SessionTable MUST have
a single-component key on the SessionID field.
You can also clear the table manually yourself by embedding code in the
WebHandler in the NotifyDeleteSession and NotifyUpdateSession methods.
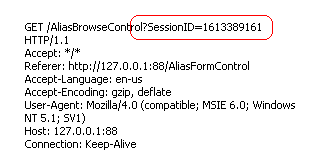
Parameters (Values)
When the Browser asks for a page, it is also possible
for it to pass parameters to the server. If the request takes the form of
a GET then the parameters appear in the URL. In the log you can see them
here:
When the request takes the form of a POST can appear in the URL, or
they can appear below the header. In the log they look like this:
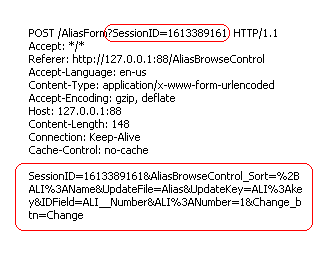
Regardless of whether the request is a GET or a POST, all these values are
automatically parsed for you and placed in the Value Queue. If a
value appears in both the POST section, and the URL then the URL value
takes precedence. (If a cookie exists with the same name, these overwrite
the cookie value in the Value Queue.)
You can use the method
value =
p_web.GetValue('name')
to get the current value, and
p_web.SetValue('name','value')
to set the value to a specific value. To determine whether a value exists
use
p_web.IfExistsValue('name')
These settings are only available during the course of
this thread. They are not (by default) stored for use in other threads. If
you do want to save them, then be sure to write them into the
SessionQueue.
As we'll see later this is an important point. Indeed in most cases,
should you need to work with a value directly, all you should be doing is
storing it in the session queue. Then in all other places in your code you
use only Session Queue data. The method to store a value is
p_web.StoreValue('name') Cookies
Warning: Some people
turn the cookies functionality off for various reasons. NetTalk depends on
the cookie mechanism to pass the Session ID with each request. The use of
cookies though should be used sparingly. There are very few cases, outside
the Session ID, and possibly login information, where cookies are actually
required. Data should be stored on the server, not the client.
A Cookie is a value, sent by the browser. This value is attached to all
GET's and POST's which you receive from the browser. Incoming cookies are
automatically parsed for you, and added to the Value Queue.
In order to set a cookie in the Browser you use the
p_web.SetCookie('name','value')
method.
If used like this then the cookie will be valid in the browser for as long
as the browser is open, but will then be discarded. To make the cookie
more permanent you need to set the date, and optionally the time, when it
will expire.
p_web.SetCookie('name','value',ExpiryDate,ExpiryTime)
The ExpiryDate and ExpiryTime are standard Clarion Date
and Time fields (ie LONG's). Note that the time and date are relative to
GMT time, not the time of the browser, or the time of the server.
To delete a cookie currently being stored in the Browser use the
DeleteCookie method
p_web.DeleteCookie('name')
Note that cookies can only be accessed by the site that
"wrote" them. It is not possible to access the cookies placed in the site
by another browser.
Example 7 contains an example of using cookies. In this example the
LoginForm procedure saves the value of the login and password fields, for
30 days, so if the user returns to the site the login is "remembered".
There is no need for special functionality to "Read" the cookie. All the
cookies that belong to a site are sent automatically by the browser with
every single request. These are automatically placed in the Value queue
for you so you can read them using the normal
p_web.GetValue('CookieName')
syntax.
Remember though, there are almost no cases where a cookie is the right
solution to the problem. In almost every case where you think you might
need a cookie, the Session Queue, or a User Data Table is a better place
to store the data.
Tip: Cookie names, like all HTML field
names cannot contain a colon. However if the name contains a
double-underscore, then that will be translated into a colon by
GetValue.
For example;
p_web.SetCookie('Loc__Login','NetTalk')
would be accessible using
p_web.GetValue('Loc:Login')
Session ID Cookie Name
The
SessionID cookie
is a built in cookie that allows each request the user makes to be
linked to their session. This is done automatically and you do not need
to do anything. With very few exceptions this is ideally the only cookie
your app should make use of. Any other user settings can be set at the
server side in Session Values.
Up to NetTalk build 9.23 the default name for the session ID cookie is
SessionID. This name was used for both secure, and insecure sites.
From build 9.24 this default name is SessionID for HTTPS connections,
but SessionIDx for non secure connections. This allows both secure, and
insecure sites to exist on the same domain. This is
necessary because starting from Chrome 52 and
Firefox 52 insecure sites can no longer overwrite existing cookies for
secure sites.
Should you wish to you can override the name of the cookie. This is done
in the web handler procedure, in the
SetSessionIDCookieName method. At this point in the code you
can test
self.ConnectionSecure to see if
the connection is secure or not. It is recommended that you use
different names for secure, and insecure sites.
Having a unique cookie name for secure and insecure parts of the domain
means that sites that are intentionally mixed may have limited
functionality.
Browsers understand 3 languages, and none of them are
Clarion.
HTML is the "Markup language" - this contains the Structure of the
document. HTML is made up mostly of <tags> which describe the
structure of the text being displayed.
CSS is the "Visual language" - this determines what the page looks
like, and (some of) the page layout.
JavaScript (which is Not Java) is a programming
language with variables, and loops, and things like that, which is able
to manipulate both the HTML and the CSS on the page.
As a NetTalk developer you do not need to know any of these languages in
order to get started. However you will find yourself picking up HTML as
you go, and likely learning CSS as well. More advanced developers will
also start using a line or two of JavaScript in strategic places.
Your NetTalk app will make use of all three languages, by generating HTML,
and by including the default NetTalk CSS and JavaScript files.
NetTalk includes, the jQuery JavaScript library. jQuery contains some
fantastic JavaScript code, which is used as a building-block, and also
some UI components that improve the user interface of your NetTalk site.
jQuery is also a "pluggable" system with a large number of plugins already
available on the web.
While jQuery is no longer used as the primary building block of the web,
it nevertheless provides powerful and simple JavaScript functions which
underpin much of the NetTalk JavaScript code.
From NetTalk 12 jQuery UI Theme system has been extended to make it more
flexible. Regular jQuery UI Themes are still supported, but are considered
to be deprecated, and support for them may be removed in the future.
NetTalk 12 (and later) ship with a specialized theme designer in the
examples folder - Themer (86)
With the NetTalk WebServer we’ve tried to place as few
limits as possible on the programmer. We like flexibility ourselves, and
we appreciate it in the tools we use. But every now and then we need to
impose a condition simply because without it the system will not work.
As far as your tables goes, the NetTalk Web Server requires tables to have
at least 1 unique, unchanging key. This is so that records that are used
in one place, and have to be reloaded in another, can be properly
identified.
Consider for example a Form. When a form is opened, so that a record can
be changed, the record is read into memory, and displayed in the web page.
Then that thread finishes. Later on the user clicks Save (after editing
some data). At that point the original record is reloaded, the changes
applied, and the record is saved. But the system needs to know which
record was being edited in order to do this. If the user were allowed to
edit the very field used to identify the record it could not then be
reloaded.
If you had the luxury of going to University you’ll probably already have
this key. Good database design courses teach this approach anyway as a
prerequisite to having a good database design.
If you don’t have a unique, unchanging key then you can add one to your
tables. Set the key as AutoNumbered, and forget about it.
If you are using the CapeSoft Replicate product in your dictionary then
you’ll already have a non-changing unique key in the GuidKey that
Replicate requires. You can use this key as your unique key in NetTalk
WebServer.
The Server interacts with the browser in a very
specific way. The Browser makes a GET or a POST (as we saw above). The
server responds by providing a web page. Once that’s done (typically
taking a small fraction of a second) the server then forgets all about the
request. During that time there may be instructions to copy items in, or
out, the Session Queue, but once the page is delivered it is immediately
forgotten.
Of course the Browser doesn’t forget. It displays the page to the user for
as long as the user likes. The user then clicks a button, or a link, and
another POST or GET is sent to the server. For another brief instant the
server awakes, does some work, and forgets.
This is a very efficient approach because there are no resources (no RAM
or CPU) on the server being used for the time the user spends staring at
the screen. Thus supporting many users “at the same time” is not a big
problem, because each request uses the server resources for a very brief
period of time. Compare this to the WebBuilder, or Terminal Server
approach of having a complete copy of the program, in memory, for every
single connected user, for the duration of their entire session from start
to finish.
I cannot stress this enough - There is no "connection" between the Browser
and the Server. This is why it is impossible for the server to "push"
information into the browser. The browser makes a request, gets a reply,
and the connection is severed.
Every time the user does something (clicks a link, clicks a button,
etc) a request is sent to the server. Each request processed by the
server is done on its own thread. In other words;
a. A request arrives
at the server'
b. A new thread is
started to handle the request'
c. The thread
immediately performs any actions, and sends a page back to the browser'
d. The thread ends.
Thus unlike a windows program, the lifespan of each thread is very
short.
The Web Server is capable of managing multiple requests simultaneously.
Thread Pools
By default each incoming thread is processed on its
own thread. The request comes in and the WebServer starts a thread for the
WebHandler. The WebHandler then processes the request, and returns the
reply. The thread then ends.
In a normal application the "cost" of starting and ending the thread is
very small. So this approach is both simple, fast and effective. However
the time it takes to start the thread is proportional to the amount of
global threaded data and objects that you have. The biggest part of the
data is of course the number of THREADed tables in the dictionary.
Therefore in some apps the cost of starting and ending threads becomes
significant. To overcome this problem a feature called "Thread Pooling"
exists.
Please Note: Thread Pooling cannot be
used in the Multi-Site host application. If an application is used as a
DLL to the Host, then the thread-pooling features there will be ignored.
The idea is that instead of closing when the request completes, the thread
hangs around for a bit. If another request comes in then the WebServer can
pass the request to the existing thread, instead of having to create a new
thread. If the thread is not used for some period of time then it quietly
closes in the background.
To make use of thread Pooling virtual no changes need to be made to the
app. All that has to be done is;
a) The creation of a WebHandlerPoolThread procedure and
b) The activation of the feature in the WebServer procedure
Create the WebHandlerPoolThread procedure
This is a simple window procedure, with the window
MDI attribute OFF. No controls are required on the window.
The prototype for the procedure should be;
(string p_PoolNumber,string p_waiting, string
p_server)
Add the NetTalk Extension, WebServer Pool Thread Window to the
procedure.
Set the name of the Handler Procedure (typically WebHandler) in the
extension properties.
Activate Pooling in the WebServer procedure
Two settings for the thread Pooling can be found in
the WebServer extesion, Performance tab.
The name of the WebhandlerPoolThread procedure, and the maximum number
of pool threads can be entered here.
If all the pool threads are busy then an additional pool thread is
started until the maximum number of pool threads is reached. After that
individual threads (up to the maximum allowed number of threads) will be
created in the usual way.
In Windows a program usually runs only after a user has logged in.
However if you are creating a Server program then typically you want it
to run before a user logs in. (For many servers, no user logs in at all
unless there are other tasks to perform.)
In Clarion 6 and later you can turn any program into a service, either
by using the Windows 32 API, or (if you’re lazy like me) by using a
template. Not surprisingly we recommend SelfService (https://capesoft.com/accessories/selfservicesp.htm)
for making services.
Note: Frames are now considered a poor choice when building an
app. This section is included as a reference, but the use of frames is
discouraged.
One of the first decisions you’ll need to make is if the site is going
to use Frames or not. This is a key starting point, because this will
determine the way you build the site.
It is of course possible to make a site that works using both Frames or
No-Frames, but that is extra work, so start with one approach, and add
the other approach necessary if you want to.
Frames allow you to divide the visible window (in the browser) into
different “panes”. Each pane can then be updated individually, and one
pane can change another.
The primary disadvantage with frames is three-fold.
a. Search Engines
struggle with them, and
b. The address bar in
the browser stops working when you have frames.
c. They do not respond well
do differing screen sizes.
If your site is designed to be used as a program, with a login and then
the ability to do stuff then Frames are good. If your site is
going to be a public site, and you want Google to search it then don’t
use frames.
Sites without frames however are also a bit more flexible when it comes
to layout, and give the programmer somewhat greater freedom when it
comes to doing stuff. Personally I've moved away from using frames to
building apps that do not use frames.
TLS
In the web world there are 2 kinds of servers. Secure
servers, and non-secure servers. If you are transferring information
between the server and the client that you want to protect (and almost all
web apps fall into this category) then you want your server to be secured
using TLS.
This is a topic that is very simple on one hand, but also can get
bogged down in details very quickly. NetTalk allows you to build Secure
servers, non-secure servers, and servers which do a combination of
both. This is discussed in detail in the document Building Secure Web Sites.
Update: Now that certificates for secure sites are free, the barrier to
entry for secure sites is zero. All sites should now be made secure, and
there is no longer a good use case for insecure sites. NetTalk Server
includes built-in support for acquiring free certificates, so making
your site secure is both trivial, and free.
A very quick overview of a typical NetTalk app is useful here. Each of
these parts is discussed in more detail in a moment.
-
Each web server app has a WebServer procedure and
a WebHandler procedure. These handle the incoming responses.
-
The app may contain static htm pages stored on the
disk.
-
The app may contain one or more NetWebPage
procedures, which generate a complete HTM page on demand. You cannot
embed one Page inside another Page.
-
The app may contain one or more "Control"
procedures. These are things like browses and forms. They can be
embedded on a page, or they can be called directly as a page.
-
The app may contain one or more "Source"
procedures. These can be embedded on a page, but not called directly
as a page.
Each WebServer you create will listen on a specific port. The default
port for secure web servers is 443, but only one server can be listening
on a single port at a time. If you are making a general purpose site,
one aimed at the whole internet community then of course you will need
to run on port 443. If you are making a non-internet server (for
example, you’re just making a way to access your program across the
network) then you can use your own port number. Port numbers above 1000
are generally considered to be “open”.
The default port for Secure servers is 443. However any port can be
secure. The default port number for insecure servers is port 80. However
any port can be insecure.
An app may contain multiple web server objects. Each Web Server object
listens on a single port, but as a whole the app is listening on
multiple ports.
The WebServer procedure is the procedure that listens to the open port.
In the examples it’s always called WebServer, but the name is not fixed
– you can call it anything you like. Obviously if you have more than one
then they need unique names.
The WebServer procedure consists of a Window procedure, to which is
added one or more NetTalk Objects. These objects are set to the
NetWebServer base class. Some settings for the server will appear on the
settings tab. The details of each setting is discussed in the reference
document.
The WebServer procedure listens for incoming requests. For each request
the WebHandler procedure is called, on a new thread. The name of the
WebHandler procedure for this web server is set on the Settings tab.
In NetTalk the multi-site Host application was introduced. This allows
a single server to share a port between multiple apps. For more
information see the document here. The
host application can share multiple secure apps on the same port.
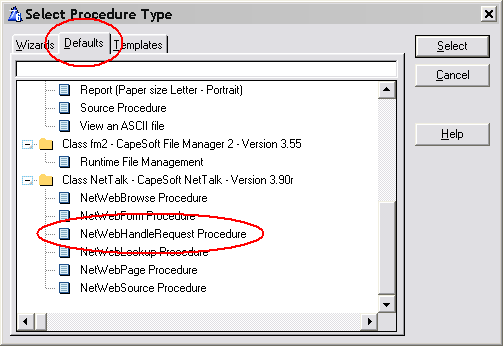
The WebHandler procedure is based on the
NetWebHandleRequest procedure template. When adding this procedure it is
recommended to use the NetWebHandleRequest
Default .
The WebHandler procedure will become a good place to embed some code
later on, but for now there’s no hand-code necessary here. There are
also no template settings of any note in this procedure.
Each web app will contain at least 1 WebServer procedure, and at least
1 WebHandler procedure.
Many WebServer procedures can share the same WebHandler procedure.
Many NetWebServer objects can share the same WebHandler procedure, even
if some of the NetWebServer objects are secure, and others are not.
|
Legacy Templates
In order for all the Web Server features to work correctly, you
need to make sure that the Smart Generate feature in the Web
Handler procedure is turned on.
Web Hander procedure, Extensions, NetTalk or NetSimple Object
Extension, Class Tab, Smart Generate option.

|
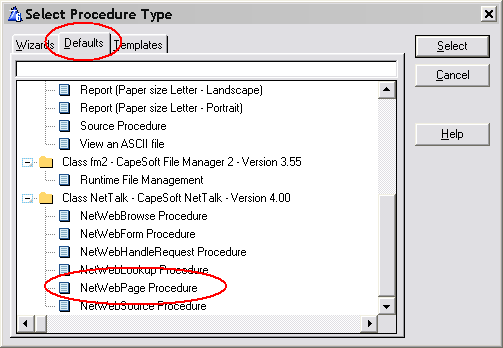
A NetWebPage is the basic structure that starts each web page. On this
page you can place your own HTML code, menus, Browses, Forms and so on.
To Create a new page use the NetWebPage Procedure Default.
Each page has a number of settings which are described in the Reference
document.
To a Web Page procedure you can attach one or more extensions. These
extensions include:
NetWebFrame - Frame Extension
NetWebBorder - Border Extension
NetWebMenu - Menu Extension
Each of these extensions will be discussed in more detail in a
moment.
Using HTML you can describe the content of the page, including other
NetWeb controls (such as Browses and Forms.) You can also embed
custom HTML source, from other procedures in your app (procedures
based on the NetWebSource procedure template.)
It should be noted that you cannot embed another page on this page.
An example of a simple NetWebPage can be found in example 1.
In this example the IndexPage procedure contains the following HTML;
<!-- Net:PageHeaderTag -->
<!-- Net:MailboxesBrowseControl -->
<!-- Net:PageFooterTag -->
Essentially this page is made up of 3 parts. Each part is constructed
by a separate procedure in the app. Using the NetTalk tag system
procedures can be embedding on the page.
Tags
A NetTalk Tag is basically a wrapper around some variable, or
procedure, that you want to include at this point in the page. It
takes the form
<!--Net:Something -->
In this case that Something are procedures, so the HTML
generated by those procedures are included on the page.
If the Something is not a procedure, then it might be a session
variable. For example you might have a session variable and you can
include that on the page. You’ll see a lot of this happening as you
progress through the examples.
Static pages (usually .htm pages on
disk) that contain tags have to be parsed by the server. If you use a
static page on the disk these tags can still be used. However in that
case the first line of the page must be
<!-- NetWebServer -->
It's important to note that you can put any tag you like into your web
page, as long as you handle it in the ProcessTag method
in the WebHandler procedure. However
there are some built-in Tags which you can use without having to add
code to the WebHandler procedure.
-
<!-- Net:FunctionName -->
This tag will call the specified function in that point in the code.
This can be a function based on any of the NetWeb procedures. (Note:
Not all the procedures make sense at every point though.
-
<!-- Net:s:SessionVariable -->
This will embed the current contents of the session variable on the
web page. If the variable should be formatted (for example a DATE
field) then make sure the Picture parameter of the session variable
is set using either
p_web.SetSessionValue('name','value','pic') or
p_web.SetSessionPicture('name','pic')
-
<!-- Net:v:Variable -->
This will display the current contents of a Parameter at this point
in the web page. In other words the same as (2) above, but uses the
Value queue, not the Session queue.
- <!-- Net:f:FileName -->
Includes a (html) file at this point of the web page. Similar
to the Clarion "INCLUDE" command. Use this to include static bits of
HTML, stored in static files on the disk, inside dynamic web pages.
Tip: If the file contains raw text, not formatted HTML, then you can
wrap the tag with the <pre> Html tags. For example
<pre>
<!-- Net:f:disclaimer.txt -->
</pre>
The file itself should be placed in the Web folder. It can be
in a sub folder, but then the filename should contain a web-relative
path. for example;
<!-- Net:f:/loggedin/header.htm -->
The encoding of the files can be complicated. Assuming your site is
serving pages as utf-8 (which it should be doing) then ideally your
files are also encoded as utf-8. Unfortunately there is no way to
reliably detect if a file is encoded as ANSI, UTF-8 or UTF-16.
Therefore NetTalk has to guess the format (to determine if conversion
is necessary.) There are however techniques which you can use to make
the guessing more accurate. The order of the assessment is as follows;
A. If the file has a byte-order-mark then that will be used to know is
is already in utf-8 or utf-16 format.
B. If the file starts with the text; <!--
utf-8 --> , then it is assumed to be in utf-8 format.
C. If the file starts with the text; <!--
utf-16 --> , then it is assumed to be in utf-16 format.
D. If the file contains the text <meta
charset="UTF-8"> then it is assumed to be in utf-8 format.
E. If the file contains the text <meta
charset="UTF-16"> then it is assumed to be in utf-16
format.
F. If the second, and fourth characters in the file are CHR(0) then it
is assumed the file is in utf-16 format.
G. If all the above are not true then the file is assumed to be in
ANSI format.
- <!-- Net:x:SessionVariable -->
This is exactly the same as a session variable, except that the
contents of the variable will not be xml encoded. Use this when you
expect the session value to contain actual HTML code (which you want
the browser to see as actual HTML code.) In this case however you are
required to make sure the contents are actually xHTML compliant.
- <!-- Net:h:HostVariable -->
Host variables are like session variables except that they are
"global" to all sessions. For more information on host variables
see Host Variables.
- <!-- Net:d:something -->
The
d: tag allows you to access various
current date and time values and include them in html. The
following identifiers are recognised;
| tag |
meaning |
| <!-- Net:d:today--> |
Display today's date, format using
p_web.site.datepicture. |
| <!-- Net:d:clock--> |
Display the current time, using @T4 as the format
picture. |
| <!-- Net:d:day--> |
Display the day number in the month |
| <!-- Net:d:month--> |
Display the number of the current month in the year |
| <!-- Net:d:monthname--> |
Display the name of the current month (January, Feburary
and so on) |
| <!-- Net:d:year--> |
Display the current year value. |
| <!-- Net:d:dow--> |
Display the day number in the week, (Sunday=0, Monday=1
etc.) |
| <!-- Net:d:weekday--> |
Display the week day name, Monday, Tuesday and so on. |
| <!-- Net:d:dayname--> |
Display the name of the day of the month, eg 1st, 2nd,
3rd, 4th and so on. |
| <!-- Net:d:hour--> |
Display the current "hour" part of the time. |
| <!-- Net:d:minute--> |
Display the current "Minute" part of the time. |
| <!-- Net:d:second--> |
Display the current "second" part of the time. |
- <!-- Net:t:something
-->
t: tags are designed to be
resolved by your own embed code in the WebHandler, inside the ExpandTableTag
method. ExpandTableTag passes in two
StringTheory objects, the first contains the tag, and you must
populate the contents of the second in your code. This tag type is
provided so that you can read the value out of a table in your
database.
For example, the Service Methods allow you to embed documentation
against methods, fields and so on. These template options allow for
tags. You could use the <!-- Net:f:something
--> tag to load that documentation snippet from a disk
file. Or you could use the <!--
Net:t:something --> tag to make a call into ExpandTag,
and thus read the documentation from a data table. Your code might
look something like this;
Access:Documentation.Open()
Access:Documentation.UseFile()
doc:id = p_tag.getvalue()
If Access:Documentation.Fetch(doc:IdKey) = level:benign
p_result.SetValue(doc:html)
End
Access:Documentation.Close()
See also
Host Variables
The use of Frames in an application is now considered (mostly)
to be poor form. Their use, and the use of this template, is
discouraged.
The Frameset extension allows you to create the frames that your app
will run in.
Before making use of the FrameSet extension you need to decide if your
site will be using Frames or not. See the section above entitled Frames
for more information on making this decision.
A good example of the use of Frames is Example number 4 – “Frame with
Menu”.
Frames, as an HTML concept, are both simple, and complex. There is no
easy way to give you the power in Clarion, without also giving you some
complexity, so this is by far the least intuitive of the extension
templates. Taking a moment to understand frames is a good idea if you
want to use them.
A FrameSet is an HTML term that denotes the breaking up of the window
into multiple pieces. Each of these pieces in turn can contain either
another Frameset, or a Frame. Thus it is a somewhat recursive process
which can make it confusing.
To make matters worse, the manner of breaking up the window is also
flexible. You can break the window into multiple rows, or multiple
columns, or multiple rows and multiple columns.
Let’s use the Example 4 Frameset procedure as an example. Here’s the
result as seen in the browser:

In this case the window is split initially into 2 rows. The top row
becomes the Header of the eventual site. The bottom row is split into 2
columns. The left column is where we’ll put the Menu for the site. The
right side of the bottom row is where the rest of the site will appear.
It’s important to note that each part of the above window is ultimately
a Frame. And each Frame has a name (which you set.) By using this name
(also known as the “target”) you can determine what pages appear in
which frame.
The Framset page itself does not contain any HTML of its own. It just
provides the “container” into which other pages, based on NetWebPage,
will appear.
Web Border Extension
This extension is now obsolete. This section in the document
can be ignored. It is included here for backwards compatibility
reasons.
One way of making pages look better is by placing a border around them.
NetTalk has an extension template that simplifies this for you.
The border extension includes different style possibilities, as well as
allowing you to specify the HTML contents to appear inside the border.
You can use the Web Border extension on NetWebPage procedures, as well
as NetWebSource procedures.
Borders are cosmetic in nature – not functional.
Menus are an important part of any app, and the Web is no different.
However unlike Windows there are no standards as to how menus are
implemented, or how they behave. NetTalk Web Server includes in-the-box
support for several menu styles. You can of course implement any
menu system you like if you have a sufficient knowledge of JavaScript
and HTML.
Accordion style. This is a vertical menu. The key thing to note about the
accordion style is that only one section can be open at a time. As a
section is opened, the other sections are closed automatically.
Double-Drop style. Similar to a Windows menu, this menu is horizontal
in nature. However the Double-Drop menu supports menus within menus, and
also uses the ThemeRoller styles.
TaskPanel style. This is similar to the Accordion however each panel can
be opened and closed independently.
NetWebSource Procedure
Template
A procedure template called NetWebSource exists. This
allows you to create HTML “snippets” that can be included in other pages.
These could contain anything you like, however “Browses” and “Forms are
better handled using those specific templates.
A good example of using the Source procedure in the Examples are the
PageHeader, and Page Footer tags. Since the header of each page is common
to all pages, this can be defined in one place (in the NetWebSource
procedure) and then “embedded” onto multiple pages.
PageHeaderTag
The PageHeaderTag procedure contains generic HTML
that will "wrap" all your browses and forms. Typically this includes
some site header information and one, or more menus.
This procedure can also affect the local layout of
pages - determining menus, side-bars, and so on. The phrase "header"
here refers to the position in the HTML where this code will be
generated. It should be noted that visually things in the header can be
anywhere on the page. They are not limited to the top of the page.
Individual Browses and Forms can specify their own
header and/or footer procedures, so the use of these procedures can be
overridden at the local level.
PageFooterTag
The opposite to the header tag is the footer tag.
This code is generated after generic pages (browses, forms and so on.)
Client-Side Session Manager
NetTalk 12 introduced the client-side session
manager widget. This is usually attached to the Footer procedure.
This widget allows a count-down timer to be
displayed in the footer, which shows the user how much time is left in
the session. If the session comes within some warning time (say 30
seconds) of the session ending, they are prompted to extend the
session, or if they wish to, end it. If the warning is ignored then
the session will end at the appropriate time.
When the session ends, the browser will
automatically go to a designated page, usually the home page.
By default the session manager is only used when the user is logged
in, however that is an option that can be set on the template.
Sometimes it’s possible that you want to use a Browse,
Form procedure as a page in it’s own right. NetTalk makes this possible
through the concept of a generic page. If you use a control procedure
(i.e. a Form, Browse) in a place where you would usually use a Page,
then NetTalk will wrap the control up as a page and serve it.
It’s likely that you may have either a common header,
or common footer, (or both) for these pages. In the first 3 examples you
can see this in action via the PageHeaderTag and PageFooterTag
procedures. These 2 source code procedures include HTML that you want
included at the top, and bottom, of every generic page.
The name of the two tags are set in the WebServer
procedure, under the Settings. The generic header tag is
'<!-- Net:PageHeaderTag -->'
and the generic footer tag is
'<!-- Net:PageFooterTag -->'
Notice the standard wrapping for a NetTalk tag
<!-- Net:Something -->
The use of a procedure name in a tag means that that
procedure will get called and the HTML from that procedure will get
generated into the page at that point.
The generic header and footer do not apply to
NetWebPage pages. In example 3 the procedure IndexPage contains the
following HTML – explicitly including the header and footer if we want
them.
<!-- Net:PageHeaderTag -->
<!-- Net:PageFooterTag -->
In the beginning we all had desktop computers, with
large screens (circa 12 inches to 17 inches) and life was easy. As time
progressed though the size of screens changed dramatically - from 4 inches
on the low end to 30 inches on the high end, and everything in between.
Web apps had to evolve to handle this range of sizes. They became more
responsive, able to respond to different screen sizes by adopting
different layouts, hiding or unhiding extra information, and so on.
A
Responsive Web App is thus an app which Responds to
screen size.
As the web has evolved, so NetTalk has evolved, but with the added proviso
that backward compatibility is ever important.
The primary way the web evolved was to move from layout based HTML
<tables> to layout based on HTML <div>'s. This change, coupled
with extra power added to the CSS language allows for a much for flexible
layout - one which is able to best respond to the user.
NetTalk 10 added support for DIV mode. In DIV mode all <tables> (on
browses, forms and child-layouts) can be switched to <divs>. In
NetTalk 10 the default is still Table layout, however in future NetTalk
releases this will change to default to <div> layout. If you have an
existing app you will need to switch the app manually from TABLE mode to
DIV mode. This is done in the WebServer procedure, Settings / Defaults tab
- on the Browse and Form tabs.
It is likely you will see some differences in your application after
making this switch. In some cases the shipping CSS can be extended to
better support the switch, but there are some differences you will need to
understand.
Browse Width
The biggest fundamental difference has to do with
width. Specifically <table> width and <column> width.
Tables are very flexible when it comes to width. They automatically
adjust their own width, and the width of every column, to take up as
much space as they need, and at the same time as little space as
possible.
One way in which this is evident is that columns will automatically size
themselves to fit the visible content. Equally a table will limit it's
own width to just-fit the data - often resulting in a browse which
appears to be "cramped" against the left-hand edge of the page. It is
possible (but not required) to set the size of a table though, and the
size of each specific column in the table.
<div> based layouts are different. In a <div> based layout
it is necessary to set the width of the browse or form (defaults to
100%) and each column is sized relative to the other columns. So, for
example, in a browse you do not set an absolute value for the width of a
column, but rather the relative value for the width of a column.
(Aside: Taking about this is complicated because on a small screen the
browse adapts, so using words like "row" and "column" don't really map
to what you see on the screen. But for purposes of this discussion we're
considering a browse as it appears on a large monitor.)
Another side effect of the <div> columns is that because they have
this relative width, the column does not get wider to accommodate wider
content. So as the screen gets smaller more and more content can become
truncated.
Browse Cells
In the past a browse contained a single item in each
column. A cell ( a <td> in HTML terms) in the table contained a
single piece of data, or a single button, and so on.
NetTalk now however allows you to put multiple items together into a
single cell. This means that columns can be combined together - for
example the typical column for a change button, and the column for a
delete button, can now be merged into a single cell, which can making
sizing a lot more effecient.
This has a dramatic effect as the screen gets smaller, because as the
screen shrinks so the browse switches from being a horizontal layout, to
being a vertical layout. In this case each cell now takes up a whole
horizontal row. If you have multiple buttons in the cell then they can
still appear next to each other. If you have the buttons in different
cells then they appear underneath each other.
A form is a good example of the difference between a Web app, and a
Windows app.
In a windows App the form procedure starts, and remains running until
the user closes the window. The act of loading the record, displaying
the form, validating the input, and saving to disk all takes place in
one place. Importantly one single procedure drives all this
functionality.
In a Web app the form behavior is split over several separate threads.
When the user clicks on a link that opens the form, a thread starts
which loads the record, and constructs the Html. This Html (this “page”)
is passed to the browser and the thread closes.
When the Save button on a form is pressed then a second thread starts.
This thread will validate the record, and save it to disk.
In a NetTalk app it is convenient though to keep all the code related
to a single form in one procedure. This makes things more organized and
easier to keep track of. However this one procedure performs a few
different functions. Each function should be considered as distinct from
the others. Local variables in the form procedure are NOT
preserved between calls. The library ends up calling the Form
procedure many times. A parameter to the procedure determines which part
of the process the Form procedure must now perform.
So far I’ve described the form as a Page. And that is not strictly
accurate. The form is more like a Control. It can exist on a page all by
itself, but it’s more likely to be just one part of a more complex
page. A web form procedure in your app is thus Not a page, but
just a control to be included on other pages.
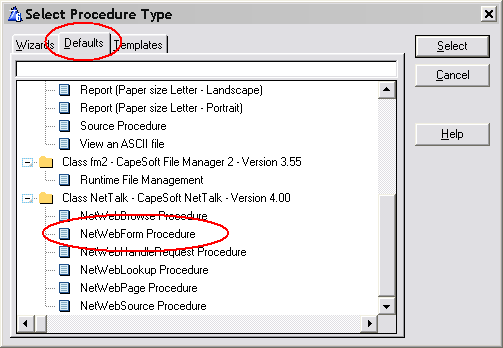
In the App a form is created using the NetWebForm procedure template default.
The specific options for the form are covered in the Reference
document.
Advanced
Forms can be dynamic. In other words when the user Selects, or
Accepts any of the fields, then one or more items on the form can be
updated. This is done asynchronously (in the background) and allows
you to make your forms highly interactive.
Some of the interactivity is already built in for you. For example if
you have a lookup field, and you've entered the code and description
fields of the remote table on the Lookup Settings tab, then your
lookup field is already dynamic. Try typing in the code rather than
looking it up. Notice the way the description changes? That's the sort
of thing I'm talking about here.
Example 21, UpdateInvoices procedure, has a good example of this when
selecting a customer.
Aside: Try typing in the description into the entry field and see
what happens.
Adding your own interactivity to a form is a 2 step process.
First identify what needs to be changed, and when it needs to be
changed. Each row of the form consists of 3 parts, the Prompt, the
Value, and the Comment. Each part can be updated, and any number of
parts on the screen can be updated on any event. You can also update
Prompts, Values and Comments for other fields when this field changes.
The second part is embedding the correct code (in the right place) to
calculate the item you want to display.
For example, let's say you want to update a Comment Field when a
Value is entered. To keep it simple let's assume you're going to
validate an Email field to make sure it contains both a @ and a .
So, step 1, identify (and set) the fields that need to be updated.
This is done on the Client-Side tab. For the email field set Refresh:
Comment on.

Then step 2. In some cases you won't need to do a step 2 because the
templates are already doing it for you.
In other cases the code you've entered into the comment field may be
sufficient. Like here
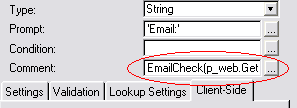
(In this case you've made your own function, called EmailCheck, which
is doing the validation for you and returning an appropriate comment.
Notice the SessionValue is always used - the whole comment field looks
like this
EmailCheck(p_web.GetSessionValue('Cus:Email'))
But in some cases you'll need to embed code in the routine that
generates this comment (or prompt, or value).
Remember each prompt, value, or comment field can be updated, and for
each of these cells a routine has been generated called either prompt::field,
value::field
or comment::field
where field is the name of the field. For example, in
this case the entry field is cus:email, and we're looking to set the
comment, so use the embeditor to find the comment::cus:email
routine. In this routine is an embed point, and here you can set loc:comment to be what
it needs to be. For example;
If Instring
('@',p_web.GetSessionValue('cus:email'),1,1) > 0 and |
Instring('.',p_web.GetSessionValue('cus:email'),1,1) > 0
loc:Comment = 'Email ok'
Else
loc:Comment = 'Email not ok'
End
In the prompt embed point you would set loc:prompt and in the value
embed point you would set the Sessionvalue of the field, using p_web.SetSessionValue('fieldname',value).
Debugging Tips
It can be quite hard to debug this asynchronous updating when it's
not working. Since there are different parts involved it's hard to
know where to look, and which part of the process isn't working.
Here's one process you can use to help identify the source of the
problem.
1) Do a Regenerate All. If the code you are adding hasn't been
correctly generated into the WebHandler (by the template) then that's
the easiest possible problem to fix.
2) First thing to determine is if the event on the browser is
triggering an event to the server as expected. You can do this by
watching the Web Server window. Click on the Clear button to clear the
log, then change a value. You should see and item appear in the GET
part of the log. Like this:
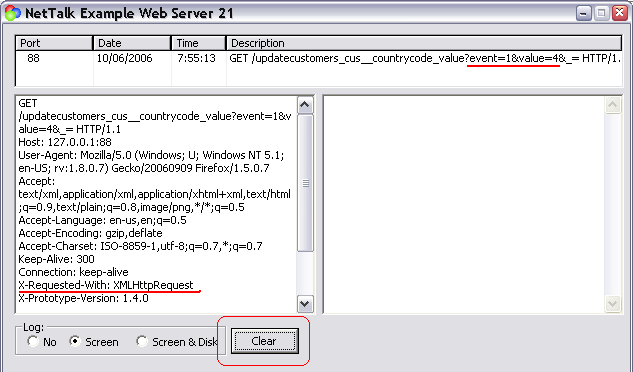
Note that the request included the Event (Event:Accepted = 1) and
also the new value for the field that changed. You can also see the
request was asynchronous because of the XMLHttpRequest item in the
header.
3) So the request is being generated, but the response is not making
it to the browser. Or perhaps it is, it's just not the response you're
expecting. The most likely place for an error is in the embed code you
may have added. (Don't worry, it's normal to make errors when writing
code. This isn't about blame, it's about correctly identifying the
source of the problem so it can be fixed.) What I usually do in this
case is comment out my embed code entirely, and replace it with a
simple bit of code, that doesn't have a bug, and which makes a visible
impact in the browser. For me that's
loc:comment = Random(1,1000)
If this works then I examine the embed code a bit at a time to see
which part isn't working as expected.
Tip: Remember that this little
routine is being called asynchronously and none of the rest of the
Form has necessarily run. So if you need to access other data tables,
then you will need to open and close them appropriately. Also you
should always use Session variables rather than file variables for the
actual form fields. That's why in the example code above I used p_web.GetSessionValue('cus:email') and not
just cus:email.
4) But what if the simple use of Random suggested above doesn't work?
Well then the most likely reason is you missed out step 1. But what if
it still doesn't work? Well then the next step is to examine the
packet that is being sent to the browser. You can do this by adding
NETSHOWSEND=>1
to your project, in your app, as a Project Define. Then use the free
DebugView program (available from
SysInternals) to monitor the outgoing packets.
Form Prompts and Labels
Since its introduction NetTalk has supported the
"Prompt / Value / Comment" layout for forms. Support for this remains.
NetTalk 14 introduces a new concept, called Field Labels. These
(can) take the place of prompts and place the label just above (or below)
the field, inside the same "form cell". The location and style of the
label is controlled with CSS, so there is a lot of flexibility on how this
is displayed.
Labels exist in addition to prompts. You can have both, or you can
suppress the prompt cells completely.
The existence of Labels can be controlled globally (WebServer procedure,
Defaults/Form tab), and then overridden at the procedure (Layout Tab) ,
Tab , and Field (General Tab) level. Thus you may choose to make use of
this feature everywhere, or in just a few select places.
For some field types (fields which take a string input like String, Number
and so on) the label can be floating. This means that they
appear similar to a placeholder on empty fields, but then revert to the
normal position when the user enters some text. You can select (in all the
places mentioned above) whether the label should be Fixed, or Floating.
Field types that don't support floating labels will always used Fixed
labels.
FormCells
Since its introduction NetTalk has supported the
"Prompt / Value / Comment" layout for forms. Originally these cells were
created using HTML Tables, but since then support has been added for using
CSS Flex or CSS Grid layout options.
In current NetTalk you can choose from any of these Form Layout
Methods, either globally (WebServer procedure, Defaults / Form tab)
or at the procedure level (Layout tab).
While the concept of different cells for the prompt, value and comment is
powerful, and a simple system for beginners to learn and use, there are
various options you can use to control the layout of the form, and move
away from a string prompt/value/comment concept.
The first tool available is the ability to set a field as not Last in
Cell. If this is set then the following field (prompt, value &
comment) gets placed into this cell. This can be handy when grouping say
two entry fields together, or putting a button next to an entry field, and
so on. This setting is done at the field level (Field tab).
The second tool in play is the ability to suppress the comment or prompt
columns. These suppression's can be done globally (WebServer procedure,
Defaults / Form tab), at the procedure level (Layout tab), at the Tab
level, or at the field level (Field Tab). Suppressing comments can make
the form take less space. Suppressing Prompts is introduced with NetTalk
14 and is especially practical if the Field Labels feature (see above) is
turned on.
Thirdly Cells can be "spanned". This is an HTML term, which means that the
boundaries between the cells can be removed. So you can span the Prompt
and Value cells, the Value and Comment cells, or all three. While having
the prompt, value and comments in separate cells makes it easier to line
things up, spanning them makes more efficient use of space. As with the
other options these can be set at the global, procedure, tab, or field
levels.
Browses
The browse is the root of many applications. It allows you to display
data on the screen in a tabular format. In many way the browses provided
by NetTalk WebServer are similar to the browses you are already familiar
with in Clarion.
A browse can have many different settings. These are covered in more
depth in the Reference
document.
Browses can be page-loaded, or file-loaded. They can be sorted by
clicking on the header. They can have locators.
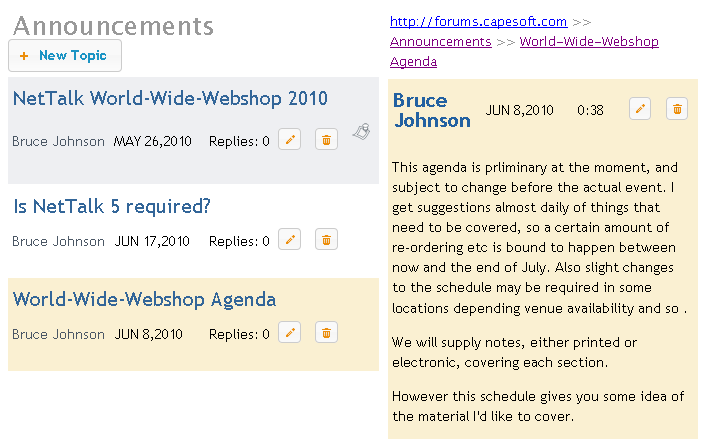
In most cases a browse is simply a tabular list of data, something that
will be instantly recognizable to any Clarion developer.
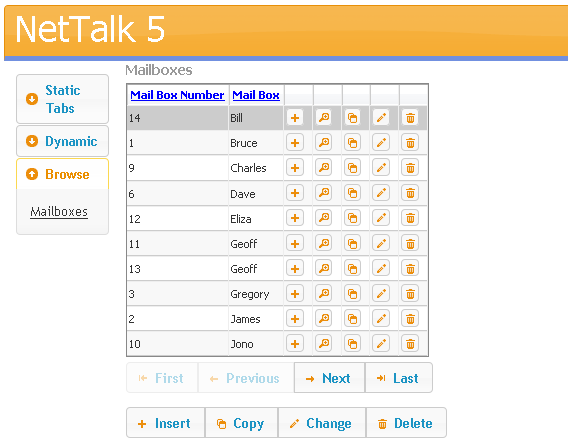
However tabular data can be displayed in many creative ways, some of
which don't look like a browse at all. The following are two browses,
one on the left, and a child on the right.
One big difference between a Web app and a Windows app is the concept
of global variables. In a Windows app one user is using the program.
Multiple copies of the program may be running, but each copy belongs to
only one user. So you can set global variables which implicitly belong
to just that user.
A web app can be serving multiple users (at the same time) from one
single exe. So you can't assign a global variable to a single user. All
users can see all the globals all the time. (At least that's how your
program would behave if you used globals.)
In NetTalk you use Session Variables to assign values to a user. We
discussed Sessions earlier. Each user has a single, unique, session
number which they keep for the duration that they are in the browser. If
you need to store a variable you do it by writing the value into the
Session Queue. And you can fetch it from the Queue when you need it. For
example;
After the user logs in we want to store their name. So we go to the
place where their login is validated (ValidateUpdate Routine) and we add
some code;
p_web.SetSessionValue('LoginName',clip(loc:login))
Later on we can get this value, and put it in a local variable by doing
loc:login = p_web.GetSessionValue('LoginName')
if you wanted to embed this session variable inside an HTML page then
you can put, inside your HTML,
<!-- Net:s:LoginName -->
The default deployment folder structure looks something like this;
HTML files are placed in the web folder. The WebServer is
limited (by default) to supplying files in, and below, this folder.
Default is appPath\web where appPath is the
location of the Exe.
You can set the web folder on the NetTalk settings on the WebServer
Window.
Below this folder are a number of folders. You can override these as
well, but by default they are:
Scripts (contain .js files)
Styles (contain .css files)
Log (contain Log files if logging-to-disk is turned on)
If these folders do not exist they will be created for you.
In addition it is recommended that images are placed in an “images”
directory. However this is not a requirement, just a suggestion.
You need to deploy your program (exe, dlls, tps files whatever) as
normal.
NetTalk web server does not require any additional programs on the
machine. (i.e. no IIS or Apache etc.)
You need to deploy your web folder onto the server machine as well.
For more information on program deployment see the Deployment
doc.
Multiple Data Sets
It is occasionally desirable to identify the user, and
then direct them to a specific data set. The same program will be running,
but the user will be using one set of data (and potentially a different
web folder) to other users of the server.
The multiple-data-set approach works well for both TPS and SQL data
stores.
To implement multiple data sets you need to
- Set the dictionary correctly
- Identify the user on each request
- Set the filenames or owner strings for the tables appropriately.
Setup Dictionary
Tables in the dictionary need to use either a unique
Full Path Name variable (for TPS and other ISAM file type) or a Owner
Name variable (for SQL file types.) Multiple SQL files can share the
same Owner, however multiple Owners (hence different databases for
different tables) are also allowed.
The variables used MUST be set as THREADed.
Example
A SQL Table Customers has the Owner Name set to
!Glo:Owner
A global, Threaded, String Glo:Owner is
also created (in the dictionary, or the app.)
Example
A TPS Table Customers has the Full Path Name set to !Glo:CustomersName
A global, Threaded, String Glo:CustomersName
is also created (in the dictionary or the app).
Identify the User
There are a few basic ways to identify the dataset
the user is needing.
- Use the HostName (ie the URL the user typed) to determine which
set to use. OR
- Have a separate USERS database, in which you store the location.
The user then uses a generic login procedure, which then sets a
Session Value, and the SessionValue is then used to set the data
location.
Using the Host Name
The Host Name (ie the URL the user typed) could be
used to differentiate the data set desired. For example
www.cidc2015.com and www.cidc2017.com are two host names that point at
the same server. The server decides which site to serve based on the
URL the user used.
In the same way, sub domains can be used. For example
capesoft.somesystem.com might route to a different database than
softvelocity.somesystem.com.
Setting information based on the hostname can be done in the
WebHandler procedure, in the RequestHostSet method,
before the parent call.
Example
Access:Sites.Open()
Access:Sites.UseFile()
Sit:HostName = self.RequestHost
If Access:Sites.Fetch(Sit:HostKey) = 0
self.site.WebFolderPath = Sit:WebFolder
self.site.DataPath = Sit:DataFolder
self.ChangeTheme(Sit:Theme)
end
Access:Sites.Close()
In the above example the host is checked against a table to
see if it exists. If it does then the
WebFolderPath, DataPath and Theme are all set based on the Host value.
Note that this bit of code will be called a LOT - once for every
incoming request. Thus storing this data in a Memory table is strongly
recommended. A Global Unthreaded Queue could also be used, but that is
not thread safe, so you would need to wrap queue access in a Critical
Section. If you are not sure how to do that then stick to using the
Memory table.
Note also that this code is not setting the Filenames or Owners - that
must still be done as described below.
Generic Login
The most useful place to validate a login is in
the WebHandler procedure, Authenticate method.
In this procedure you can check the incoming user credentials against
your USERS database, and then set session values appropriate to the
user there.
Example
p_web.Authenticate PROCEDURE(String pUser,String
pPassword)
CODE
Access:Users.Open()
Access:Users.UseFile()
Use:User = pUser
If Access:Users.Fetch(Use:UserKey) = Level:Benign
If Use:Password = pPassword
self.SetSessionLoggedIn(true)
self.SetSessionValue('WebFolderPath',use:WebFolderPath)
self.SetSessionValue('DataPath',use:DataPath)
self.SetSessionValue('theme',use:Theme)
Return True
End
End
This sets the session values, but you then need to set the properties
based on those session values for each request.
p_web.ParseRequestHeader PROCEDURE()
CODE
self.site.WebFolderPath =
self.GetSessionValue('WebFolderPath')
self.site.DataPath = self.GetSessionValue('DataPath')
self.ChangeTheme(self.GetSessionValue('theme')
parent.ParseRequstHeader()
Set File Names / Owners
The global, threaded, filename and/or owner
variables need to be set in the WebHandler procedure, ProcessLink
method, before the parent call.
Example
Glo:BreaksName = clip(self.site.DataPath) &
'Breaks.Tps'
Glo:CountryName = clip(self.site.DataPath) & 'Country.Tps'
Example
Glo:Owner = 'some database connection string'
Printing Reports
There are various way to approaching printing in a WebServer
application.
Firstly it should be remembered that the printing is a function of the
browser. Which means that any page your application delivers is
intrinsically a report. The user can click on the browser print option
at any time. By careful design, and attention to the information you are
presenting, you can make many "reports" obsolete.
There are times though where a specifically formatted document is
necessary. In these cases HTML doesn't necessarily offer the degree of
control that you need. The best option in this situation is to create a
PDF file, and have the browser display this.
Since Clarion 6 Enterprise Edition contains a Report-To-PDF extension,
this seems like a good place to start. You can take existing report
procedures in your application, and with minor additions make it
generate a PDF file, and also allow the NetTalk WebServer to send the
PDF file to the browser. PDF makes an excellent format for this sort of
thing because most browsers already know how to display a PDF (via the
Adobe plugin) and you have 100% control over how the page will be
displayed, and importantly 100% control over how it will look when
printed.
If you don't have Clarion 6 EE, then there are other 3rd party tools
that can be purchased that do a similar thing. NetTalk 4 includes
examples of using the Clarion 6 EE functionality, as well as examples
from other vendors.
There are 2 examples included with NetTalk which demonstrate the
technique used to use existing report procedures in your web site. In
each example there are 2 reports, one simple one, and one more complex
one that makes use of an "Options" window, and the ABC Pause button.
Example 13 (PDF Report - requires C6EE) requires, as the name suggests,
Clarion 6 Enterprise Edition (or alternatively the Clarion 6
Professional Edition, with the optional PDF Report Generator).
Example 14 (PDF Report - requires PDF-Tools) is the same example, but
uses the
PDF-Tools product from Tracker Software Products to convert the
reports to PDF. PDF-Tools is available for Clarion 5.5, 6,7 and 8 so
this example works in all of those.
Steps to use an existing report procedure in a Web application
- If you've not already done so, add either the SoftVelocity PDF
Global Extension, or the PDF-Tools Report Global
extension to your application.
- If you've not already done so add the two Global extensions
required by NetTalk (Activate CapeSoft's NetTalk, and
Activate NetTalk Web Server.)
Tip: If this is a multi-dll system,
you can still add these two extensions, even if this is not the actual
web Server app. See the section on Multi-DLL
for more information.
- Set the Prototype, and Parameters, of the report procedure to
(<NetWebServerWorker p_web>)
- Add the NetTalk Extension to ABC Report to the Extensions list for
this procedure.
- This step is optional, and is only required if you have a "Report
Options" window, or if you have additional parameters passed to the
Report.
When called in "Web mode" the report will not be able to stop and ask
the user for options. If options are necessary you will need to gather
these using a NetWebForm procedure, or alternatively have the options
stored in the Session Queue. An embed point is included at the correct
place where you should prime these optiions. The embed point is called
Prime Report Options
In the supplied examples a NetWebForm procedure is created, which
contains 2 variables, FromSize and ToSize. The Report procedure is
dependant on 2 options, also called FromSize and ToSize. In the embed
point the following embed code is included:
fromsize = p_web.GetValue('FromSize')
tosize = p_web.GetValue('ToSize')
Advanced
If your report procedure already takes parameters,
then add the new parameter in Step 3 above as the first parameter.
Make all the other parameters optional.
When called normally, leave the first parameter out. For example
myReport(,otherparms)
When called by the report engine the other parameters will not be
passed, so the report will need to populate those values from either the
SessionQueue, or the Value queue using the techniques described in Step
5 above.
If your Report is set to start in Paused mode, then the Start button
will automatically be pressed by the NetTalk template, when the report
is running in Web mode.
Date formats are a little tricky to handle. In Clarion you're probably
used to selecting date formats all over the place, using one of the
built-in date pictures (like @D1 or @D2 etc.). However at the
browser these values are meaningless, so a suitable method for selecting
dates must be available.
With NetTalk, the date-selector popup is the one offered by jQuery.
This supports all Clarion date pictures up to (and including) @D16. Note
that D17 and D18 are not supported.
In order to allow you to select the format globally, rather than just
on a form-by-form basis, there is a setting on the WebServer procedure,
Extensions, NetTalkWebServer, Settings called Date Picture. This should
be entered without quotes.
On Browses you can set the picture of a specific column to anything you
like. If you would like to set it to say D6 then you would enter '@D6' . If you would like to set it to the
global default then use
p_web.RequestData.Webserver.DatePicture .
If you have, or are making, a Multi-DLL system (ie one comprised of
many APP files) then you may want to use procedures in one other other
DLL's in your NetWeb application. For example, if you have a
report, or graph, in an external DLL, it would be ideal if this
procedure could be used in the Web interface as well.
First a quick note about normal Clarion Source procedures. These can be
used already in the normal way. Remember your web app is a Clarion
program, and Clarion already has templates in place to allow you to use
External procedures in an application. So using normal source procedures
is no problem.
The problem occurs when you are exporting procedures with NetWeb
extensions. For example a NetWebReport, or NetwebBrowse and so on. If
you wish to use these procedures in the main NetWeb app then you need to
tell the WebHandler to include these procedures. To do this:
- Open the application that contains the WebHandler
procedure.
- Go to the Global Extensions, to the Activate NetTalk Web
Server extension.
- Go to the Multi-DLL tab.
- Enter the name of the remote APP file here.
Now all the NetWeb procedure in that remote APP file will be included
correctly in the Web Handler procedure.
In the remote app you will need to add the Activate NetTalk Global
extension, Activate Net Web Server Global extension as normal (although
you don't need to fill in anything on the Multi-DLL tab).
Your procedures in the remote APP will need to be EXPORTED in the normal
Clarion way.
In the WEBHANDLER app you will need to link in the remote procedures in
the normal Clarion way.
So to summarize:
- Make the apps just as you would in any normal Multi-DLL
Clarion system.
- In the WebHandler App, add the "External Apps" to the External Apps
list on the NetTalk Global Extension.
Possible Errors:
- Compiling the WebServer application you get an error;
Link Error: Unresolved External BrowseSomething@
This means you probably haven't EXPORTED the procedure in the app
where it is declared. Go to that app, go to that procedure, and make
sure Export Procedure is ticked on.
- Compiling the WebServer application you get an error;
(someapp_ni.clw) Syntax error: Unknown Function label
and when you go to the line in question you see a call to one of the
web procedures - possibly something like this;
UpdateCustomers(self,Net:Web:Div)
This means you have not included that procedure (in this example,
UpdateCustomers) as an external procedure in the WebServer app. Add it
as an external procedure (with the correct Prototype) in the normal
Clarion way.
- Compiling the WebServer application you get an error;
(someapp_ni.clw) Syntax Error : No matching Prototype
available
This means you've added the procedure, as an external, to the
WebServer app, but you've not set the Prototype correctly for that
procedure. The best approach is to go to the app where it is declared,
and copy the prototype from there, so they match.
- When you run your application, and go from one procedure to another,
say from a browse to a form, and it does not seem to work, then make
sure all the external apps are added to the Global Extension in the
WebServer app. Adding the LIB's is not sufficient, you need to add any
apps with web procedures to the global extension.
Using Browses and Forms
on Static Pages
By embedding a couple of tags on your web page, it is possible to
generate fully functional browses and forms which appear inside your
static pages.
Basic support needed on the page
-
The first line of the page must be
<!-- NetWebServer -->
-
Inside the <head> of your page you must put
<!-- Net:c:Head -->
-
Just before the </body> tag of your static page add
<!-- Net:c:BodyEnd -->
-
The NetTalk styles, and scripts, should be in folders called Styles
and Scripts respectively, and these folders should be inside the
same folder as your HTML pages. In other words, the pages will
reference styles/netweb.css.
Embedding a Browse on the Page
You can embed a browse on the page simply by using a NetTalk tag. For
example
<!-- Net:BrowseCustomers -->
will embed the BrowseCustomers procedure at that point on the page.
Embedding a Form on a page
If you have embedded a browse on a page, then chances are you will also
want to embed the form on a page.
In this case simply
a) Insert the tag into the page as normal. For example
<!-- Net:UpdateCustomers -->
and
b) Tell the browse procedure, in your app, to call your static page on
an update, rather than go directly to the form. You can do this by going
to the NetWebBrowse settings, to the Form tab, clear the Form Control
Procedure field, click on the Advanced button, and enter the name of
your static form page.
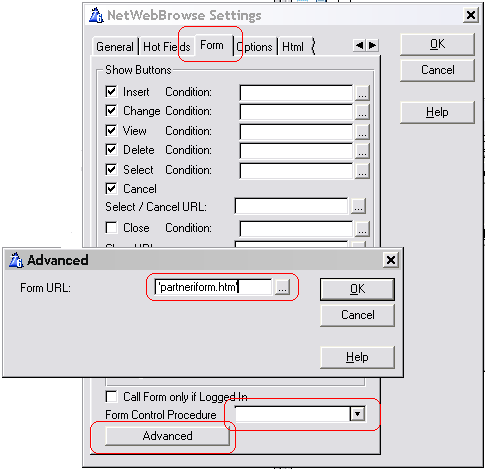
Embedding the Popup, and Message on a page
The validation on the form can generate an automatic Message (which
appears on the window) and/or an automatic Popup (which appears as the
form is refreshed). If you create a static page as a container for
the form, then you'll want to embed these onto that static page as well.
Use <!--Net:Message--> to embed
the message. I recommend putting this just before the tag which includes
the form.
Use <!-- Net:Popup--> To include
the popup. I recommend placing this at the bottom of the page, after all
the visible components of the page have been done
Most browsers allow the data passed from the server to
be compressed using the GZIP format. Using this technique it is possible
to improve performance, by reducing the bandwidth requirements for a site.
Graphics
If you are using PNG, GIF or JPG files for your graphics, then the
graphics are already compressed. No additional compression is necessary,
or recommended.
Static Page Pre-Compression
The most efficient way to compress am unchanging text file, such as a
static HTM file, a JS file, or a CSS, file is to store a compressed copy
of the file on the disk, in the same folder as the original file. Because
the file is already compressed there is no additional CPU load on the
server, and the minimum bandwidth is required to get the file to the
browser.
NetTalk supports this pre-compression by looking first for
filename.gz
before looking for filename. So if you have a file, called say
whatever.css,
then you can use the
Gzip utility to compress this to
whatever.css.gz. and store this on the server
along with
whatever.css. You want to
leave the
whatever.Css file there as well
for the benefit of those browsers that don't support compressed files.
You can disable the automatic serving of pre-compressed files on the
Settings/Advanced tab of the NetTalk Extension in the WebServer procedure.
Dynamic Compression
NetTalk includes dynamic-page compression as well. This is on by default,
but can also be turned off on Settings/Advanced tab of the NetTalk
Extension in the WebServer procedure. When this is on, then all the
dynamically generated pages are compressed before being sent to the client
program (ie the browser.)
Client Side Compression
Support for Client-Side compression is new to
NetTalk 14. Overall this feature is rare on the internet, and most
servers either do not support it, or do not have it turned on.
Because clients cannot "discover" that the server supports this feature,
it is only useful when a client "already knows" the server supports it.
This is a chicken-and-egg problem - how does the client know if the
server can't be queried. The only way to know, is to use the feature,
and see if it works.
If the feature is disabled in NetTalk 14 (by way of a
template
setting) then a HTML Response code of
415 Unsupported
Media Type is generated. NetTalk 12, and earlier servers,
simply can't understand the request and so the behavior depends on the
call itself. For API calls, which are expecting JSON or XML, this likely
results in a simple API error.
When the feature is enabled in NetTalk 14, then the process is
transparent to the Server code. In other words, the WebHandler will
decompress the data for you when the incoming data is compressed.
When this feature is on, the the log will include the compressed, not
uncompressed request. This is because the log is written before the
processing starts, so before the decompression starts. For this reason
it's best to test with compression turned off.
Anchors
Traditional Web Pages make use of Anchors to hyperlink
not just to a page, but into the page as well, taking the user to a
specific part of the page. While this feature would be nice to do in a
dynamic web app, there are some complications.
A normal anchor comes after the URL, and is separated from the URL by a #
character. For example in
https://capesoft.com/downloads#nettalk14
the nettalk14 part would be considered to be the anchor part.
Note that the anchor part, after the # sign is not passed to the server.
Thus when the user uses an anchor in the URL, the server does not know
that they have done so, nor does the anchor get passed to the server.
The most likely place where you would want to use an anchor, on a dynamic
page, is on a browse. And the browse template has an option for putting
one, or more, anchors on the browse itself. For example the
dynamically-generated Downloads page on the CapeSoft site contains the
product name for each row of the browse.
So
https://capesoft.com/downloads#nettalk14
takes you to the downloads page, and then straight to the NetTalk 14
product on that page.
This approach works very well for file-loaded browses. Since all the data
rows are always on the page, if the anchor exists then the browser will
navigate to it. For page loaded browses however the approach fails because
the server does not see the anchor, and hence does not know to generate
the specific page that contains that specific anchor.
NetTalk has two approaches to solving this problem. By necessity these are
not web standards, however they may be useful. The first approach is to
use a normal URL parameter (
a) in the name, and the
second is to use a slightly modified URL. You can use either, or both
approaches in your application.
The parameter approach is somewhat more standard in that passing
parameters is a well established web technique. The name of the parameter
is use is simply
a. For example;
https://capesoft.com/downloads?a=nettalk14
As you can see the # has simply been replaced with ?a=
More completely the URL should be
https://capesoft.com/downloads?a=nettalk14#nettalk14
But since the browse is page-loaded, all the records will (hopefully)
be visible so the last part is unnecessary.
The second approach is slightly neater, but also somewhat more outside the
web norms.
https://capesoft.com/downloads!nettalk14
In this case the # symbol is replaced with a ! symbol. This is passed to
the server, which then removes the name after the ! and attempts to find
the record identified by that anchor in the browse.
Whichever approach you use it should be pointed out that anchors are not
suitable for all browses, at least not without a little bit of
hand-coding. In order to position to the browse to contain the record, the
table is searched to find a record with a matching anchor. This is not a
key or index based operation, so can result in the reading of a lot of
records on large tables. For tables with more than a few thousand records
it is suggested that the anchor be chosen to match a key value, and that
some embed code is added to optimize the search based on the knowledge
that the value can be located via a key.
Translations
Server-Side translations
It is often desirable to allow your web app to be
translated into the language of the user's choice. A NetTalk app has
several features which makes translations possible.
Translate Method
The root of all translation activity in the
WebServer is the WebHandler procedure, .Translate method. This method is called
regularly from inside the web app with all the various "text" that the
app uses. You can use any translation engine inside this method to
convert the text to something else. The exact code that goes in
here will depend on the engine you are using.
Internally the Translate method also checks the text to make sure it
is "safe" and if necessary encodes any special characters so they are
compatible with HTML and XML. For this reason it is advised to call
the Parent method, with the translated text before returning that
value. For example;
p_web.Translate PROCEDURE(<String
p_String>,Long p_AllowHtml=0)
ReturnValue ANY
CODE
If Omitted(p_String) or p_String = '' then return ''.
ReturnValue = SomeTranslationFunction(p_String)
ReturnValue = PARENT.Translate(ReturnValue,p_AllowHtml)
Return ReturnValue
The contents of the SomeTranslationFunction call will depend on the
translation engine you are using.
AnyText
There are several 3rd party translation tools
available for Clarion. One of them is another CapeSoft accessory
called
AnyText.
AnyText includes built-in support for NetTalk which is covered in the
documentation there. Basically AnyText includes a template which
adds the necessary code to the Translate method discussed above.
Date Picture
The recommended date picture to use throughout the
application is p_web.site.datepicture.
This picture can then be set in the ProcessLink
method, in the WebHandler procedure,
based on the user preference.
Client-Side Translations
The server-side translation engine takes care of
text generated by the app. However NetTalk also makes use of a number of
client-side JavaScript widgets which (in some cases) have their own
text. Most of these widgets also include a mechanism for translating
that text as desired.
Date Picker
Date Options (for all the date lookups) can be set
by setting a property (p_web.site.DateOptions) in the WebHandler
Procedure, in the .ProcessLink method, before the parent call.
The various options for the date picker are
documented on the JQuery UI web site. Here's an
example from Jeffrey Kuijt which translates the various fields into
Dutch.
Self.site.DateOptions = |
'monthNames: [''januari'', ''februari'',
''maart'', ''april'', ''mei'', ' & |
'''juni'', ''juli'', ''augustus'', ''september'', ''oktober'', '
& |
'''november'', ''december''],' & |
'monthNamesShort: [''jan'', ''feb'', ''maa'',
''apr'', ''mei'', ''jun'', ' & |
'''jul'', ''aug'', ''sep'', ''okt'', ''nov'', ''dec''],'&|
'dayNames: [''zondag'', ''maandag'', ''dinsdag'',
''woensdag'', ' & |
'''donderdag'', ''vrijdag'', ''zaterdag''],'&|
'dayNamesMin: [''zo'', ''ma'', ''di'', ''wo'', ''do'',
''vr'', ''za''],'&|
'dayNamesShort: [''zon'', ''maa'', ''din'', ''woe'',
''don'', ''vri'', ''zat''],'&|
'closeText: ''Annuleren'','&|
'currentText: ''Vandaag'','&|
'dateFormat: ''dd-mm-yyyy'','&|
'nextText: ''Volgend'','&|
'prevText: ''Vorig'','&|
'showWeek: true,'&|
'weekHeader: ''wk'','&|
'firstDay: 1,'&|
',buttonText:
''Hulpkalender'''
Authentication
When a client program (like a browser) access the
server then a session is created. In many cases it is desirable for the
client to "log in" to the server in order to perform some actions. This
process of identifying the user is known as Authentication. There are a
number of approaches that the client can take.
- Enter the login and password on a Form
- Using HTTP Basic or Digest Authentication
- Pass the login and password values as Cookies as part of the header
Because there is this variety of methods, and because you don't want to
duplicate code more than is necessary there are best-practice places for
you to write the necessary code.
WebHandler Procedure; Authenticate method
This method can be called with a Username and
Password. You can do all the work in here to determine if the password
is correct or not. If it is correct then set the ReturnValue to true.
Note that if you access any tables (including your User table) you will
need to open and close it here.
You should definitely populate this method if you want to support Basic
Authentication. You can also populate this method, and call it manually,
from a Login Form.
WebHandler Procedure ; SetSessionLoggedIn method
This method will be called when the user is logged
in (or logged out). Any additional work required at that point (like
setting the SessionLevel or storing other User variables in the Session
Queue) should be done here. Note that if you access any tables
(including your User table) you will need to open and close it here.
WebHandler Procedure ; GetPassword method
This method is only used if you support Digest
Authentication and you have access to the plain-text password on the
server side(*). Given a specific user this method should return the
password for that user.
(*) Storing user's passwords is considered a bad practice and as such
Digest Authentication is not a recommended approach to authentication.
It is better to store a Salted Hash of the user's password instead.
Basic Authentication allows you to store a salted has of the password,
so is considered a better approach over Digest Authentication for sites
secured with TLS.
Multi-Tab Support
Users can, and sometimes do, open your web app in
multiple tabs in their browser at the same time. Because all tabs share
a Session cookie, the server is unable to tell when a request comes from
one tab, or from some other tab, and hence activities on one tab can
influence the "state" of the app in another tab. This influence is
usually unwelcome and can lead to strange behaviors, or in extreme cases
data corruption.
NetTalk includes Multi-Tab support which can be enabled in the WebServer
procedure, Performance Tab settings.
If this support is on then each tab is given a unique identifier, and
requests from that tab include the identifier. In this way the app can
identify which tab is making a request, and hence keep the state in one
tab different to the state in another tab.
If this feature is on, then setting a session value in one tab will not
set that value in other tabs (See below for how to create cross-tab
values).
However the session itself is shared. The following states are stored in
the session itself, and NOT in the session data queue. If any of these
states change in one tab they will therefore change in all tabs.
- LoggedIn (yes or no).
The details of who is logged in are usually stored in the
SessionData, and that SessionData will not change. However the
overall state (logged in / not logged in) will be consistent across
all the tabs.
It is not possible for the user to Login as two different users at
the same time, in different tabs. If you want to do that use browser
incognito mode so the session ID is not shared between tabs.
If you are logging login's and logouts by embedding code in the
SetSessionLoggedIn, ValidateLogin and/or NotifyDeleteSession then
you need to be aware that you'll only get one call to these methods,
but in effect multiple logout's may be occurring at this point.
- Security Level
This is also at the SessionLevel, not the SessionDataLevel, so
changing the level in one tab will change the level in all tabs.
- Last Activity
Every time the user performs some activity, which results in a call
to the server, the session timeout period is reset. This remains at
the session level, not the Tab level, so if the user performs an
activity in any one tab, they extend the session, and hence all tabs
are extended.
If a tab is "spawned" from another tab (perhaps the link has a Target
set, or perhaps the user right-clicked and chose Open in New Tab) then
the current session values are Cloned into that new tab. From that point
the tab will have its own values, but it starts with the same set of
values as the "from" tab.
Cross-Tab Session Values
This section refers to Session Values that you want
to store, and use across all the tabs. For example you may set session
values relating to the user, when the user logs in. These values
should be used across all the tabs. Most of the time you don't need to
worry about this though - most session values should only apply to the
tab they belong to.
Background: Session values are stored in a queue using the SessionID /
Name as the identifier. You don't actually pass the SessionID - that
is handled for you. Multi-Tab support changes this so that the queue
became Session ID / TabId / Name. Again TabId is usually handled
(invisibly) for you.
There is the ability for you to specify the "tabId" to use. The
generated one only uses numbers and letters, so adding something else
(like say a -) will guarantee there is no clash.
By specifying the TabId you can basically create your own (invisible)
"tab" - and you can get, and set values in this "tab". So when you
want to create or use a "cross tab" value, you can put it in this tab.
For example;
p_web.SetSessionValue('name','value','picture','cross-tab')
Typically the picture is omitted so this might be
p_web.SetSessionValue('name','value', '' ,''cross-tab'')
or
p_web.SSV('name','value', '' ,''cross-tab'')
however do NOT use
p_web.SetSessionValue('name','value','tabid')
Omitting the extra , '' , would be bad.
On the Get side it's a little simpler;
p_web.GetSessionValue('name',''cross-tab'')
or
p_web.GSV('name',''cross-tab'')
Other methods that have been extended are;
p_web.IfExistsSessionValue('name',''cross-tab'')
p_web.DeleteSessionValue('name',''cross-tab'')
p_web.GetSessionValueLength('name',''cross-tab'')
p_web.GetSessionValueFormat('name',''cross-tab'')
p_web.GetSessionPicture('name',''cross-tab'')
Of course you will need to change all your existing code where you
want to store or retrieve these "cross tab" values, but all other
places remain unchanged - unless specified the tab ID default remains
as it was.
Web Sockets
Web sockets allow a connection to be made between
the browser and the server, and to remain open. Fundamentally this means
that information can be pushed to the browser, something not possible
with the request/response nature of HTTP.
Requirements
- IE 10 or later. Android browser 4.4 or later. Or any other
browser.
Sessions
If a web socket connection is open between the
page and the server, then the session on the server will not time out.
In other words, the web socket connection keeps the session alive.
However if the web socket disconnects (and there has been no other
activity on the session for some time) then the session may end soon
afterwards.
Activate WebSockets Support
- Go to the WebServer procedure, Extensions, Settings, Scripts tab
and tick on the WebSockets option.
NetWebSource (including Header and Footer)
To add a watched value to a NetWebSource procedure
is a two step process;
- Add the value to the HTML with an appropriate ID
- Add the item to the Watch List (on the watch Tab)
HTML
The watched value needs to be in a block (ie a <span> or a <div>)
with an ID parameter. For example;
Users Online: <span
id="NumberOfUsers"><!-- Net:h:UsersOnline
--></span>
In the above example the id is NumberOfUsers and
the value being displayed is a Host Value (it could just as easily
be a Session Value) called UsersOnline.
The idea is that as the value inside the Host value changes, so the
contents of the <span> will be
refreshed.
NetWebForm
Display
Add the Display field to the form in the usual
way. When setting the settings for the tab, on the Display tab, set
the "Display" to either Session Value or HostValue, and then enter
the Session Value Name (or Host Value Name) in the field. For
example;
Display: SessionValue
'userAge'
NetRefresh
NetTalk Desktop includes a global extension
template called NetRefresh. This adds functionality to desktop
programs such that if a row in a table is changed on one workstation,
it is automatically updated on another workstation. In other words if
3 users are looking at the browse customers screen, and one of them
changes a record, then that change is automatically (and immediately)
visible on the other user screens ( without them doing a refresh.)
From NetTalk 11 this functionality has been extended to include
WebServers. This means that changes in a web server app will
immediately reflect in the browser for other users who happen to be
looking at the same data.
To be clear, data updated in the web server, or updated in a desktop
app will be updated for other users, regardless of whether they are in
a web or desktop view.
In the Web Server program this is accomplished by the browse creating
a web-socket connection to the server. Therefore this feature is off
by default and must be turned on on a browse-by-browse basis. Noting
the changes made in a form (or EIP) do not incur a performance
penalty, and so that is on for all forms (if NetRefresh is active.)
Activating NetRefresh in a Web Server App
- Add the Global NetTalk Activate NetRefresh extension template
to the app
- Go to the WebServer procedure, Scripts tab, and turn on
support for web sockets.
- In the app, Open the WebServer procedure, go to Extensions, to
the NetRefresh extension and tick on this is a WebServer
procedure
- Unlike for desktop programs, Netrefresh is not enabled for
browses and calendars by default. It needs to be turned on, on a
case-by-case basis.
For browses that need to be automatically refreshed, go to the
Advanced tab and tick on Refresh via WebSocket. Also set the
Refresh parameter to determine where the browse will refresh to
(default is "disabled")
- For calendars that should be automatically refreshed go to the
Advanced tab and tick on the option to refresh via WebSocket.
Triggering a table change from the WebServer
You now have browses watching the Host-Table
value, and refreshing themselves when that changes. If the table
changes via the web interface, or via another desktop app with
NetRefresh (on the same LAN as the server) then you are done.
But what if the table changes via some other mechanism - like
perhaps code in the WebServer procedure? In this case, in the web
server procedure you can use
s_web.SetTableValue('tablename',today() &
'-' & clock())
If you are in a WebHandler procedure (like WebHandler, or any
NetWebBrowse, NetWebForm etc) then you can use
p_web.SetTableValue('tablename',today() &
'-' & clock())
This will trigger a refresh event to the browses that are monitoring
the table value.
PHP
NetTalk has the ability to serve PHP pages. It does this by having
the ability to call the Pgp-cgi.Exe program, feeding it the necessary
information it needs, and trapping the output. The primary purpose is
to allow easier integration to existing web sites.
Note: In order to support PHP from your web server, you will require
OddJob and
StringTheory.
Example: A good example of using PHP in an app is
example 58 (cunningly called PHP).
In order for your application to support PHP pages, you need to do
the following three steps;
a) Add the OddJob, and StringTheory global extensions to your
application. If you are building a multi-dll application then add this
to the Data Dll.
b) Copy the PHP folder from the Example 58 folders. This contains the
Exe and DLL's and other support files that PHP requires. This folder
should be a sub folder of your application folder.
c) Make sure when you deploy, that the path name to the application
does not include any bracket characters. The example is in a folder
called "php (58)" and this WILL NOT WORK. You must rename the folder
to say "PhpExample" in order for it to work.
There is a property, called phpPath which
contains the path to the Php folder. If
you wish to relocate the Php folder for some reason, then set the
property in the WebHandler procedure, ProcessLink
method, to the actual location. For example;
self.site.phpPath = 'c:\php'
Note that one of the files in the Php folder is the Php.Ini file which contains details that the
Php exe uses. Since this file can change from time to time (and can be
changed internally by the web server) it is not recommended to have
the Php folder in the c:\program Files
path. Under Windows writing to this folder is forbidden.
IP Banning
Occasionally a client behaves badly when connecting
to a server. You'll occasionally see this in a web server when a server
is subject to an unsolicited penetration test. All NetSimple servers
(and hence WebServers) in NetTalk 9 have the ability to Ban an IP
address. When an address is banned then all existing connections to that
address are closed and no further connections from that IP address will
be accepted.
IP Banning is implemented at the NetSimple level, so any NetSimple
server can ban clients. The most common usage is for the WebServer, but
Banning is not limited to the web server.
A maximum of 10 IP addresses can be banned at any one time. If
additional addresses are banned then the oldest banning is dropped and
the latest one added. If this limit becomes a problem it can be
expanded, but typically banning is unusual and not many addresses need
to banned at once.
Banning is not the same as Rate Limiting, which simply applies a
standard of "fair use", Rate Limiting will be discussed elsewhere.
Methods
| Method |
Description |
| Ban (IPAddress) |
Adds a specific IP address to the Banned list. If the IP is
already on the list then there is no change to the list. |
| Unban(IPAddress) |
Removes a specific address from the banned list. If the IP
is not on the list then nothing happens. |
| IsBanned (IPAddress) |
Returns true is the IP address
is banned, false if not. |
| GetBanned |
Returns a comma separated string. the string contains the IP
addresses of all the currently banned clients. In addition the
final entry in the list contains the number of addresses that
are currently banned. |
Apply to WebServer
To apply banning to a WebServer procedure
- Go to the WebServer Procedure to the Window Designer.
- Delete both the Logging and Performance control templates.
- Return to the AppTree (this step is important.)
- Go back to the WebServer procedure, to the screen designer.
- Populate the Logging and Performance control templates onto the
two tabs.
The Ban button is added to the first tab, with the logging. To ban an
IP address highlight an entry in the log list, and click the Ban
button.
The list of banned IP addresses and the Unban button is on the
performance tab.
Request Filtering
It's possible to add request filtering to the
server. This is a check for specific patterns of "bad" behavior which
can help minimize the time spent on requests which are obviously not
valid for this site.
That said, checks on incoming requests apply to all requests, so
effectively slow down all legitimate requests. So there's a balance here
between aggressive filtering and improved overall performance.
If a request comes in, it is received by the
WebServer
procedure. This does very little to inspect the incoming
request, doing just enough to understand when the request has been
completed. Once the request has completely arrived it is handed onto a
separate thread for processing.
This processing thread first checks the request to see if it matches any
of the procedures (browses, forms, pages etc). If it does not then it
checks the filename for obvious problems (in the
ValidateFileName
method) and then looks for the file on disk. If not found then
it returns a 404 error.
Errant requests cannot cause harm to the system. If someone asks for a
PHP page that does not exist they simply get a 404. If you run a server
on the internet you'll quickly see items appear in the log asking for
pages or URL's which are known flaws in say PHP or IIS or whatever.
These don't do any harm to the NetTalk system other than using up a few
CPU cycles.
That said, it is possible to add extra filtering to the
WebServer
procedure, and the
WebHandler procedure
if you wish to do so. For example, if none of your pages use a
.php
suffix, and you don't support PHP, then you can filter out PHP pages
earlier in the process.
WebServer
In build 10.20 a new method was introduced in the
WebServer procedure. This method, called
FilterRequest, is called once per request
when the end of the HTTP header in the request has been detected.
At this point you can inspect the request (header) and return Net:Ok
if the request passes, or Net:NotOk if
it fails. Remember this code runs for every single incoming request so
make sure to keep it as fast as possible.
At this point in the code the incoming request is in the self._ConnectionDataQueue.Data
property. This string may be bigger than the current request, and may
not be padded with spaces. The current length of the request is in self._ConnectionDataQueue.DataLen. The data property may contain more than just the
header, it may also contain some (or all) of the body. A passed
parameter pCRLF indicates the location
of the end of the header part.
No properties for the request are parsed by this point, but you can
use the self._GetHeaderField method to
parse out headers.
For example;
expect = self._GetHeaderField ('Expect:',
self._ConnectionDataQueue.Data, 1, |
self._ConnectionDataQueue.DataLen, 1, 1)
Here's another example, looking for .asp
ReturnValue =
PARENT.FilterRequest(pCRLF)
If
instring('.asp',lower(sub(self._ConnectionDataQueue.Data,1,self._ConnectionDataQueue.DataLen)),1,1)
ReturnValue = NET:NOTOK
End
RETURN ReturnValue
Bear in mind that the above test is simplistic. It is searching for
.asp in the whole header, not just the URL part. You may want to limit
the search to the first line of the request, and so on.
Since this filter takes place before the item is added to the log, and
before any performance measure, this request will not be added to the
log and will not be added to the site statistics (total requests and
so on.)
WebHandler
There are two methods in the
WebHandler
procedure where additional filtering code (based on anything
you like) can easily be added.
ParseRequestHeader
The
ParseRequestHeader method parses out
the HTTP header, and allows you access to all the common header
values. If you add code after the parent call you can inspect any of
these values and reject the request by returning
Net:NotOk.
When this happens the connection to the client is terminated without
an error code being returned.
Since this happens in the
WebHandler the
item is added to the log and it is also included in the site
performance metrics.
Some useful properties you can inspect here, after the parent call,
are
| Property |
Populated From |
| self.PageName |
The name of the page/file in the URL. No parameters, and no
path, just the page name. |
| self.RequestAuthorization |
Authorization: header |
| self.RequestContentType |
Content-Type: header |
| self.RequestFileName |
The local name, including local path to the file on the
disk. |
| self.RequestHost |
Host: header |
| self.RequestOrigin |
Origin: header |
| self.RequestReferer |
Referer: header |
| self.SOAPAction |
SOAPAction: header |
| self.Spider |
Set to true if the request is
coming from a known web spider, like Google or Baidu etc. |
| self._UserAgent |
User-Agent: header |
| self.UserAgent |
The browser being used, like curl, edge, safari or chrome
etc. |
| self.WholeURL |
The whole incoming URL of the request. |
| self.XForwardedProto |
X-Forwarded-Proto: header |
Example
ReturnValue =
PARENT.ParseRequestHeader()
If
instring('.php',lower(self.pageName),1,1)
ReturnValue = Net:NotOk
End
RETURN ReturnValue
As mentioned earlier a later test is done using the
ValidateFileName
method. This method takes a
filename as
a parameter and returns
Net:Ok if the
file is ok. It returns either
Net:Blank
(-1) if the file is blank, or
Net:Abort (-2)
if the file is known to be bad. If the method returns anything other
than
Net:Ok then it sends the browser a 400
Error (Bad Request)' and closes the connection.
Host Variables
Host variables are like Session variables, but they
are common to all users. So a host variable written by one user can be
read by another user.
Host variables can be set from a processing thread by using
p_web,
but they can also be used from the web server procedure using
s_web.
So
p_web.SetHostValue(name,value) can be
used in WebHandler, Browses, Forms and so on. In the WebServer procedure
though you can also set them using
s_web.SetHostValue(name,value).
Host variables exist outside of sessions and so are not cleared by the
deletion of a session. Internally they are stored in the same queue as
the SessionData, so they will reflect as SessionData on the Performance
tab of the server. This means that it's possible to have SessionData
exist, even if the number of sessions is set to 0.
Because the variables exist across sessions they are useful for sharing
information between users. They are useful for broadcasting information
to either all users, or a subset of users using
WebSockets.
Tags
A new tag form Net:h:name,
has been added. This allows you to use host variables in tags, just as
you would session values.
Methods
| Method |
Description |
| SetHostValue(Name,Value) |
Set a specific hostname to a specific value. |
| SHV (Name,Value) |
Shorthand for call to SetHostValue. |
| GetHostValue(Name) |
Get the value of a specific hostname. |
| GHValue(Name) |
Shorthand for call to GetHostValue. |
| DeleteHostValue(Name) |
Delete a hostname variable. |
| WatchHostValue(Name,Watch) |
Watch a hostname variable. If it changes then the new value
is sent to either debugview, or the web sockets. Valid values
for Watch are net:WatchDebug and
net:WatchSocket. |
| PushHostValue(Name) |
Sends the current hostname variable to all the websockets
which are watching the variable. |
See Also
Tags
Popup Animations
Support for animations for the opening and closing
of popup windows has been added. These animations can be set globally
(On the various Default tabs of the WebServer procedure) or locally for
each procedure type.
Animations are provided by the jQuery UI framework. animations consist
of an effect name, and a duration time. The duration time is in
thousandths of a second. A list of possible effects can be found at
https://jqueryui.com/effect/.
Examples;
'effect: "slide",duration: 500'
'effect: "transfer",duration: 300'
Rubberbands
This is a feature which can be used to multi-select
multiple rows, or columns (or both) on a browse.
To turn it on Select the Rubberband option
on the Browse template, Options tab.
If the option is on then the user can click hold the mouse left button
down on a cell, move the mouse to span multiple cells, or rows, and then
release the button. While the mouse left button is down a "rubber band"
will be visible to the user so they can see what they are selecting.
When the user releases the button the rubber band can be either left
visible or made invisible. By default it becomes invisible visible. If
you wish it to remain on mouse up then set the option Hide
rubberband on mouse up (also on the Options tab) to off. If
this option is off then you will need to hide the rubberband manually
yourself (when it is appropriate to do so.) You can do this by calling;
p_web.ntBrowse(loc:divname,'hideRubberband')
Remember that JavaScript is case sensitive, so the hideRubberband
must be written exactly as is.
For a web app, when the user selects an area a request is sent to the
server. This request sets the event to selectRange,
and it is handled in the browse procedure in the SelectRange
routine. This routine contains a loop, which parses out the row
ID's for you and loads the records the user has selected. What you then
do with those records is up to you.
Once your code is complete you may wish to refresh the browse. This
would be necessary if the code you did altered the rows, and you wanted
that alteration to be visible to the user. You can turn this on using
the Refresh browse on mouse up option (also
on the options tab.)
On the options tab you can also set the minimum and maximum column
allowed for the rubberband. This allows you to minimize the columns the
user can select. If blank (or 0) then the setting is not applied.
Scanning Barcodes and QR Codes
NetTalk 11 added support for the Form Field Type
Barcode Scanner.
This allows your camera (webcam on PC's, Environment Camera on phones
and tablets) to be used to scan barcodes and QR Codes.
To enable support for this make sure you tick on the Barcode Scanner
script, on the Scripts tab, in the WebServer procedure.
Tthe barcode scanner is added to a form in the same way as any other
form-field type. The size of the camera image can be controlled using
CSS. This CSS sizing does not affect the resolution of the scanner
(which is dependent on the resolution of the camera.)
A variety of Barcode formats are supported (including CODE 128, CODE 39,
CODE 39 VIN, CODE 93, EAN, EAN-8, CODABAR, UPC Code, UPC E Code,
INTERLEAVED 2of5 and 2of5. QR Codes are also supported.
On most devices (everything except iOS) a sound can be played when the
barcode is scanned.
The value read can be sent to a field on the form - in the case of a QR
code, if the QR Code represents a URL then that URL can be automatically
followed.
Notifications
Notifications allow you to display a notification to
the user when something happens.
To make use of Notification turn on support for the Notification script
in the WebServer procedure, Scripts tab.
Web Notifications
This implements the browser
Notifications API. Web Notifications happen when
the user is in a Web Browser and they are open on a page in your
site. The site must be secure (HTTPS) for notifications to
work. This lets a web page send notifications that are displayed
outside the page at the system level. This lets web apps send
information to a user even if the application is idle or in the
background.
Web Notifications are supported in Chrome, Firefox, Safari and Edge.
They are not supported in IE. They are sort-of supported in Chrome on
Android, but not Safari on iOS.
How the notification is displayed to the user depends on the OS and
Browser combination. Some browsers (for example Chrome on Windows 10)
make use of the OS Notification system others (like say Firefox on
Windows 10) display the notifications inside the browser. (For
notifications on Android and iOS see
Push Notifications below.
In Chrome on Android, the notification makes a small sound on arrival,
and will appear in the notifications bar (when the user pulls down the
notifications area) but it does not interrupt the browser. So the
notification is likely to be unnoticed.
You MUST [1] ask the user for permission to activate notifications by
calling (in Clarion)
p_web.AskForNotificationPermission()
or (in JavaScript)
ntn.askForPermission();
. It's a good idea to make this request via a menu item, or checkbox
etc so that the user is choosing to turn this on. These calls trigger
a prompt on the device, and whatever the user chooses, that answer is
remembered and they won't be asked again. (Unless they manually reset
the permissions in the browser.)
Once permission has been granted, you can send a notification to the
browser at any time by calling the
p_web.DisplayNotification
method.
p_web.DisplayNotification Procedure(String pId,
String pTitle, String pBody, String pIcon,<NetActionsQueueType
pActions>)
The method takes five parameters.
| Parameter |
Description |
| pId |
Each message should have an ID string. Messages with the
same ID will replace each other in the user's message list. In
other words, if you are sending the same message, or an
updated version of the message, use the same ID |
| pTitle |
The title of the notification |
| pBody |
The body of the notification |
| pIcon |
A graphic file to display on the notification. This should
be relative to your web folder. The client will fetch this
file from your server. |
| pActions |
An optional queue, containing a list of actions. |
[1] Behavior has been changed in NetTalk 14 which requires you to
explicitly ask for permission, based on a user action, before a
message can be sent. In the past it would ask-on-first-message, but
browsers are no longer tolerating this behavior.
Web Sockets
In normal circumstances the call to
DisplayNotification above will add a small script to the
current server-response-to-the-browser. This script will be executed
once the whole response has been received
by the browser.
However if Web Socket support in the application is on [1], and the
WebSocket Listener has been activated on your web page[2], then
calls to DisplayNotification will be
sent to the browser immediately via the web socket connection. This
approach does not rely on a completed response to the browser.
[1] WebServer procedure, NetTalk Extension, Settings / Scripts tab,
Web Socket script on.
[2] On a specific page, browse, form or whatever call
p_web.NotificationSocketsOn()
If you want this to apply to every page in the application you can
add this to the Header or Footer procedure.
[3] If you want to turn it on in JavaScript code (ie client side,
not server side, then call ntn.listen();
Service Worker and
Actions
If you have a service worker for your
application turned on [1] then you can add Actions to your
notifications.
Note that this feature is only available in NetTalk Apps level. Also
note that this feature is currently only supported by the Chrome and
Edge browsers.
Actions allow you to add one or more "buttons" to the notification.
Each button has an action, a title and an icon.
[1] Go to the Global Extensions for the application, to the Activate
NetTalk Web Server extension. Go to the
Apps tab,
to the
PWA tab. Tick on
Generate
ServiceWorker.js. Note that you do not need to create a
complete PWA - this feature can work independently of the app
being a PWA.
User Experience
Some common pitfalls to avoid:
- Don't put your website in the title or the body. Browsers
include your domain in the notification so don't duplicate it.
- Use all the information that you have available. If you send a
push message because someone sent a message to a user, rather
than using a title of 'New Message' and body of 'Click here to
read it.' use a title of 'John just sent a new message' and set
the body of the notification to part of the message.
Device (Push) Notifications (This
is a NetTalk APPS Level feature)
This implements the HTML Push API. Device
Notifications happen when the user is using a mobile device (running
Android or iOS) and they are not on your web site, and your
application may not even be running.
There are a few moving parts here, and while it's all automated by
NetTalk, it's helpful to understand how it works.
ECEC.DLL
Servers that make use of the Push Notifications
need to have the ECEC.DLL file in the
application folder.
Service Provider
Push notifications are available because browser
makers (Google, Mozilla, Apple, Microsoft etc) provide an automatic
cloud service for their browser. Their OS can receive messages from
this service, even if the browser isn't running.
When an app "subscribes" to the service, then some details are sent
to your app server. Using these details your NetTalk server can
"send" a message (for the device) to the cloud service. The cloud
service then passes it on to the device.
Each device gets a unique endpoint - a
URL provide by the cloud service - and the NetTalk app uses this
endpoint to send messages to the device.
VAPID (Voluntary Application Server Identification for Web Push)
Since your NetTalk app will be sending messages
to the cloud service, it's helpful (and in some cases required) for
your app to authenticate with the service. This means that ONLY your
server can send messages to the device via the specific endpoint.
To authenticate with the service the Server makes use of a
Pulic/Private key pair, collectivly known as a "VAPID Key". Your
program should have a unique VAPID key. (NetTalk knows how to
generate them [1]). If your server changes its VAPID key, then all
the device endpoints will become unusuable, and each device will
need to re-subscribe.
If you have a cluster of servers, behind a load-balancer, then all
the servers should be using the same VAPID key. Because the key is
shared like this, and should not change, it is built into the
program at compile time, and is not a run time setting. The key is
entered once on the Global Extension, Notifications Tab, and after
that can be ignored.
Device Information
Because each device gets a unique endpoint (and
a couple of other things) this information needs to be stored at the
server, attached to the device.
The Device table is the ideal table to store this information. (The
Device table works better than the Users table, because one user can
have multiple devices).
If you add the appropriate fields to your devices table, and you
fill in the settings on the Global Extension, Settings Table tab,
then the information will automatically be stored for you when the
user gives permission for notifications.
Android
iOS
On iOS Devices the App must be installed to the
home screen in order for push notifications to work. Notifications
are delivered silently, meaning no sound, vibration, haptics or
screen wake.
Paths
By default your web server is installed in a directory (the AppPath)
and below this hang the Web folder, Log folder, Web\Uploads folder and
so on. However in some situations you may prefer to rename some of
these folders.
Log Folder
Default is AppPath\Log
This can be problematic under Windows if you have installed your
program into the \Program Files folder.
If you've done this then the LogPath breaks Windows' rules. Setting
the LogPath to the AppData folder is
probably preferable in these circumstances.
To set the logpath, in the WebServer procedure, in
the NetTalk object before Init Section embed point,
add some code such as the following;
ThisWebServer.LogPath = 'c:\logs'
Web Folder, and Web Uploads folder
Defaults are AppPath\Web
and AppPath\web\uploads respectively.
However the same Windows problem that affects the Log path applies
here as well. If your program accepts uploads, then writing them into
the \Program Files folder can be a
problem.
You have 2 choices when moving the Uploads folder.
Either move the Web folder completely (by adjusting the WebFolderPath
AND UploadsPath properties) or
just move the Uploads folder.
Remember that static files can only be served if they
are under the web folder, so the real question is whether you want
your uploaded files to be available for download. If yes, then you
need to move the whole web folder, if no, then you can afford to just
move the Uploads folder.
Because both the WebFolder, and Uploads folder are
site specific, you need to alter their properties in the _SitesQueue
property of the WebServer. For example;
Get(ThisWebServer._SitesQueue,1)
ThisWebServer._SitesQueue.Defaults.WebFolderPath = 'c:\web'
ThisWebServer._SitesQueue.Defaults.UploadsPath = 'c:\web\uploads'
Put(ThisWebServer._SitesQueue)
The best place to do this is in the Init method of the web server
procedure.
Editors for Text Fields
One of the Form Field types is called Text. This
field allows for the entry of free-form text, similar to a Clarion TEXT
control on a window, but it also allows fr two other kinds of entry. It
does this by offering the option of a variety of rich text editors to be
used in the control.
The first HTML control offered was the TinyMCE editor. This is a rich
text editor which offers WYSIWYG HTML editing into the text control.
This editor does not allow the ability to upload files from the local
computer.
The second editor is the Redactor editor - this is a commercial editor
but is included with NetTalk under the terms of the OEM license that
CapeSoft purchased, and you are free to use it in your
applications. This one allows users to upload images, and other
files, from their local computer.
NetTalk 12 introduced two new editors to the family.
The first one is the popular CKEditor4 editor (which is the editor that
ships with Chrome Explorer.) This editor is notable for having
Paste-from-Excel and Paste-From-Word options. It is also a highly
customizable editor, and can be adapted to different requirements. While
NetTalk ships with a default CKEditor4 setup, it is possible for each
developer to create the exact set of features they require. To create
your own custom editor visit
https://ckeditor.com/ckeditor-4/download/ . The
package you download can then go into the
\web\ckeditor4
folder. This editor does not allow the ability to upload files from the
local computer.
The CKEditor comes with 12 different themes, and you can select which
theme to use with your editor. However please note that the theme can
not be changed while the control is on the page - it has to be set when
the control is created. So in the example you can select the theme to
use, but you need to save the form, and return to it to see the change
take effect. Also all CKEditor controls on the page will use the same
theme.
The second new editor is different. It's not a WYSIWYG HTML editor, but
rather a rich code editor known as ACE (Advanced Code Editor). It has
it's own set of themes (38 at last count) and color-syntaxing and other
support for many programming languages (around 120 at the time of
writing this.) It is an excellent way to allow users to editJSON, XML,
HTML and so on inside your web application. While the template options
offer a drop list of the most common languages and themes there is also
template options to specify a language not on the list.
The home page for the ACE editor is at
https://ace.c9.io/,
and for a comprehensive demo of the options an possibilities see
https://ace.c9.io/build/kitchen-sink.html.
The Example app HtmlEditor (36) has been extended to show this editor in
use. In the example the theme, and language of the editor is determined
by other fields in row, allowing various document types to exist in the
same table.
From NetTalk 12 a BLOB field can be used to store the contents of a Text
field. If you are using a rich editor then the use of a BLOB for storage
is recommended because adding HTML to a document can make it large.
Using a size-constrained type (like a STRING) could result in the HTML
being truncated, and therefor render it invalid.
JSONList Form Field Type
One strategy for including somewhat unstructured,
user-defined, data in a table is to use JSON data in a Binary BLOB
field. For Desktop programs the MyTable accessory provides the
functionality to easily support this kind of field on a form, and allows
the user to edit the data using a list control.
The eqivalent support for web programs is provided, not by MyTable, but
by the JSONList Form-Field Type.
The JSON supported by this field, is a simple, single level, JSON file
that contains an array of some group. For example;
[{
"TABLELABEL": "Invoice",
"RECORDS": 5
}, {
"TABLELABEL": "Customer",
"RECORDS": 10
}]
The number of fields in the group is not restricted, as in the following
example, where three fields per entry are included.
[{
"MODULENUMBER": 1,
"MODULENAME": "General Ledger",
"ACTIVE": true
}, {
"MODULENUMBER": 2,
"MODULENAME": "Debtors Journal",
"ACTIVE": false
}
The Form Field includes (optionally) and Insert button (below the list),
in-line Delete, Move up and Move down buttons. You can also specify
which fields (if any) can be edited via Edit-In-Place.
The JSONList field displays the data as a table, using CSS. (You can
override the default CSS that it uses.)
Not that this is not a free-form JSON editor, for that see the
Editors for Text Fields section.
The backend data field for this field is a Blob.
ntForm Widget Methods
The ntForm widget is the JavaScript component that
acts as the container on a NetWebForm procedure. There's a method in the
Clarion server-side class, p_web.ntForm, which allows you to call
JavaScript methods in this widget.
| Method |
Description |
Clarion Server-code Example |
| ready |
Called when the popup form has been populated, and is ready
for input. |
p_web.ntForm(loc:formname,'ready') |
| setTabHeadingText |
Set the heading text for a tab. Note that tabs are numbered
from 0. |
p_web.ntForm(loc:formname,'setTabHeadingText',1,CUS:name) |
| setTabHeadingIcon |
Set the icon for a tab. Use the icon name for any of the
standard icons, minus the ui-icon- part. In other words for
ui-icon-clock set this to just 'clock'. Note that tabs are
numbered from 0. |
p_web.ntForm(loc:formname,'setTabHeadingIcon',2,'clock') |
| gotoTab |
Go to a specific tab. Note that tabs are numbered from 0. |
p_web.ntForm(loc:formname,'showTab',2) |
| showTab |
Make a tab visible. Note that tabs are numbered from 0. |
p_web.ntForm(loc:formname,'showTab',1) |
| hideTab |
Hide a tab. Note that tabs are numbered from 0. |
p_web.ntForm(loc:formname,'hideTab',0) |
| showMessage |
Display a message in the message area on the form. |
p_web.ntForm(loc:formname,'showMessage','Hello
World') |
| hideMessage |
Hide the message in the message area of the form. |
p_web.ntForm(loc:formname,'hideMessage') |
| showField |
Unhide a field. |
p_web.ntForm(loc:formname,'showField',1) |
| hideField |
Hide a field. |
p_web.ntForm(loc:formname,'hideField',1) |
| enableSave |
Enable the Save button. The second parameter is a context.
This is an integer. The button will only be enabled if all the
disabled contexts are enabled. In this way multiple conditions
may need to be satisfied before the button can be enabled. |
p_web.ntForm(loc:formname,'enableSave',1) |
| disableSave |
Disable the Save button on the form. The second parameter is a
context. |
p_web.ntForm(loc:formname,'disableSave',1)
p_web.ntForm(loc:formname,'disableSave',2) |
| clickSave |
Click on the save button on the form. |
p_web.ntForm(loc:formname,'clickSave') |
| show |
Unhide the form. |
p_web.ntForm(loc:formname,'show') |
| hide |
Hide the form. |
p_web.ntForm(loc:formname,'hide') |
ntBrowse Widget Methods
The ntBrowse widget is the JavaScript component that
acts as the container on a NetWebBrowse procedure. There's a method in
the Clarion server-side class, p_web.ntBrowse, which allows you to call
JavaScript methods in this widget.
| Method |
Description |
Clarion Server-code Example |
| ready |
called after the browse, or part of the browse, is populated
or repopulated. Optionally takes the selected row ID as a
parameter. This is the value that was returned by the
AddBrowseValue method. |
p_web.ntBrowse(loc:divname,'ready')
p_web.ntBrowse(loc:divname,'ready','KJEFTD') |
| show |
Unhide the browse control. |
p_web.ntBrowse(loc:divname,'show') |
| hide |
Hide the browse control. |
p_web.ntBrowse(loc:divname,'hide') |
| disable |
Disable the control, all entry fields and buttons. |
p_web.ntBrowse(loc:divname,'disable') |
| enable |
Enable the control, all entry fields, and all buttons. |
p_web.ntBrowse(loc:divname,'enable') |
| hideFormButtons |
Hide all form buttons (Copy, Change, Delete, View, Export and
optionally Insert) |
p_web.ntBrowse(loc:divname,'hideFormButtons') |
| unhideFormButtons |
unhide all the Form buttons. |
p_web.ntBrowse(loc:divname,'unhideFormButtons') |
| hideNav |
Hide the First, Previous, Next, Last buttons. |
p_web.ntBrowse(loc:divname,'hideNav') |
| unhideNav |
Unhide the First, Previous, Next, Last buttons. |
p_web.ntBrowse(loc:divname,'unhideNav') |
|
|
|
| clearLocator |
Clears the locator value(s). |
p_web.ntBrowse(loc:divname,'clearLocator') |
| locatorFocus |
Changes the input focus to the locator field, if it's there
and visible. |
p_web.ntBrowse(loc:divname,'locatorFocus') |
| hideLocator |
Hides the locator field(s) and buttons. |
p_web.ntBrowse(loc:divname,'hideLocator') |
| unhideLocator |
Unhide the locator field(s) and buttons.
If the parameter is 1 or 3 then the top locator is displayed.
If the parameter is 2 or 3 then the bottom locator is displayed. |
p_web.ntBrowse(loc:divname,'unhideLocator',1)
p_web.ntBrowse(loc:divname,'unhideLocator',2)
p_web.ntBrowse(loc:divname,'unhideLocator',3) |
| goLocate |
Locate the browse to a specific value. This is as if the user
has entered a value into the locator field, and the locator is
then passed to the server. |
p_web.ntBrowse(loc:divname,'goLocate','somevalue') |
|
|
|
| first |
As if the First button was pressed. |
p_web.ntBrowse(loc:divname,'first') |
| previous |
As if the Previous button was pressed. |
p_web.ntBrowse(loc:divname,'previous') |
| next |
As if the Next button was pressed. |
p_web.ntBrowse(loc:divname,'next') |
| last |
As if the Last button was pressed. |
p_web.ntBrowse(loc:divname,'last') |
| cancel |
As if the cancel button was pressed |
p_web.ntBrowse(loc:divname,'cancel') |
| close |
As if the close button was pressed |
p_web.ntBrowse(loc:divname,'close') |
| goExport |
As if the Export button was pressed. The desired format is
passed to the server via this call. |
p_web.ntBrowse(loc:divname,'goExport','excel') |
ntWiz Widget Methods
The ntWiz widget is the JavaScript component that
makes Wizard-style tabs on a form. There's a method in the Clarion
server-side class, p_web.ntWiz, which allows you to call JavaScript
methods in this widget.
| Method |
Description |
Clarion Server-code Example |
| showNext |
Unhide the Next button. |
p_web.ntWiz('procedurename','showNext') |
| hideNext |
Hide the Next button. |
p_web.ntWiz('procedurename','hideNext') |
| showPrevious |
Unhide the Previous button. |
p_web.ntWiz('procedurename','showPrevious') |
| hidePrevious |
Unhide the Previous button. |
p_web.ntWiz('procedurename','hidePrevious') |
|
|
|
| setTabHeadingText |
Sets the heading for a specific tab. Remember that tabs are 0
based, ie the first tab is number 0. |
p_web.ntWiz('procedurename','setTabHeadingText','Hello
World') |
| setTabHeadingIcon |
Set the icon for a tab. Use the icon name for any of the
standard icons, minus the ui-icon- part. In other words for
ui-icon-clock set this to just 'clock'. |
p_web.ntWiz('procedurename','setTabHeadingText','clock') |
| tryNext |
Trigger a next, which is sent to the server for confirmation
that the current tab is ok. |
p_web.ntWiz('procedurename','tryNext') |
| next |
Move to the next tab. |
p_web.ntWiz('procedurename','next') |
| previous |
Move to the previous tab. |
p_web.ntWiz('procedurename','previous') |
| gotoId |
Go to the tab identified by the data-tabid="something"
attribute. Typically a 0-based tab counter. However some tabs
might not be included, so the number may not be sequential. The
tab as a fixed number, regardless of the other tabs being
generated or not. |
p_web.ntWiz('procedurename','gotoId',2) |
Browse Column Resizing
This feature is only available when the
Browse is in GRID mode.
The possibility of column resizing can be set at three levels;
- Globally. WebServer Procedure, NetTalk Extension, Defaults tab,
Browse Tab, Allow User Column Resizing checkbox.
- Locally, at the Browse level (for all columns). Browse Procedure.
Actions. Options Tab. Allow Columns Resizable
option. This can be set to default (uses the global setting), or you
can override the global setting setting it on or off.
- Locally at the column level. Browse Procedure. Actions. Fields
Tab. Properties. General Tab, Column Tab. Allow Column
Resize option. Again, this can override the Global and
Procedure settings.
If this option is on then the user can resize the width of any column in
the browse. The resizing only applies to this user, other users are not
affected.
The browse must have headers in order for this feature to work.
The widths are remembered for the duration of the session. If you wish
to remember the settings beyond the session, then code must be added to
the WebHandler procedure in the LoadFormatList and SaveFormatList
methods. The easiest way to do this is by adding the
RunScreen Web Extension to the WebHandler
procedure.
Browse Column Ordering (aka Browse
Formatting)
This feature is only available when the
Browse is in GRID mode.
NetTalk 14 introduces the ability for users to sort the columns to their
own preference. This is done by activating the Format button on the
browse.
This button can be turned on (or off) globally (WebServer Procedure
Extension template, Defaults, Browse, Include Format button on
Browses.
If this option is on then a FormatListWeb procedure is needed. You can
import this procedure using the provided button.
The option can be overridden at the browse level (Form tab, Format
button tab).
If you have RunScreen then you can store the selections against the
user, so the user will have the same settings when they return.
Drag and Drop Browse Row
Ordering
In some cases it's desirable to allow your user to
manually sort the items in a browse by dragging the rows to their
correct position. Support for this is included, but with some
limitations;
- The table needs a REAL field to set the order. For this doc the
field will be called ORDER, but it could be anything.
- The table needs a key on the ORDER field. For this documentation
this will be referred to as ORDERKEY.
- The browse itself should be Ordered by the ORDERKEY. This is NOT
the unique key. That remains unchanged. (Set the browse order on the
Sort tab.)
- Typically the ORDER field is not displayed in the browse. If a
"line number" is required it is recommended that is another field
(which you can manually update after the actual order is set.)
Nothing stops you including the ORDER field, but it is a
non-contiguous REAL value, so it has no real meaning.
- The browse can have Header fields
- The browse can have column sorting, and ordering will still be in
play, but the UI doesn't really make any sense. So typically,
ordered browses will have column sorting turned off. (Sorting "None"
on Sort Tab).
To Activate Drag and Drop Row Ordering, go to the Browse procedure,
Options tab. Check on the Support Drag and Drop Row Ordering option,
enter the Order Field and the Order Key.
New-Field Priming
If the order field is new in your dictioary table,
then it should be primed to a "unique" value. (It doesn't have to
actually be unique, but it mustn't just all be the same value, like
0.)
Long not Real
Technically it is possible to use a different
field type than a REAL for the Order Field. A Long, Decimal, Sreal and
so on will all work. However In the case of an integer number (like a
LONG) it will only be able to correctly order a row between two other
rows, if an open integer exists between those numbers. So, in that
case it's recommended that a re-order process is written (not included
in NetTalk) to renumber the order field so that there is "sufficient"
space between numbers to facilitate reordering.
robots.txt
The
robots.txt file
is a file you can place in your
\web
folder which allows site crawlers to know your prefered crawling
preferences. It does not prevent a search engine from indexing the page.
It may, or may not, be ignored by the crawler. It is not a security
measure. It merely gives some guidelines to the crawler - you can assume
that many crawlers will ignore it completely.
The file is placed in the
\web folder
(nowhere else.) It is called
robots.txt
(nothing else.)
Creating your own static file is trivial, and you can certianly create,
or craft one by hand, and place it in the web folder.
That said, NetTalk 14 will create a file for you, and allow you to
specify rules for the file. You can also override these rules on a
procedure-by-procedure basis. So letting the system generate this file
for you is not a bad idea.
Settings
The global settings for the
robots.txt
file are set on the Activate Web Server global extension, on the
Robots
tab. This is where the file can be set to generate, and the
rules for the generation. When seeting rules, you can do it per file,
or per folder (per folder rules are of the form
\folder\
whereas file rules are of the form
\folder\file.)
There is a global embed point,
Inside Robots.Txt, if
you want to add any additional items to the file.
You can also overide these settings on the Secure tab on each
procedure.
Sticky Page Header
Through the magic of CSS it's possible to make
things on the page "sticky". That is they remain fixed, even when the
rest of the page is scrolling. For example, in this document you'll see
the breadcrumbs at the top of the page is still visible, even though the
rest of the page has scrolled down.
Several classes have been added to the CSS which can be used to make
your own headers sticky.
| Class |
Description |
To use |
| nt-sticky-panel-top |
This make the whole header panel sticky, including the
menu (if it is set to generate inside the header div. Do
not use this AND nt-sticky-top-menu, pick one or the other. |
Header procedure,CSS tab, Top-Panel.
Add
' nt-sticky-panel-top' |
| nt-sticky-top-menu |
This makes the header scroll up, but the menu "sticks" at the
top of the page. |
1. Header procedure, Advanced tab, Generate Menu outside
header div.
2. Menu Extension, CSS tab, DoubleDrop tab, Menu Bar Div Style,
Add
' nt-sticky-top-menu'. |
| nt-browse-row-header-sticky |
This makes the browse row header "stick" at the top of the
page, and the browse rows scroll, but the header remains
visible. |
|
Guide to WebServer
Examples
Not surprisingly there are many different ways to accomplish any
given task. The NetWebServer examples are designed to cover as many of
these possibilities as we can. This section describes each example in
a bullet form, covering the features you can see in operation.
Basic Browse and Form
This is the simplest example. It provides a server that
displays the contents of a single table, and allows you to Add, Change
and Delete entries.
Table is File Loaded.
Table has a fixed sort order.
Table uses “Radio” style row selection.
Form has a forced-lookup date-entry field.
Form has “plain” style interface.

Adds a Windows style menu to the top of the page, to
navigate through the site. The example consists of 2 related files.
Tables are File Loaded.
Tables demonstrate client-side sorting. (click on
headers).
Tables have “Highlight” style row selection.
Form allows date lookup or date entering.
Alias Browse has a relational lookup on the Mailbox
file.
Forms have ‘rounded’ style interface.
Basic form validation added.
Alias Form has example of a “drop down” entry field.
Shows the addition of Login and Password information,
which the user must use to access parts of the site. (Use login of Demo,
password Demo when running the application).
Tables are Page-Loaded with Server side Sorting.
Forms have ‘tab’ style interface.
Greenbar effect on browse.
Locator above browse.
Shows browse set to “include blank rows”.
Alias Form has example of a “lookup”.
Adds a simple Frame to the index page. Includes an
Outlook style menu in the left frame.
Forms have ‘Outlook’ style interface.
Browse is page loaded.
Greenbar effect on browse.
Locator below browse.
Shows hand-coded procedure which displays login
message. Linked into LoginForm procedure as “layout tab / Source
Before”. The message is set, in LoginForm, if a login fails.
Shows a single page that has both a browse, and a Form
on the same page.
If you click on an item in the browse, then that record
is loaded in the form.
Clicking on Save in the Form refreshes the Browse.
[ this example is not working perfectly yet ]
Demonstrates a server running exclusively on a secure SSL port.
Similar to Example 4, but shows the login screen
appearing before the frame appears.
Useful for programs where absolutely the first thing
the user must do is log in.
Frame borders are suppressed.
Range Locator. (try pressing ‘j’ in locator field.)
Includes a picture in the browse and on the form.
Example of using a cookie to preserve the login &
password information in the browser so it is remembered for the next
time the user logs in.
Demonstrates a server running on 2 ports, one serving normal pages,
and another serving SSL pages.
Demonstrates a server running on 2 ports, a secure port and a
non-secure port. All incoming requests on the non-secure port are
redirected to requests on the secure port.
Requires Insight
Graphing
Shows putting a graph on a window.
 11: Send
Email from a Web Browser
11: Send
Email from a Web Browser
Shows the use of a Memory form, linked to a SendEmail
function.
The user can fill in the details for an email, but the
Server program sends the email (rather than relying on the client's
email setup.)
12: User Access Control (** work in
progress **)
Requires Secwin
Integrates Secwin functionality into a NetTalk
WebServer application, including the ability to limit users from certain
controls, depending on the individual, at runtime.
13: PDF
Report using C6 EE Report-To-PDF functionality
Requires Clarion
6.x Enterprise Edition
Demonstrates the use of the template that takes an
existing Report procedure and makes it available as a PDF file to the
browser
14: PDF
Report using PDF-Tools
Requires PDF-Tools
SDK
Demonstrates the use of the template that takes an
existing Report procedure and makes it available as a PDF file to the
browser
19:
Select Item from one browse, then filter another
Select a Mailbox on one browse, then the Alias browse
is always filtered based on that selection.
This example also shows setting a dynamic header on the Alias Browse.
20: Multi-DLL
ABC Example
Shows using the web server in a multi-DLL
example. Normal Multi-DLL rules apply, but NetTalk specific
settings are listed below.
1. AllFiles.App. This is the Data DLL. (Generate all
file declarations is on.)
a) This app has the Activate NetTalk global extension
added.
2. Customers.App. This app contains one or more NetWeb
procedures.
a) Global NetTalk Extension, and Global NetTalk Web
Server extension are added as normal.
b) ALL NetWeb procedures MUST be marked as EXPORT.
3. WebServer.App. This app contains the WebServer and
WebHandler procedure, as well as one or more other NetWeb procedures.
a) Global NetTalk Extension, and Global NetTalk Web
Server extension are added as normal.
b) On Activate NetTalk Web Server, Global Extension,
Multi-DLL tab, all apps (excluding this one) with netweb procedures are
listed.
c) ALL NetWeb procedures in ALL other DLL's must be
added here as EXTERNAL procedures.
Make sure to get the
prototypes right;
Browse, Page, Source : (NetWebServerWorker p_web)
Form: (NetWebServerWorker
p_web,long p_action=0),long,proc
d) All files used by NetWeb procedures must be
generated in this app. (Typically just turn on Generate All File
Declarations).
4. MainExe.App. This is the Exe program
a) Activate NetTalk Global Extension is added.
b) WebServer procedure is called as desired.
21:
Browse In Form Example
This example demonstrates the use of a Browse as a form entry field.
It's the classic Invoice-LineItems relationship, where LineItems can
be added, or edited when the Invoice Form is open.
22: Relational
Update Example
Similar to Example 21, this example uses a Invoice / LineItem
dictionary. In this case however there is a new field, InvoiceNumber
added to the Invoice table, and the LineItems are related to the
Invoice Number and not the Invoice ID.
Because the Inv:Id field is used in the unique key it cannot be
changed on the UpdateInvoice web form. However this allows the
Inv:Number to be changed on the form. As the LineItems are related to
the Invoice number (and not the ID) they need to change whenever the
invoice number changes.
Outwardly this example is no different to example 21 - there's
nothing the programmer needs to do to make the relational updating
work. The relational stuff is done for you by the template, and
classes.
23: Browse
To Another Form
In this example the Browse is on one table (Customers) but the Form
is on a different table (MoreCustomers). [ note - as at build
4.21 this example is not working yet ]
24: Form
To Form
This example shows how to override the destination of the "Save"
button to chain to a second form. Notice the URL on Save
setting for the FirstForm procedure.
25: Parent-Child
Browse
An often requested ability is to have 2 browses, on the same page,
where the "child" browse updates as a row in the "parent" browse is
selected. This example demonstrates this behavior.
Notice the Children tab on the Browse Invoices
procedure. This is where you set the set the BrowseLineItems procedure
to be a child of the BrowseInvoices procedure. Children can be to the
right, or below, the parent. Children Browses can have children of
their own (demonstrated in example 31).
Notice also the ability to have conditional filters on the LineItems
browse. In this case the filter is set to a specific range if the
parent is the BrowseInvoices procedure. This feature allows
browses to be re-used in different places, with different filters.
This example also shows the ability to override the browse colors on
the extension to the Web Server procedure.
26: File
Upload / Hot Fields / Logging
This example shows how the user can upload a file to the server. In
this case the expected file is a picture which will be associated with
the mailbox.
The first thing to note here is on the form. The current picture name
is displayed as a Display field. The "Upload" field is NOT pre-primed
with the existing name. (If it was the file would be re-uploaded on
every Change.) If the upload-file field is blank when the form is
Saved then the existing value is NOT overwritten.
In addition, this example, shows how the graphic can be displayed
both in the browse, and as a "Hot Field" to the right of the browse.
This is done by using the NetWebSource procedure "HotImage". Notice
the way HotImage is set as a Child procedure of the MailBoxes browse.
Lastly this example has Logging enabled. Activate the logging by
clicking on the "Screen & Disk" option on the main Web Server
window when the program is running. Right-click on the
Screen-&-Disk radio option in the Window formatter to see the
various logging options that need to be set.
27: Frame
with Task Panel
Similar to example 7, this one uses the XP Task Panel
style menu on the left hand side instead of the Outlook style menu. The
menu in question is in the MenuOnLeft procedure. Note that toggling
between the menu styles here is as simple as changing the option on the
drop-down.
28: Buttons
This example shows the ability to place buttons on Forms, and
Browses. Currently Buttons to send Emails, and link to other screens
are included. Special notice should be taken of the "Link with ID"
button on the browse.
29: Basic
XML
An example to show serving an XML page rather than a HTML page.
Notice the MailBoxesXML procedure, where the page type is set to XML.
This would be used primarily in cases where other programs (not
browsers) need to access your data (and XML is the preferred markup).
30: Hyperlinks
Shows the ability to add hyperlinks to browses and forms.
31: Accounts
A largish demo (currently running at
http://oak.capesoft.com) this example incorporates many features
into a single app. Notable highlights include the use of the XP
Task-Panel menu, Child browses, Dynamic Forms and so on.
32: Error
Page
Shows how a custom error page can be embedded into the Web Server
procedure.
Tip: Resist the urge to place the
name of the missing file in the error message. This can lead to a
security problem known as
cross-site-scripting.
33: Drop
Filter
This example shows the use of a Drop box (on a form) to dynamically
filter a browse (also on the form). See the FilterAlias NetWebForm
procedure.
34: Calculator
This example shows dynamic fields being captured on the form, which
then change the values in other fields on the form.
The Calculator tab includes a "Calculate" button, although this
doesn't actually do anything. It does give the user something to
"press" though.
The Area tab shows fields being hidden, and unhidden in real-time as
the "shape" of the area is chosen.
The Button tab shows the use of individual buttons to build up the
equation. The result is calculated on the fly. The embed code here
shows calling a generic routine to do the work. Notice that the
Equation and Result fields are set as "Dynamic" because they are not
set as Reset Fields for any of the buttons. An alternative to the last
2 lines of the hand-coded routine would be to set the Equation and
Result to be Reset Fields of each button. While there's nothing
exciting about a server-side calculator, this technique can be used to
prevent key-logging when entering passwords etc.
Notice the use of the Layout tab (on the template settings) to
prevent the form from "dancing" as fields are hidden and unhidden.
35: Time
Fields
An example of capturing time as a form field. The field is set as a
String with a time picture (typically @T1 or @T4). However the code
interpreting the field is very forgiving. The user can enter almost
any number into a time field and it will be intelligently captured.
All the following are legal:
1 ( resolves to 1:00)
200 (resolves to 2:00)
3am (resolves to 3:00)
4pm (resolves to 16:00)
5:16pm (resolves to 17:16)
and so on.
36: Html
Editor
Demonstrates the HTML editing control.
37: Legacy
Basic
A basic web server built using Legacy templates, not
ABC templates.
In order for all the Web Server features to work
correctly using the Legacy templates., you need to make sure that the
Smart Generate feature in the Web Handler procedure is turned on.
Web Hander procedure, Extensions, NetTalk or NetSimple
Object Extension, Class Tab, Smart Generate option.
38: Legacy
Report Requires C6EE
Similar to example 37, but with the addition of a
report procedure.
39: Example
of using CapeSoft Message Box in a Web server application
Similar to example 37, but with the addition of a
report procedure.
40:
FileDownload
This example is designed to demonstrate 2 different
alternate techniques for serving "static" content from the web server.
Serving static files from blobs
Firstly it contains the ability to serve files from a
BLOB inside a TPS file. In this example the files in web\images,
web\scripts, and web\styles have been added to a simple TPS file (called
BlobFile). Each record in the table contains the name of the file, and
the contents of the file (in the Blob.)
In the WebHandler procedure, _Sendfile method,
some embed code has been added that checks the Blob file before checking
the disk. If the file is found in Blobfile then it is sent from there,
rather than from the disk.
This approach allows you to dispense with shipping the
web folder, and sub-folders. The server will still create these folders,
but they will be empty.
Serving static files from outside the "web"
directory
By design, static files can only be served if they are
below the web folder on the disk. This is a security mechanism, and
should not lightly be over-ridden. However if you need to serve files
from elsewhere on the disk you can. In this example 3 static PDF files
can be served from the application folder, above the web folder.
To do this a generic procedure ServeDocument has been
added to the App. This procedure checks for the parameter called Name,
and uses this parameter to find the file to serve. From the browse this
procedure is called with an URL similar to this;
ServeDocument?name=file1.pdf
If you choose to override the built-in security and
offer this approach to accessing static files, then you will need to add
your own handcode to suitable limit what files will be served by this
procedure. Failure to add code will result in any file on the server
being servable.
AddBlob utility app
In order to make maintenance of the TPS file easier a
small, windows, utility called AddBlob is also in this example folder.
You will need WinEvent
in order to compile it. If you don't have WinEvent then you can just run
the EXE in the folder.
This example can be called from the command line, using
a parameter -r. If you do this then the files inside the blob will
automatically be refreshed with the current version of the original
file.
In other words, let's say you added
c:\temp\whatever.txt to your blob file. And you've set the FileName (the
"ServeAs" name) to be whatever.txt. If you call AddBlob -r then the
c:\temp\whatever.txt file, inside your blobfile, will be refreshed.
41: LegacyGraph
A simple example, which uses
Insight Graphing with the Clarion ("Legacy") templates. Similar to
Example 10, but for Legacy not ABC.
42: SOAPServer
(Requres
XFiles version 2.86 or later)
A very simple example of a SOAP server. An example SOAP
client (as a Windows program), called client.app, is also here.
Scenario
In this example the client app (a windows program)
passes a request-for-information to the server as an XML packet. The
request asks for either Teacher or Student information. If asking for
the teacher information then a password is also supplied.
On the client side the server receives the request, and
creates one of three results. Either the Teacher, or Student information
which was requested, or an Error.
SOAP Server
The app has, apart from the Web Server procedures, only
one function. This function is called GetInfo. GetInfo is based on the
NetWebPage procedure template, and the Page Type is set as XML. the
handling of the incoming XML packet, and the formation of the outgoing
XML packet are done in embed code, using xFiles.
The possible incoming, and outgoing structures are
defined as groups. Using an xFiles object the incoming request is placed
into the Request group. Then depending on the request one of the
response groups is populated. the xFiles object turns the group into an
XML string (Xml.XmlData), and this string is the "Page" sent to the
client by the NetTalk web server.
SOAP Client
In this example the client uses xFiles to construct the
XML packet with the SOAP wrapping, and then does a simple POST to the
server. Note the URL of the post contains the name of the function
(getInfo) - this is how the server knows which function to run.
Data
In the example data files you'll find teacher with an
ID of 1 (password jake) and another with an ID of 2 (password brian).
Threre are also 3 students, with numbers 1,2 and 3 respectivly.
Tip: For more SOAP Client examples, see the examples
that ship with xFiles.
43: AccessLevels
An example of Access Levels.
In this example log in as
Login: Super / Password: Super
to have full access to the browses and forms, login as
Login: Operator / Password: Operator
to have limited access to some of the forms, and login as
Login: Guest / Password: Guest
to have read-only access to the system
45: WScriptActiveX
This example will only work in IE, and only if the IE
security levels are set to allow ActiveX scripts for the "zone" that the
server is in.
It demonstrates using an ActiveX control, specifically
the built-in WScript.NetWork control.
In the login form, a call to the JavaScript function
SendUser() is made. This function is in a file called wscript.js, which
is in the scripts folder. This function uses the WScript.Network control
to get the UserName and ComputerName of the client computer, and send it
to the server as a session value. If you examine the log after
requesting the login page in your browser, you should see the additional
calls to set the Session values.
Note: The use of ActiveX controls is clearly limited to
very specific situations. Typically this approach is only useful in an
environment where the browser itself is specified (IE) and the security
settings on the browser can be set for your site.
Zones: If you want this control to work, the user must
place your site into a "Zone" in their browser that has a Low priority
set. the attached picture for IE 7 may help;
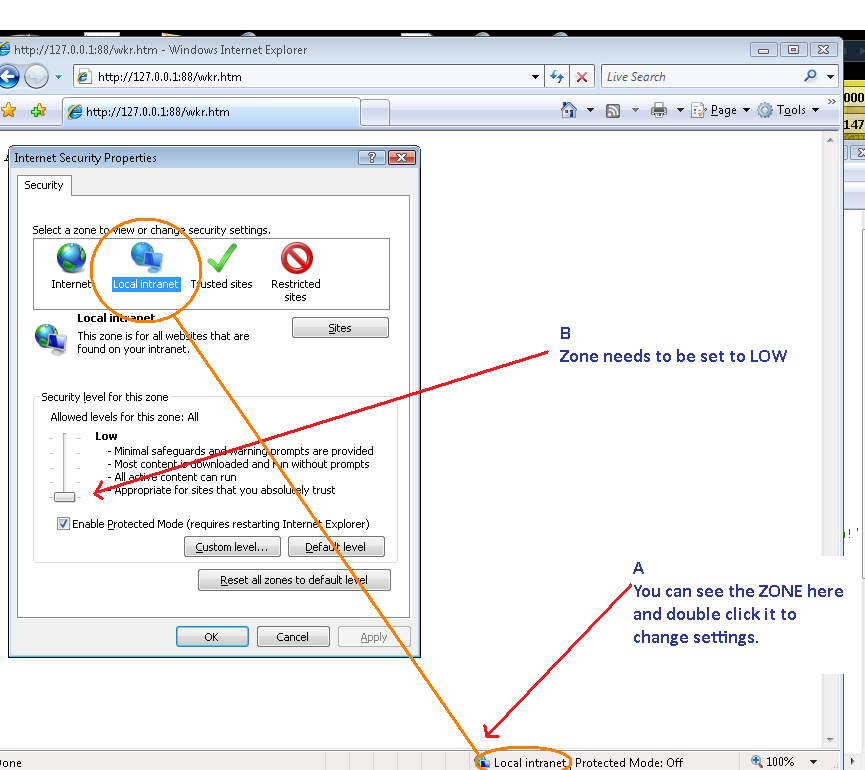
At this point the user will probably get a popup
warning whenever the script is invoked. To turn off this warning, click
on the Custom Level button (as seen in the picture above), and set the
ActiveX settings from "prompt" to "enable".
My thanks to Bram Klootwijk who assisted with the
creation of this example and did the research to make it work.
46: Timers
This example shows the use of Timers as they are
applied to web pages.
From the index page, click on the link "Page with
Progress". This will show a very simple text progress percentage. This
case uses a NetWebSource with a timer in the ProgressSoFar procedure.
The MailBoxForControl procedure includes a Display Form
Field that is updated on a timer. This uses the TimeClock NetWebSource
procedure.
47: Pages
This example shows how to embed a browse in a static
htm page, and also how to embed a form in a static htm page.
The default page for the site is set as 'index.htm'
which is a static htm page in the web folder, rather than the normal
case where the page is a procedure in the application. This index.htm
page contains an embedded session variable, as well as an embedded
browse procedure. It also has an embedded NetWebSource procedure, the
footer.
The browse calls a static page, form.htm, instead of
the form procedure. Form.htm is also in the web folder. This page has
both the form, and the header embedded on it.
48: Tagging
This example shows the EIP on a browse, where the EIP
is working on a secondary table. As the user tags the records in the
browse, the state of the tags is saved into a table. (In the example a
TPS table has been used, but if you have the In-Memory driver, then this
would make a very good driver for this table.) While nothing is actually
done with the tagged records, obviously you can use the Tagged table
later on in your code to "do something" with the tagged records.
In normal (primary file) EIP the changes are saved
automatically as they are made. When the changes are made on a secondary
table (in this case a table containing the tags themselves) hand-code
must be added to fetch, modify and save the appropriate secondary
record.
In addition this example contains some embed code in
the WebServer procedure that shows custom behavior when a session is
automatically deleted.
49: Locators
The goal of this example is show the variety of ways
that locators can be configured for a browse.
Typically these settings are set at design time, but
the programmer, however as this example demonstrates it's also possible
to set the settings at runtime - thus allowing the user to select the
locator they prefer.
50: MultiRow
Most browses are single line affairs. However this
example uses multi-line techniques, and challenges the very essence of
what we consider a browse to be.
53: Validation
This example demonstrates the use of dictionary
Validation, and local Form Field validation.
In this example all the fields on the MailBoxes browse
are set to Validate Immediately creating a highly responsive form which
insists on the correct data being entered. Visual clues including
highlighted entry fields, popup messages, and comments are all included
automatically.
The NickName field shows how hand-coded validation can
also be applied to the field. In this case the field has Validate
Immediately setting on. In addition some source code has been
added to the Server Code button on the Client-Side
tab. The code contains both some validation (an arbitrary nickname
length of 4 characters is enforced) and some "clean up" code which
"corrects" the nickname to a suitable case.
Note that in the case where the validation is
hand-coded the Loc:Invalid, and Loc:Alert variables are set
appropriately.
54: Excel
This example demonstrates exporting to Excel from
inside a web server.
NOTE: This example requires Office Inside in order to
compile, as it uses OfficeInside
to create the Excel file. Also Excel must be installed on the same
machine as the server.
55:
Services
This example demonstrates adding SelfService to a Web
server application.
NOTE: This example requires
SelfService in order to compile.
56: Menus
This example demonstrates various menus that are
available. Use this app to experiment with different menu options and
settings.
57: Tabs
This example demonstrates the various form types (also
known as Tab Types) that are available.
58: Php
This example demonstrates the use of Php pages combined
with NetTalk pages. Not that this example (and PHP support in general
requires
OddJob and
StringTheory). For more about PHP see the notes
above.
59: MultiSite
This app is more than an example, it is the source for
the Host exe, the program that allows multiple web sites to share the
same IP address and Port number. Compiling, and using this app is
described in a different document here.
60: CPCSReport
This example demonstrates the use of the web server
with existing (or new) CPCS
Report procedures.
CPCS
[End of this document]